1. Introduktion
Thank you for choosing the HOFTRONIC Spikey LED Garden Spike Light. This manual provides essential information for the safe and efficient installation, operation, and maintenance of your new outdoor lighting product. Please read these instructions carefully before use and retain them for future reference.
2. Sikkerhedsoplysninger
- Afbryd altid strømforsyningen før installation, vedligeholdelse eller udskiftning af pære.
- Ensure that the product is installed by a qualified electrician if you are unsure about electrical connections.
- This product is designed for outdoor use and has an IP65 rating, meaning it is protected against dust and low-pressure water jets. However, avoid submerging the product in water.
- Do not touch the light source immediately after use, as it may be hot.
- Use only GU10 LED bulbs with the specified wattage (max 5W) to prevent damage.
3. Indhold i kassen
Kontroller, at alle komponenter er til stede i emballagen:
- 1x Spikey LED Garden Spike Light
- 1x unbrakonøgle
- 1x GU10 4000K LED Bulb

Figure 1: Contents of the HOFTRONIC Spikey LED Garden Spike Light package.
4. Opsætning og installation
The HOFTRONIC Spikey LED Garden Spike Light offers versatile installation options:
4.1. Ground Spike Installation
- Select a suitable location in your garden or outdoor area where the light can be securely placed.
- Gently push the ground spike into soft soil. Ensure the spike is firmly embedded to prevent the light from falling over.
- Connect the light directly to a 230 Volt power supply. The included 30cm installation cable can be extended using a waterproof cable connector (not included) if needed.
4.2. Screw Mounting (Optional)
The spike can be removed, and the fixture can be mounted using two screws (not included) to a solid surface if desired.
4.3. Bulb Installation/Replacement
- Unscrew the front cover of the light fixture.
- Insert the GU10 LED bulb into the fitting by aligning the pins and twisting clockwise until secure.
- Replace the front cover, ensuring it is tightly sealed to maintain the IP65 rating.

Figure 2: HOFTRONIC Spikey LED Garden Spike Light.

Figure 3: GU10 fitting for easy bulb replacement.

Figure 4: Product dimensions and cable length.
4.4. Installationsvideoguide
Video 1: This video demonstrates the installation and adjustment of a garden spike light, similar to the HOFTRONIC Spikey LED Garden Spike Light. It shows how to insert the spike into the ground and adjust the light's direction.
5. Betjeningsvejledning
Once installed and connected to the power supply, the HOFTRONIC Spikey LED Garden Spike Light operates by simply switching on the connected power source. The light is designed for continuous outdoor use.
5.1. Adjusting Light Direction
The light fixture is fully tiltable, allowing you to direct the light beam precisely where needed. Loosen the adjustment screws on the side of the fixture, position the light, and then tighten the screws to secure it.

Figure 5: The light fixture is fully tiltable for adjustable illumination.

Figur 6: Eksample of the spike light illuminating a garden path.
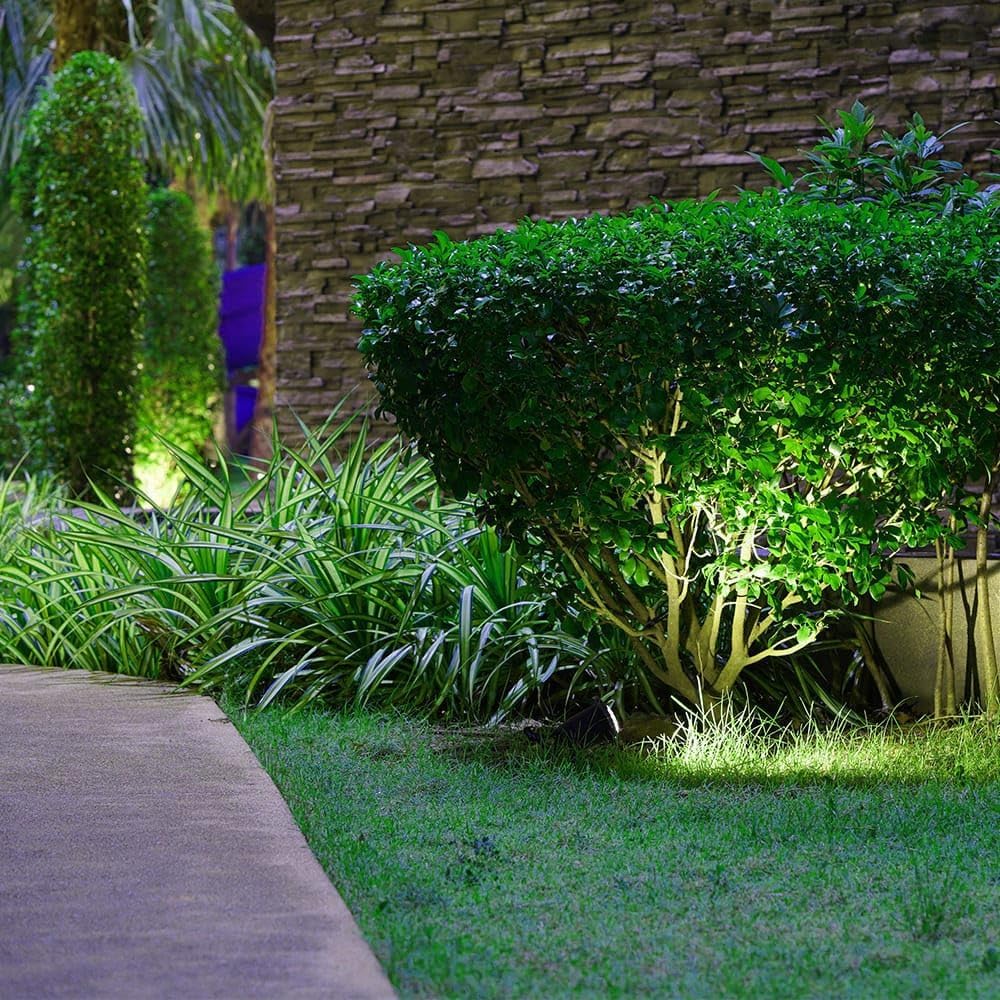
Figur 7: Eksample of the spike light highlighting garden plants.
6. Vedligeholdelse
The HOFTRONIC Spikey LED Garden Spike Light is designed for low maintenance. Regular cleaning and occasional bulb replacement are the primary maintenance tasks.
6.1. Rensning
Sørg for, at strømmen er slukket for at rengøre armaturet. Tør ydersiden af med en blød, tør klud.amp klud. Brug ikke slibende rengøringsmidler eller opløsningsmidler, da disse kan beskadige overfladen.
6.2. Udskiftning af pære
As the light source is replaceable, you can easily change the GU10 bulb if it fails or if you wish to change the light color or intensity. Refer to section 4.3 for bulb replacement steps. Always ensure the replacement bulb is a GU10 type and does not exceed 5W.

Figure 8: The durable aluminum construction is designed to withstand various weather conditions.
7. Fejlfinding
If you encounter issues with your HOFTRONIC Spikey LED Garden Spike Light, refer to the following common problems and solutions:
- Lyset tænder ikke:
- Kontroller strømforsyningsforbindelsen.
- Ensure the GU10 bulb is correctly installed and not faulty. Replace if necessary.
- Verify that the circuit breaker or fuse for the power line is not tripped.
- Lyset er svagt eller flimrer:
- The bulb may be nearing the end of its lifespan. Replace the GU10 bulb.
- Tjek for løse elektriske forbindelser.
- Water inside the fixture:
- Ensure the front cover is tightly screwed on and the rubber seals are properly seated.
- If water ingress persists, contact customer support.
For issues not listed here, please contact HOFTRONIC customer support.
8. Specifikationer
| Feature | Specifikation |
|---|---|
| Mærke | HOFTRONIC |
| Modelnummer | 5432460 |
| Produktdimensioner | 10 x 6 x 24.5 cm |
| Vægt | 5 kg |
| Ingress Protection (IP) Rating | IP65 |
| Stil | Moderne |
| Farve | Anthracite (4000K light color) |
| Antal lys | 1 |
| Voltage | 230 volt |
| Særlige funktioner | Energy-efficient 5W and 400 lumens, Supplied with replaceable GU10 LED light source, Made of maintenance-free aluminum, Long lifespan of 15,000 hours, IP65 waterproof, Multiple mounting options (wall or floor) |
| Skærmmateriale | Aluminium |
| Lys retning | Justerbar |
| Strømkilde | Elektrisk |
| Pære type | LED (GU10) |
| Lysstrøm | 345 lumen |
| Wattage | 4 Watt (product title states 5W, using 4W from specs) |
| Farvetemperatur | 4000 Kelvin |
| Energieffektivitetsvurdering | F |
8.1. Energy Label

Figure 9: EU Energy Label. For more details, visit the EPREL-database.
9. Garanti og support
The HOFTRONIC Spikey LED Garden Spike Light comes with a to års garanti against manufacturing defects. During this period, any defects will be replaced free of charge.
For warranty claims, technical support, or any questions regarding your product, please contact HOFTRONIC customer service through your retailer or the official HOFTRONIC webwebsted.


