Indledning
This manual provides detailed instructions for the setup, operation, and maintenance of your Sharp Digital Alarm Clock, Model B08TG1QB2B. Designed for simplicity, this clock features a clear LED display, dual ascending alarms, and a battery backup system to ensure reliability.

Figur 1: Forside view of the Sharp Digital Alarm Clock, displaying the time 12:08 in green LED digits.
Produktegenskaber
- Brugervenligt design: Enkel betjening velegnet til alle brugere.
- Dobbelt alarmsystem: Indstil to uafhængige alarmer til forskellige tidsplaner.
- Ascending Alarm Volume: Alarm starts softly and gradually increases in volume for a gentle wake-up.
- Batteri-sikkerhedskopi: Bevarer tids- og alarmindstillinger under strømafbrydelsetages (requires 2x AA batteries, not included).
- Illuminated Green LED Digits: Klart og letlæseligt display.
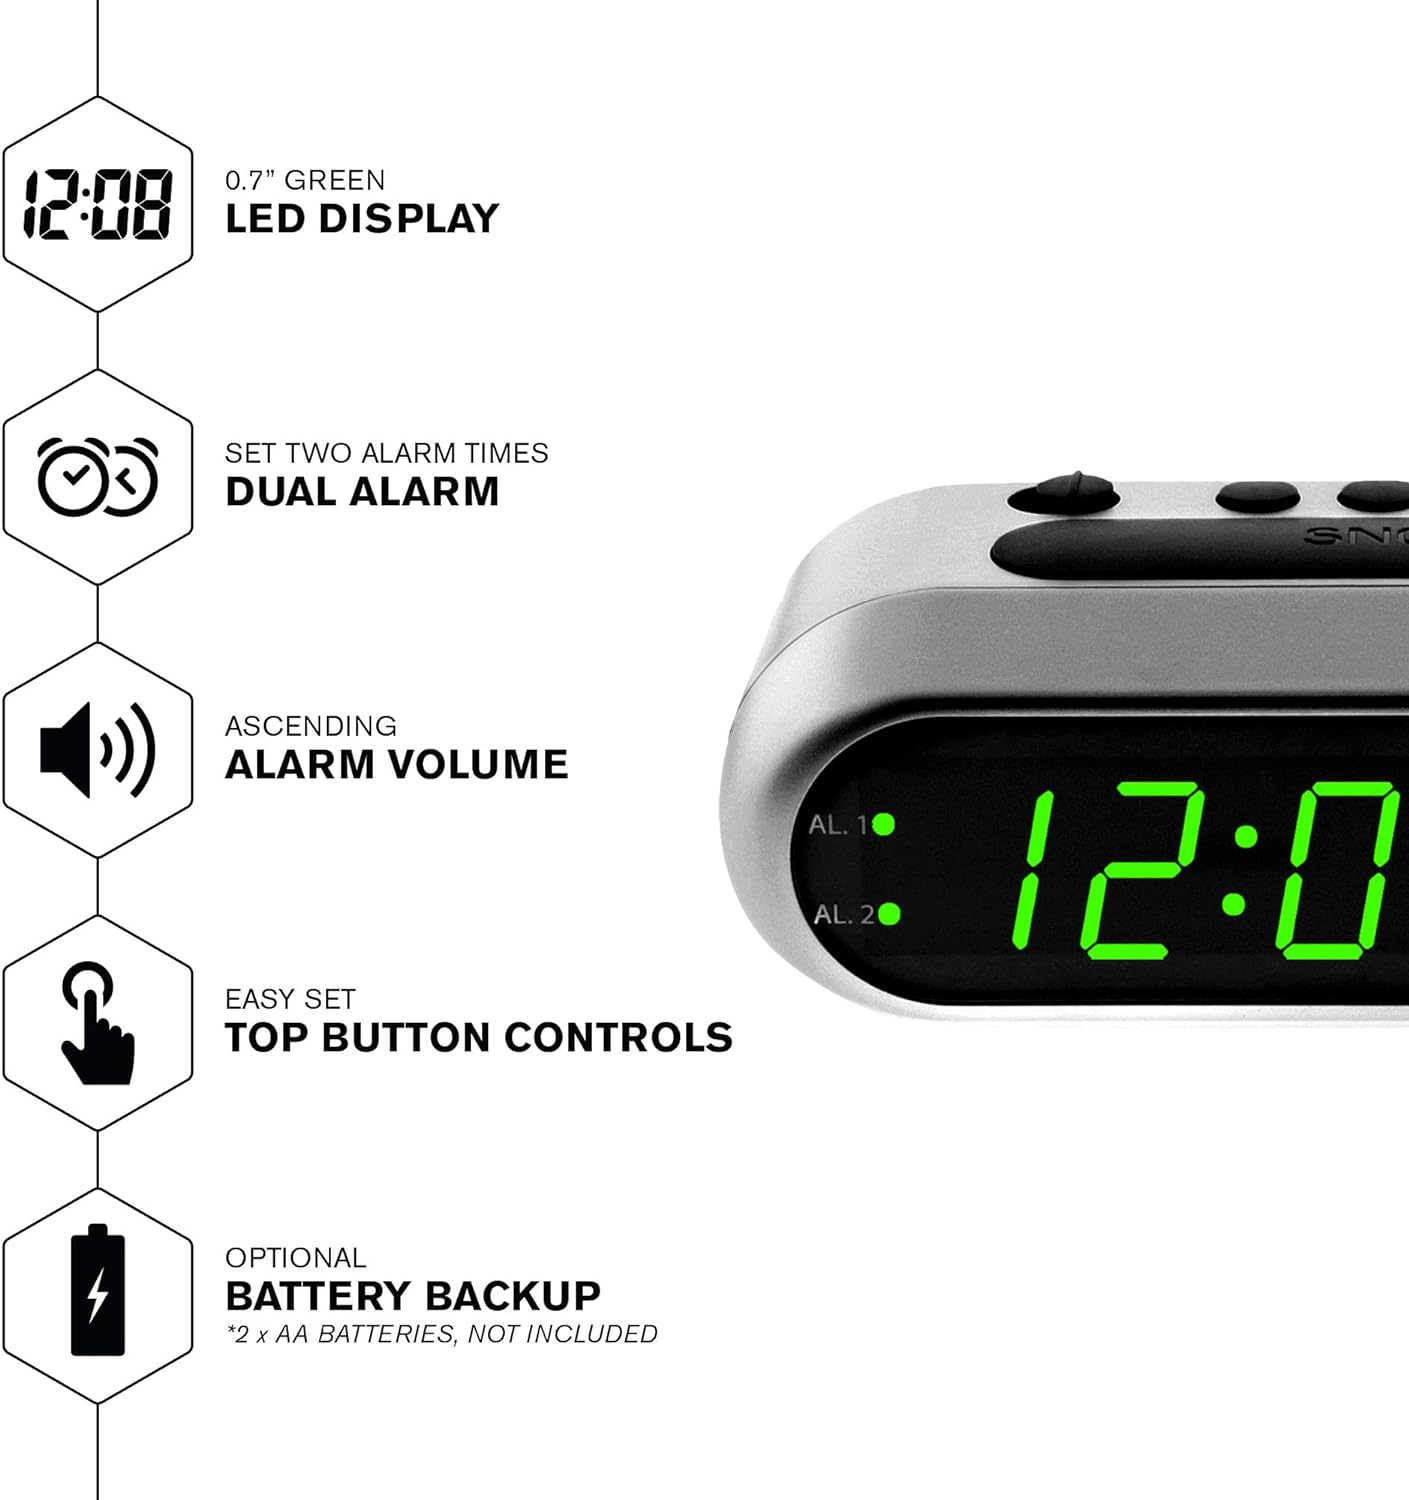
Figur 2: Overview of the clock's main features, including the LED display, dual alarm, ascending volume, and battery backup.
Pakkens indhold
- Sharp Digital Alarm Clock (Model B08TG1QB2B)
- AC strømadapter
- Instruktionsmanual
Note: 2x AA batteries for battery backup are not included and must be purchased separately.
Kontrol og visning
Familiarize yourself with the buttons and indicators on your alarm clock:
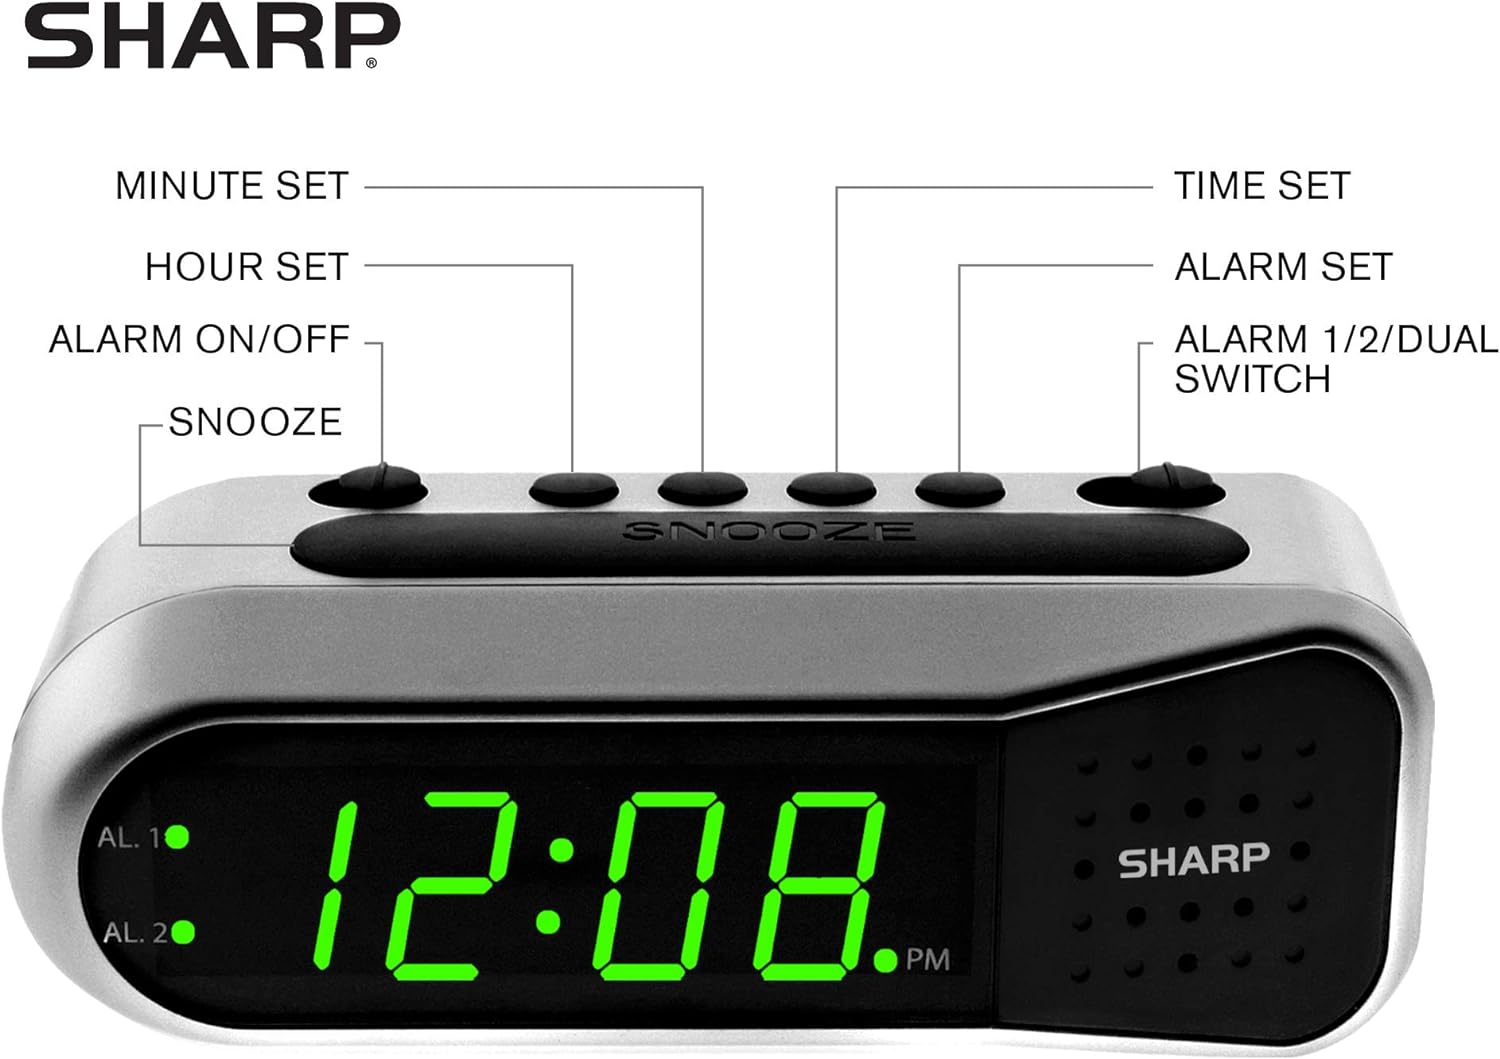
Figure 3: Labeled diagram of the clock's controls and display elements.
- Minute Set Button: Adjusts minutes for time and alarm settings.
- Hour Set Button: Adjusts hours for time and alarm settings.
- Alarm tænd/sluk-knap: Activates or deactivates the selected alarm.
- Snooze knap: Slukker midlertidigt for alarmen i en kort periode.
- Tidsindstillingsknap: Går i tidsindstillingstilstand.
- Knap til indstilling af alarm: Går i alarmindstillingstilstand.
- Alarm 1/2/Dual Switch: Selects which alarm (Alarm 1, Alarm 2, or both) is being set or activated.
- AL. 1 Indicator: Lyser, når Alarm 1 er aktiv.
- AL. 2 Indicator: Lyser, når Alarm 2 er aktiv.
- PM-indikator: Lights up when the displayed time is PM.
Opsætning
1. Strømtilslutning
Connect the AC power adapter to the DC input jack located on the back of the alarm clock. Plug the adapter into a standard electrical outlet. The display will illuminate.
2. Installation af batteribackup
The battery backup feature requires two (2) AA batteries (not included). These batteries maintain time and alarm settings during a power outage but do not power the display.
- Åbn batteridækslet i bunden af uret.
- Insert two (2) AA batteries, observing the correct polarity (+ and -) as indicated inside the compartment.
- Sæt batterirummets dæksel på igen.
Note: Replace batteries annually or when the clock experiences frequent power interruptions to ensure reliable backup.
3. Indstilling af starttidspunkt
After connecting power, the display will show a default time (e.g., 12:00 AM). Set the current time:
- Tryk og hold på TIDSINDSTILLING knap. Timecifrene vil blinke.
- Mens du holder TIDSINDSTILLING, tryk på TIMESÆT Tryk gentagne gange på knappen for at justere timetallet. Se på PM-indikatoren for korrekt AM/PM-indstilling.
- Slip TIDSINDSTILLING knap.
- Tryk og hold på TIDSINDSTILLING knappen igen. Minuttiffrene vil blinke.
- Mens du holder TIDSINDSTILLING, tryk på MINUTSÆT knappen gentagne gange for at justere minutterne.
- Slip TIDSINDSTILLING knappen for at spare tiden.
Betjeningsvejledning
Indstilling af alarm 1 eller alarm 2
Your clock features two independent alarms. To set an alarm:
- Skub til ALARM 1/2/DUAL skift til enten AL. 1 or AL. 2, depending on which alarm you wish to set.
- Tryk og hold på ALARM SÆT button. The hour digits for the selected alarm will flash.
- Mens du holder ALARM SÆT, tryk på TIMESÆT button repeatedly to adjust the alarm hour. Ensure the correct AM/PM is selected.
- Slip ALARM SÆT knap.
- Tryk og hold på ALARM SÆT button again. The minute digits for the selected alarm will flash.
- Mens du holder ALARM SÆT, tryk på MINUTSÆT knappen gentagne gange for at justere alarmminutterne.
- Slip ALARM SÆT knappen for at gemme alarmtidspunktet.
Aktivering/deaktivering af alarmer
To turn an alarm ON or OFF:
- Skub til ALARM 1/2/DUAL skifte til AL. 1 or AL. 2.
- Flyt ALARM TIL / FRA skifte til ON position to activate the alarm. The corresponding AL. 1 or AL. 2 indicator light will illuminate.
- Flyt ALARM TIL / FRA skifte til SLUKKET position to deactivate the alarm. The indicator light will turn off.
To activate both alarms, set both alarm times and then slide the ALARM 1/2/DUAL skifte til DOBBELT. Both AL. 1 and AL. 2 indicators will light up.
Snooze funktion
Når alarmen lyder, skal du trykke på den store SLUM button on top of the clock. The alarm will temporarily stop and sound again after approximately 9 minutes.
Stop alarmen
For at stoppe alarmen helt efter den har lydt, skal du skubbe ALARM TIL / FRA skifte til SLUKKET position. The alarm will reset for the next day.
Opretholdelse
Rensning
Tør uret af med en blød, tør klud. Brug ikke slibende rengøringsmidler eller opløsningsmidler, da de kan beskadige overfladen.
Udskiftning af batteri
Replace the AA backup batteries annually or if the clock loses time during power interruptions. Refer to the "Battery Backup Installation" section for instructions.
Fejlfinding
| Problem | Mulig årsag | Løsning |
|---|---|---|
| Urdisplayet er tomt. | Ingen vekselstrøm. | Ensure the AC adapter is securely plugged into the clock and a working electrical outlet. |
| Alarmen lyder ikke. | Alarmen er ikke aktiveret eller indstillet forkert. | Bekræft ALARM TIL / FRA kontakten er i ON position and the alarm time is correctly set (check AM/PM). |
| Tidspunktet er forkert efter strømafbrydelsetage. | Backup-batterierne er døde eller ikke installeret. | Install fresh AA batteries or replace existing ones. Reset the time if necessary. |
| Alarmen er for stille/høj. | Alarm volume is ascending, not fixed. | The alarm features an ascending volume. It starts faintly and gradually increases. This is normal operation. |
Specifikationer
- Model: B08TG1QB2B
- Mærke: Skarp
- Skærmtype: Digital LED (grøn)
- Strømkilde: AC Power Adapter (included), 2x AA Batteries (for backup, not included)
- Produktdimensioner: 5.5 cm B x 2.1 cm H x 2.3 cm D (omtrentlig)
- Vægt: 8.4 ounce
- Materiale: Plast
- Farve: Børstet sølv
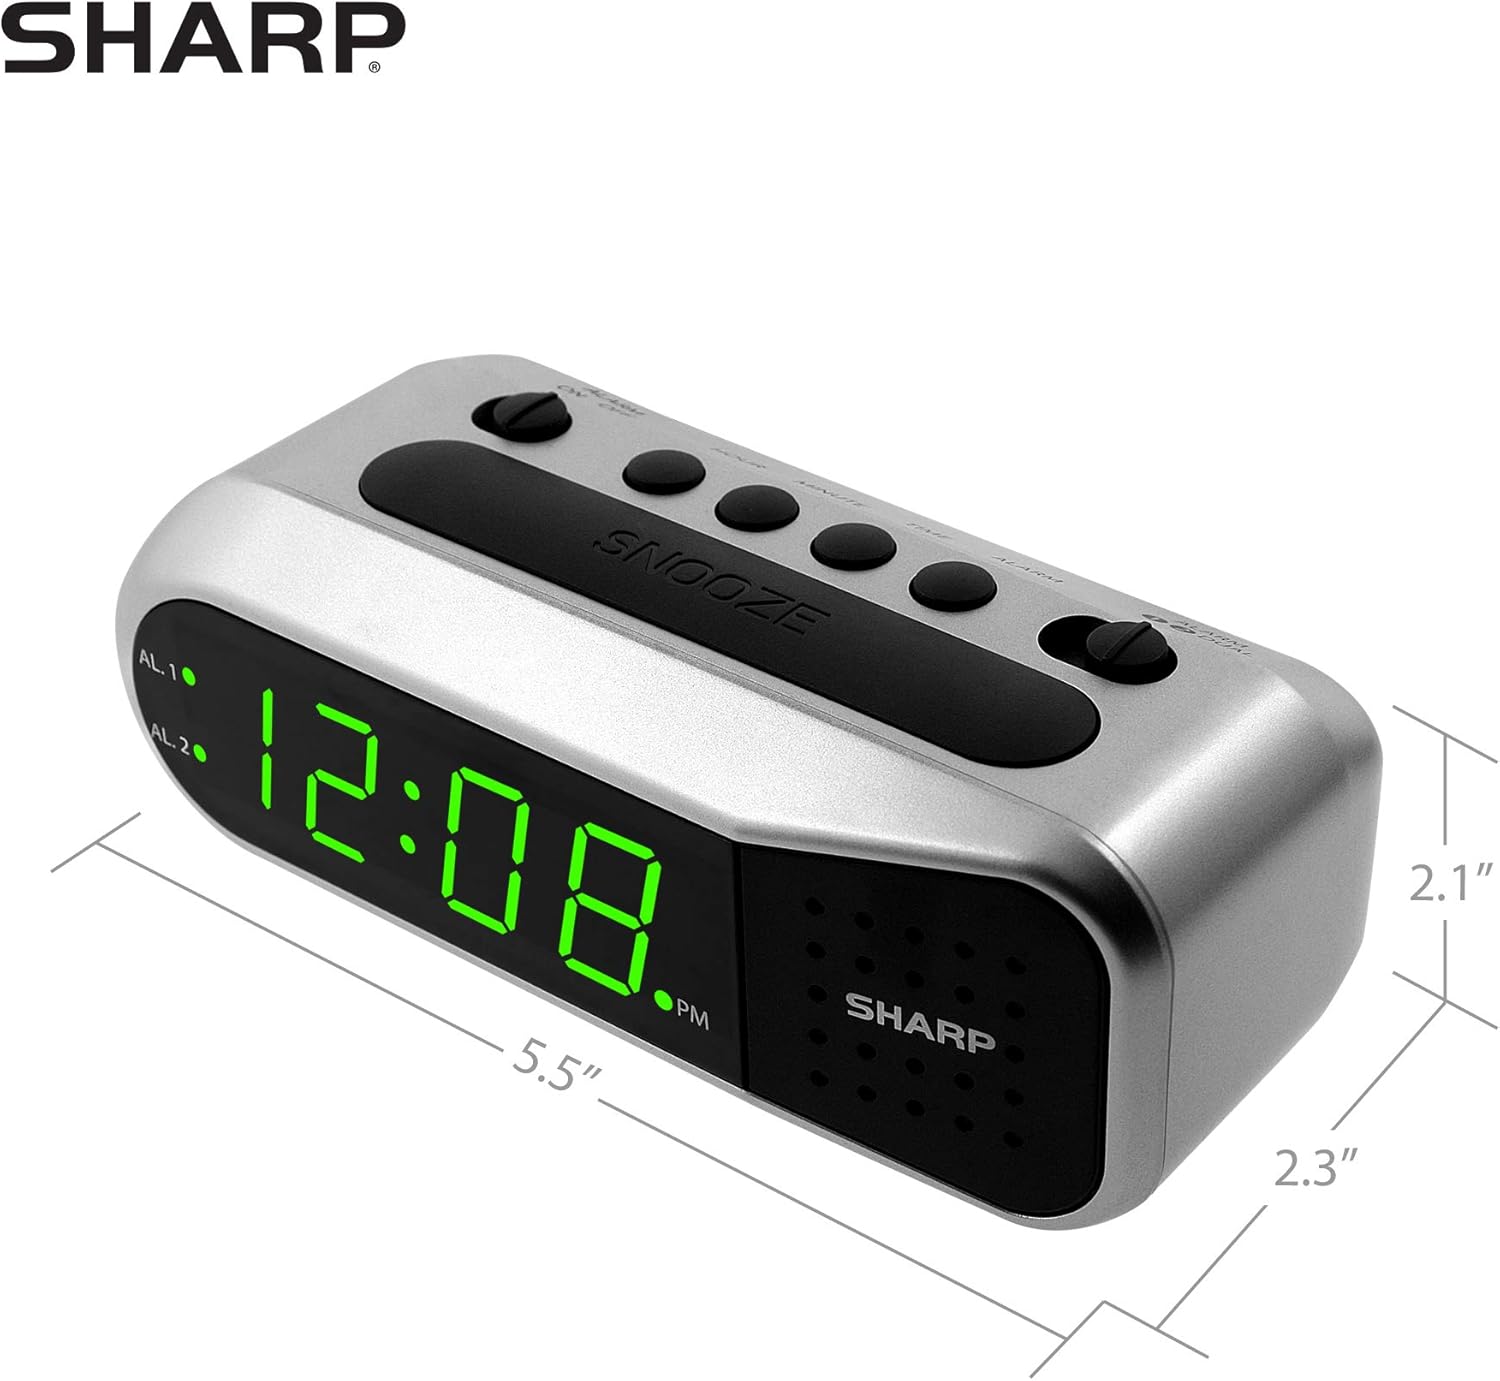
Figure 4: Dimensions of the Sharp Digital Alarm Clock.
Garanti og support
For garantioplysninger eller teknisk support henvises til garantikortet, der følger med dit produkt, eller besøg den officielle Sharp-side. webwebstedet. Behold din købskvittering som købsbevis.
For further assistance, you may contact Sharp customer service through their official channels.


