Indledning
Welcome to the user manual for your new Astro Men's Digital Watch, model A9916-PPHB. This guide provides comprehensive instructions on how to set up, operate, and maintain your watch to ensure optimal performance and longevity. Please read this manual carefully before using your watch.
Produkt overview og knapfunktioner
Your Astro digital watch features a clear display and intuitive button controls for various functions.
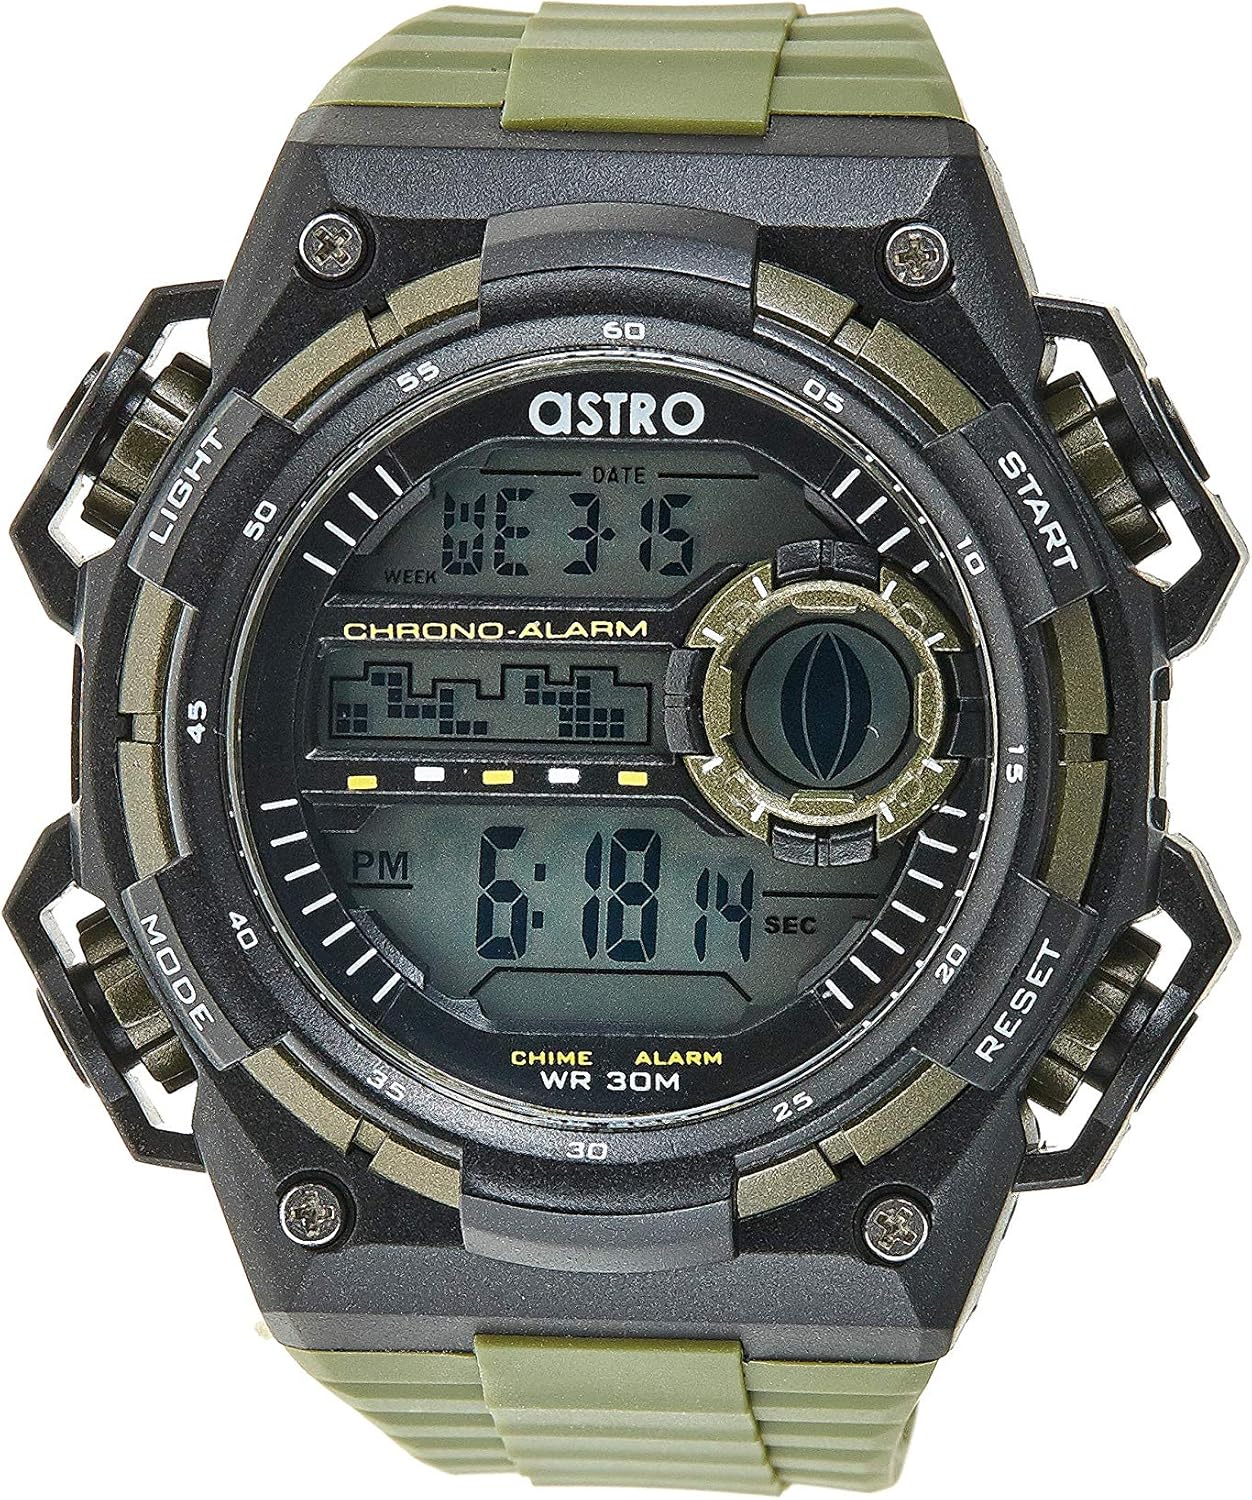
Figur 1: Forside View of the Watch. This image displays the watch face, highlighting the digital display and the four primary control buttons: LIGHT (top left), MODE (bottom left), START (top right), and RESET (bottom right). The display shows the time, day of the week, and date, along with indicators for chronograph and alarm functions.

Figur 2: Side View of the Watch. This image provides a profile view of the watch, clearly showing the placement and design of the "LIGHT" and "MODE" buttons on the left side of the watch case. These buttons are essential for navigating through the watch's functions and activating the backlight.

Figur 3: Tilbage View of the Watch. This image shows the reverse side of the watch, featuring the stainless steel case back secured by four screws. The durable olive green plastic strap, with its buckle closure, is also visible, indicating the watch's robust construction.
Knap funktioner:
- LYS-knap (øverst til venstre): Activates the backlight for viewing the display in low-light conditions.
- MODE-knap (nederst til venstre): Cycles through different modes: Time Display, Alarm Setting, Chronograph (Stopwatch), and Date Setting.
- START-knap (øverst til højre): Used to start/stop the chronograph, adjust values during setting, or activate the alarm.
- RESET-knap (nederst til højre): Used to reset the chronograph, confirm settings, or switch between 12/24-hour format.
Opsætning og indledende konfiguration
1. Udpakning og inspektion
Upon receiving your watch, carefully unbox it and inspect for any visible damage. Ensure all components, including the watch and any accompanying documentation (like the guarantee card), are present.

Figure 4: Watch Packaging and Guarantee Card. This image shows the watch's protective tin packaging and the included guarantee card, which is important for warranty claims.
2. Indstilling af tid og dato
- Fra normal tidsvisningstilstand skal du trykke på MODE button three times to enter the time setting mode. The seconds digits will begin to flash.
- Tryk på NULSTIL button to cycle through the settings: Seconds → Hour → Minute → Month → Date → Day of the Week.
- Mens et ciffer blinker, skal du trykke på STARTE button to increase the value. Hold the STARTE button to rapidly advance the digits.
- Når alle indstillinger er justeret, skal du trykke på MODE knappen for at afslutte indstillingstilstanden og vende tilbage til den normale tidsvisning.
3. 12/24-Hour Format Selection
I normal tidsvisningstilstand skal du trykke på NULSTIL button to toggle between 12-hour (with 'AM'/'PM' indicator) and 24-hour formats.
Betjeningsvejledning
1. Alarm funktion
- Fra den normale tidsvisning skal du trykke på MODE button once to enter the Alarm mode. The alarm time will be displayed.
- Tryk på NULSTIL button to select the hour or minute to set. The selected digit will flash.
- Tryk på STARTE knappen for at justere det blinkende ciffer.
- For at aktivere/deaktivere alarmen skal du trykke på STARTE button while in Alarm mode (without any digits flashing). An alarm icon will appear/disappear on the display.
- Tryk på MODE knappen for at vende tilbage til den normale tidsvisning.
2. Hourly Klokke
For at aktivere eller deaktivere hourly chime (which beeps at the top of every hour):
- In Alarm mode, press the NULSTIL knappen for at skifte til hourly chime on/off. A chime icon will appear/disappear on the display.
3. Kronograf (Stopur)
- Fra den normale tidsvisning skal du trykke på MODE button twice to enter the Chronograph mode. The display will show "00:00:00".
- Tryk på STARTE knappen for at starte tidtagningen.
- Tryk på STARTE knappen igen for at sætte tidtagningen på pause.
- Tryk på NULSTIL button while paused to reset the chronograph to "00:00:00".
- Tryk på MODE knappen for at vende tilbage til den normale tidsvisning.
4. Baggrundsbelysningsfunktion
Tryk på LYS button (top left) at any time to illuminate the display for a few seconds, making it visible in dark environments.
Vedligeholdelse og pleje
1. Rengøring af dit ur
To keep your watch looking its best, wipe it regularly with a soft, dry cloth. For stubborn dirt, a slightly damp en klud kan bruges, efterfulgt af øjeblikkelig tørring. Undgå at bruge skrappe kemikalier eller slibende materialer.
2. Water Resistance (WR 30M)
Your Astro watch is water resistant up to 30 meters (3 ATM). This means it is suitable for daily use and can withstand splashes or brief immersion in water, such as during hand washing or light rain. It is NOT suitable for showering, swimming, diving, or any water sports. Do not operate buttons when the watch is wet.
3. Udskiftning af batteri
When the display becomes dim or functions become erratic, it may be time to replace the battery. Battery replacement should ideally be performed by a qualified watch technician to ensure proper sealing and water resistance integrity.
Fejlfinding
| Problem | Mulig årsag | Løsning |
|---|---|---|
| Skærmen er tom eller svag. | Lavt batteri. | Udskift batteriet. |
| Tidspunktet er forkert. | Tiden er ikke indstillet korrekt, eller der trykkes på en knap ved et uheld. | Refer to "Setting the Time and Date" section to reset the time. |
| Knapperne reagerer ikke. | Watch may be in a frozen state or battery is extremely low. | Try pressing all buttons simultaneously for a few seconds to reset. If problem persists, replace battery. |
| Alarmen lyder ikke. | Alarmen er ikke aktiveret. | Ensure the alarm icon is displayed on the screen. Refer to "Alarm Function" section. |
Specifikationer
- Modelnummer: A9916-PPHB
- Skærmtype: Digital
- Remmateriale: Plast
- Etui materiale: Plastic / Stainless Steel Back
- Vandtæthed: 30 meter (3 ATM)
- Funktioner: Time (12/24-hour), Date, Day, Alarm, Hourly Chime, Chronograph, Backlight
- Fabrikant: Astro
Garanti og support
Your Astro A9916-PPHB watch comes with a manufacturer's guarantee. Please refer to the included guarantee card (Figure 4) for specific terms and conditions of your warranty. Keep your purchase receipt and guarantee card in a safe place as proof of purchase.
For technical support, warranty claims, or any inquiries not covered in this manual, please contact your retailer or the official Astro customer service channel as indicated on your guarantee card or product packaging.


