1. Introduktion
The TC-Helicon Harmony V100 is a 100-watt, 2-channel acoustic amplifier designed for musicians seeking integrated vocal and guitar processing. It features a 10-inch Tannoy Dual-Concentric speaker, a top-firing tweeter, and a 4-button footswitch for comprehensive control over effects and looping. This manual provides detailed instructions for setting up, operating, and maintaining your Harmony V100 amplivligere.

Figur 1.1: Front view of the TC-Helicon Harmony V100 amplifier with its included 4-button footswitch. The amplifier features a brown grille and wooden side panels.
2. Opsætning
2.1 Udpakning og placering
- Carefully remove the Harmony V100 amplifier and its accessories from the packaging.
- Verify that all components are present: Harmony V100 amplifier, 4-button footswitch, power cable, and this user manual.
- Placer amplifier on a stable, level surface. Ensure adequate ventilation around the unit to prevent overheating.
2.2 Strømtilslutning
- Sørg for ampStrømafbryderen er i OFF-positionen.
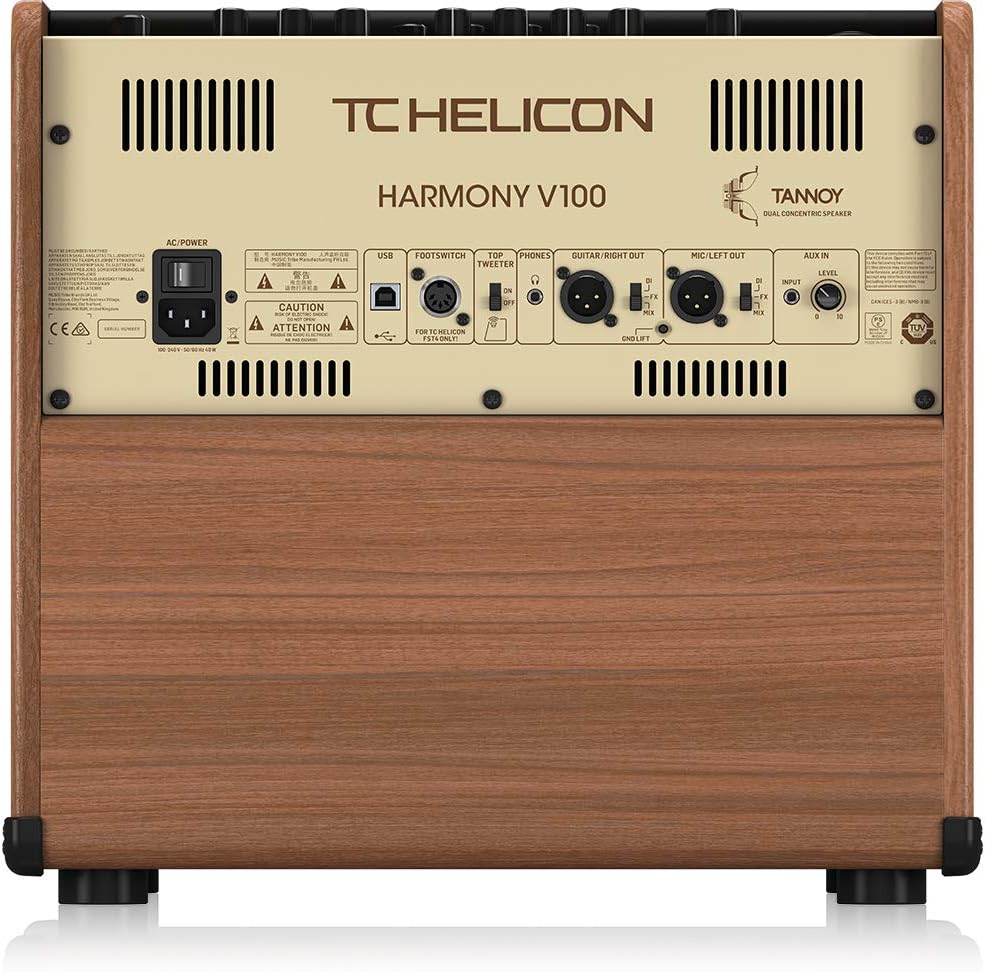
- Connect the provided power cable to the AC POWER inlet on the rear panel of the amplivligere.
- Sæt den anden ende af strømkablet i en jordet stikkontakt.

Figur 2.1: The rear panel of the Harmony V100, illustrating the AC power input, footswitch connection, USB port, and various audio inputs/outputs.
2.3 Connecting Instruments and Microphones
- Guitar input: Connect your acoustic guitar to the "GUITAR" input jack on the top panel using a standard 1/4-inch instrument cable.
- Mikrofonindgang: Connect your microphone to the "MIC" input jack on the top panel using an XLR cable.
- Fodkontakt: Connect the included 4-button footswitch to the "FOOTSWITCH" input on the rear panel. This enables hands-free control of effects and the looper.
- Hjælpeindgang: For connecting external audio devices (e.g., MP3 player, phone), use the "AUX IN" 1/8-inch (3.5mm) stereo jack on the rear panel.
3. Betjeningsvejledning
3.1 Powering On and Initial Sound Check
- Ensure all connections are secure and volume knobs are set to a low level.
- Flip the power switch on the rear panel to the ON position. The ampLifier vil tænde.
- Gradually increase the MASTER volume knob to a desired listening level.
- Play your guitar and sing into the microphone to test the sound. Adjust the individual channel volume controls as needed.
Figur 3.1: Close-up of the Harmony V100's top control panel, showing knobs and buttons for vocal and guitar channels, effects, and master volume.
3.2 Vocal Channel Features
The vocal channel offers a suite of processing tools to enhance your voice:
- Adaptive Tone: Automatically adjusts EQ, compression, de-essing, and gating for a polished vocal sound.
- Intelligent Anti-feedback: Helps to eliminate feedback issues, especially in live performance settings.
- Pitch-korrektion: Provides subtle or more pronounced pitch correction to keep your vocals in tune.
- Harmoni: Generates vocal harmonies based on your singing and the guitar input.
- Reverb & Delay: Adds spatial effects to your vocals.
3.3 Guitar Channel Features
The guitar channel provides dedicated effects and tone shaping for your acoustic instrument:
- BodyRez: Restores the natural acoustic tone often lost with undersaddle pickups.
- Intelligent Anti-feedback: Similar to the vocal channel, this helps prevent guitar feedback.
- Tuner: An integrated tuner for quick and accurate instrument tuning.
- Reverb, Delay, Chorus: Classic guitar effects for adding depth and modulation.
- 3-band EQ: Bass, Mid, and Treble controls for precise tonal adjustments.
3.4 Looper Functionality
The integrated looper allows you to record and layer vocal and guitar phrases. Control the looper using the dedicated footswitch button.

Figur 3.2: The 4-button footswitch for the Harmony V100, labeled HARMONY, VOCAL FX, GUITAR FX, and LOOPER, enabling hands-free control during performance.
- Optage: Press the LOOPER footswitch button once to start recording.
- Overdub: Press again to overdub additional layers.
- Afspil/stop: Double-press to stop playback. Press once to resume.
- Fortryd/Gentag: Consult the full manual for specific undo/redo functions, often involving a long press or combination.
- Klar: Long press to clear the loop.
3.5 Udgangsforbindelser
- DI/MIX Outputs: Balanced XLR outputs on the rear panel for connecting to a PA system or mixing console. These can be configured for separate guitar/vocal outputs or a mixed signal.
- Hovedtelefoner: A 1/4-inch stereo headphone jack on the top panel for silent practice.
- USB: Connect to a computer for firmware updates or direct recording (refer to TC-Helicon software documentation).
4. Vedligeholdelse
4.1 Rengøring
- Frakobl amplifier from power before cleaning.
- Brug en blød, tør klud til at tørre de udvendige overflader af.
- Undgå at bruge slibende rengøringsmidler, opløsningsmidler eller voks, da disse kan beskadige finishen.
- Lad ikke væsker trænge ind i ampventilationsåbninger eller kontrolpanel.
4.2 Opbevaring
- Opbevar ampOpbevar apparatet på et køligt, tørt sted væk fra direkte sollys og ekstreme temperaturer.
- If transporting, use appropriate protective casing to prevent damage.
5. Fejlfinding
This section addresses common issues you might encounter with your Harmony V100 amplivligere.
5.1 Ingen lydudgang
- Tjek strøm: Sørg for amplifier is powered on and the power cable is securely connected.
- Lydstyrkeniveauer: Verify that the MASTER volume, channel volumes (GUITAR, MIC), and instrument/microphone volumes are turned up.
- Forbindelser: Confirm that all instrument, microphone, and speaker cables are correctly and securely plugged in.
- Hovedtelefoner: If headphones are plugged in, sound may be muted from the main speaker. Unplug headphones to restore speaker output.
5.2 Footswitch Not Responding
- Kabelforbindelse: Ensure the footswitch cable is firmly connected to the "FOOTSWITCH" jack on the rear panel.
- Power Cycle: Try powering off the amplifier, then reconnecting the footswitch, and powering it back on.
- Omprogrammering: In rare cases, the footswitch may need to be reprogrammed or reset. Refer to the full TC-Helicon Harmony V100 manual for detailed instructions on footswitch calibration or assignment.
5.3 Feedback Issues
- Anti-feedback: Ensure the Intelligent Anti-feedback feature is engaged for both vocal and guitar channels.
- Placering: Juster amplifier's position relative to your microphone and guitar. Avoid pointing the microphone directly at the speaker.
- Få Staging: Reduce input gain levels if they are too high.
6. Specifikationer
| Feature | Detalje |
|---|---|
| Output Wattage | 100 watt |
| Højttalerkonfiguration | 10" Tannoy Dual-Concentric speaker, Top-Firing tweeter |
| Kanaler | 2 (Vocal, Guitar) |
| Vokale effekter | Adaptive Tone, Intelligent Anti-feedback, Pitch Correction, Harmony, Reverb, Delay |
| Guitar effekter | BodyRez, Intelligent Anti-feedback, Tuner, Reverb, Delay, Chorus, 3-band EQ |
| Looper | Integreret |
| Fodskifte | 4-button customizable (included) |
| Forbindelse | XLR Mic In, 1/4" Guitar In, 1/8" Aux In, XLR DI/Mix Out, 1/4" Headphone Out, USB |
| Strømkilde | Elektrisk med ledning |
| Dimensioner (L x B x H) | 6.32 x 4.82 x 5.84 tommer (Note: These dimensions are provided in product data and may represent packaging. Actual amplifier dimensions are typically larger.) |
| Varens vægt | 34.5 pund |
| Modelnummer | HARMONY V100 |
Bemærk: Specifikationerne kan ændres uden varsel.
7. Garanti og support
For detailed warranty information and technical support, please refer to the official TC-Helicon webwebsted eller kontakt deres kundeservice.
You can find additional resources and contact information by visiting the TC Helicon-butikken på Amazon eller deres officielle mærke webwebsted.


