1. Introduktion
This manual provides instructions for the safe and efficient operation, maintenance, and troubleshooting of your Solis Barista Perfetta Plus Espresso Machine. Please read all instructions carefully before using the appliance and retain this manual for future reference.
2. Sikkerhedsinstruktioner
- Tilslut altid apparatet til en jordforbundet stikkontakt.
- Maskinen, netledningen eller stikket må ikke nedsænkes i vand eller andre væsker.
- Keep hands and fingers away from hot surfaces and steam.
- Tag stikket ud af stikkontakten før rengøring eller når maskinen ikke er i brug.
- Brug ikke apparatet med en beskadiget ledning eller stik.
- Dette apparat er ikke beregnet til brug af personer (inklusive børn) med nedsatte fysiske, sensoriske eller mentale evner, eller mangel på erfaring og viden, medmindre de er blevet under opsyn eller instruktion i brugen af apparatet af en person, der er ansvarlig for deres sikkerhed. .
- Ensure the water tank is filled with fresh, cold water before operation.
3. Pakkens indhold
Kontroller, at alle varer er til stede i emballagen:
- Solis Barista Perfetta Plus Espresso Machine
- Portafilter
- Enkelt skud filterkurv
- Dobbelt skud filterkurv
- Tamper
- Måleske
- Rengøringsbørste
- Water Filter (if included)
- Brugermanual

Image: Solis Barista Perfetta Plus Espresso Machine with its various accessories, including portafilter, tamper, og filterkurve.
4. Produktet er slutview
Gør dig bekendt med komponenterne i din espressomaskine:

Billede: Forside view of the Solis Barista Perfetta Plus Espresso Machine, showing the control panel, pressure gauge, portafilter, and drip tray.
- Kontrolpanel: Buttons for Program (Prog.), Single Espresso, Double Espresso, and Steam.
- Trykmåler: Displays brewing pressure.
- Portafilter: Opbevarer den formalede kaffe til brygning.
- Dampstang: Used for steaming milk.
- Drypbakke: Opsamler overskydende vand og kafferester.
- Vandtank: Removable reservoir for water supply.
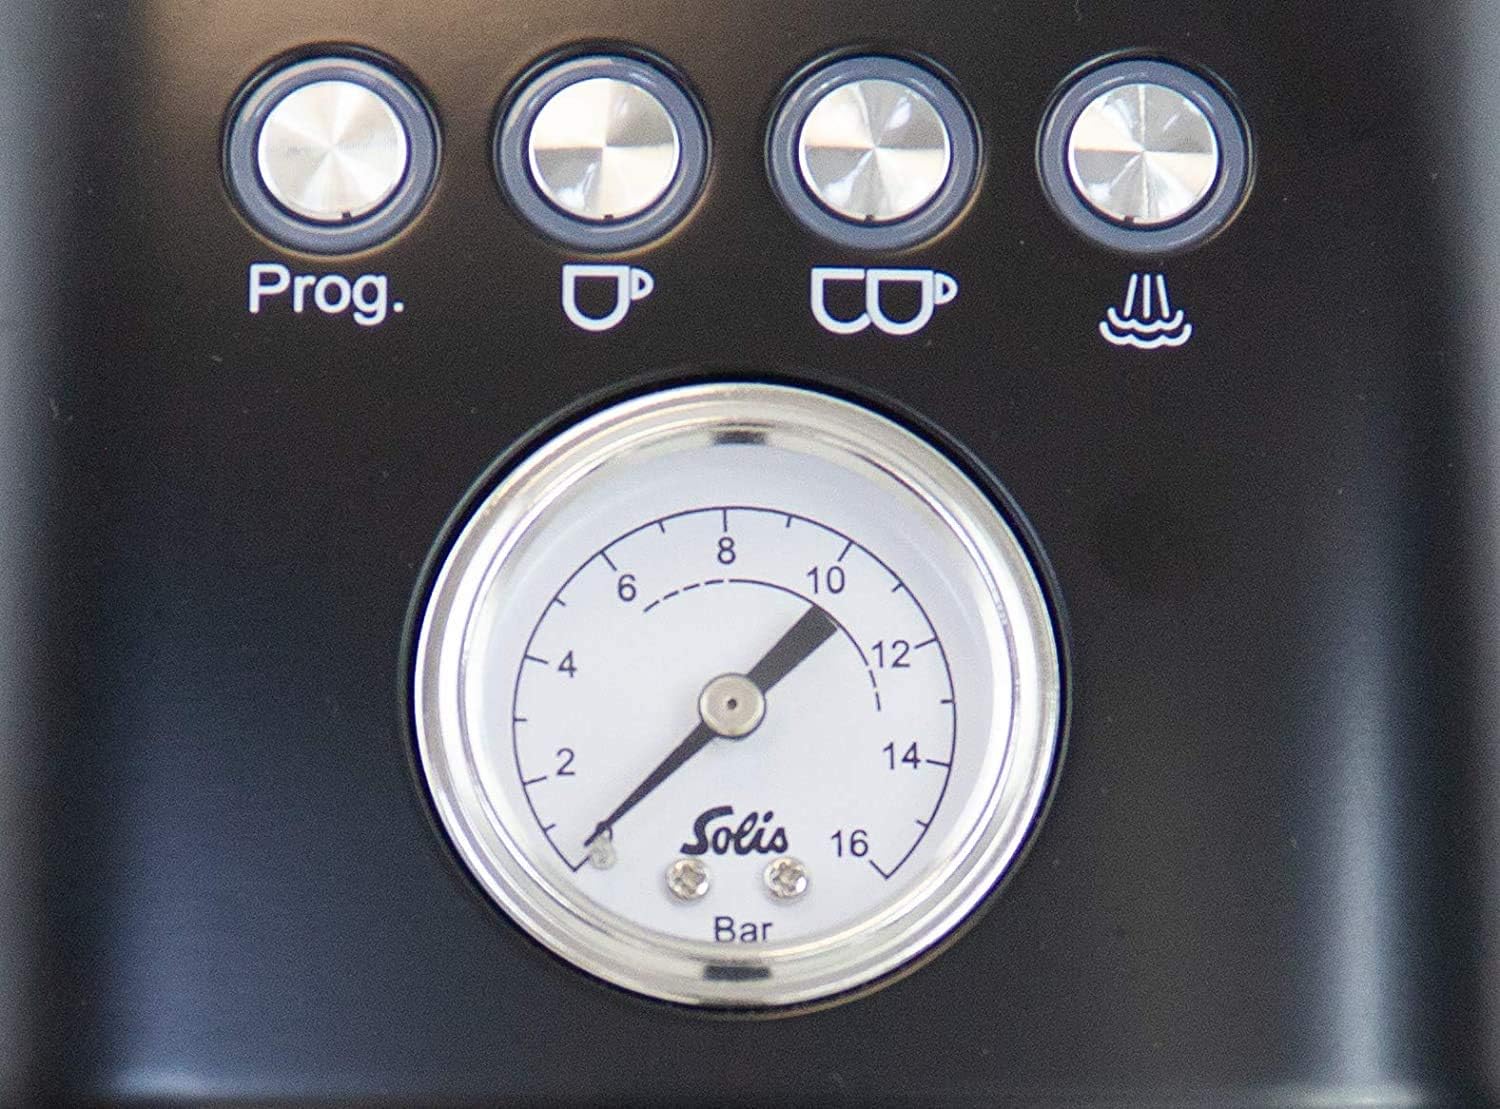
Image: Close-up of the control panel, highlighting the 'Prog', single and double espresso buttons, steam button, and the central pressure gauge.

Billede: Side view of the Solis Barista Perfetta Plus Espresso Machine, clearly showing the removable water tank with 'Max' and 'Min' level indicators.
5. Opsætning
5.1 Udpakning og placering
- Fjern al emballage og beskyttelsesfilm fra maskinen.
- Place the machine on a stable, level, and heat-resistant surface, away from water sources and heat.
- Sørg for tilstrækkelig ventilation omkring apparatet.
5.2 Påfyldning af vandtanken
- Fjern vandtanken fra bagsiden af maskinen.
- Fill the tank with fresh, cold drinking water up to the 'Max' level indicator.
- Sæt vandtanken sikkert på plads igen.
5.3 First Use / Priming the Machine
- Sæt netledningen i en jordet stikkontakt.
- Press the 'ON/OFF' button to turn on the machine. The buttons will flash as the machine heats up.
- Once the buttons are steadily lit, the machine is ready.
- Placer en kop under portafilterets tud (uden kaffe).
- Press the 'Double Espresso' button to run water through the group head. This primes the pump and flushes any manufacturing residue. Repeat this step for the steam wand by activating the steam function and letting water/steam flow for a few seconds.
6. Betjeningsvejledning
6.1 Fremstilling af espresso
- Klargør portafilteret: Vælg den passende filterkurv (enkelt eller dobbelt), og sæt den i portafilteret.
- Malet kaffe: Grind fresh coffee beans to a fine consistency suitable for espresso. The grind size significantly impacts extraction.
- Fill and Tamp: Fill the filter basket with ground coffee. Use the tampfor at presse kaffen jævnt og fast.
- Indsæt portafilter: Attach the portafilter to the group head by aligning it and rotating it to the right until it is secure.
- Placeringspokal: Placer din(e) espressokop(per) under portafilterets tud.
- Bryg espresso: Press the 'Single Espresso' or 'Double Espresso' button. The machine will automatically brew the pre-programmed volume of espresso.
- Monitortryk: Observe the pressure gauge during brewing. Optimal pressure is typically within the indicated range.
6.2 Programming Shot Volume
- With the machine ready, press and hold the 'Prog.' button until it flashes.
- Press either the 'Single Espresso' or 'Double Espresso' button to start brewing.
- Once the desired volume of espresso is dispensed, press the same espresso button again to stop. The machine will save this volume for future use.
6.3 Dampning af mælk
- Fill a milk pitcher with cold milk, typically to just below the spout.
- Press the 'Steam' button. The button will flash as the machine heats up to steaming temperature.
- Once the 'Steam' button is steadily lit, purge the steam wand by opening the steam knob briefly to release any condensed water. Close the knob.
- Insert the steam wand tip just below the surface of the milk. Open the steam knob fully.
- Steam the milk until it reaches the desired temperature and texture.
- Luk dampknappen, og fjern kanden.
- Tør straks dampdysen af med en damppistol.amp cloth to prevent milk residue from drying. Purge the wand again briefly to clear any internal milk.
7. Vedligeholdelse og rengøring
7.1 Daglig rengøring
- Drypbakke: Tøm og skyl drypbakken efter hver brug, eller når indikatoren 'Fuld' vises.
- Portafilter og filterkurve: Remove spent coffee grounds, rinse the portafilter and filter baskets under hot water.
- Dampstang: Wipe the steam wand immediately after each use with a damp cloth. Purge the wand to clear any milk residue.
7.2 Rengøring af gruppehoved
Periodically clean the group head to remove coffee oils and residue:
- Insert a blind filter (if provided) into the portafilter.
- Add a small amount of espresso machine cleaning detergent to the blind filter.
- Fastgør portafilteret til gruppehovedet.
- Run a short brewing cycle (e.g., single espresso button) for 10 seconds, then stop. Wait 10 seconds. Repeat 5 times.
- Remove the portafilter, rinse it, and repeat the process with clean water to flush out detergent.
7.3 Afkalkning
Descaling is necessary to remove mineral buildup and maintain machine performance. The frequency depends on water hardness and usage. Refer to the descaling indicator (if present) or descale every 2-3 months.
- Empty the water tank and fill it with a descaling solution mixed according to the manufacturer's instructions.
- Placer en stor beholder under damphovedet og damprøret.
- Follow the specific descaling procedure outlined in your machine's full manual or activate the descaling program if available. This typically involves running the solution through the group head and steam wand.
- Efter afkalkningscyklussen skal vandtanken skylles grundigt og fyldes med frisk vand. Kør maskinen flere gange med frisk vand for at skylle eventuel resterende afkalkningsopløsning ud.
8. Fejlfinding
If you encounter issues, consult the following table before contacting customer support:
| Problem | Mulig årsag | Løsning |
|---|---|---|
| Ingen vandstrøm fra gruppehovedet | Water tank empty; machine not primed; pump airlock; clogged filter basket. | Fyld vandtanken; klargør maskinen; rengør filterkurven. |
| Espresso brews too slowly or not at all | Kaffemalet for fint; kaffe tampfor hårdt; tilstoppet filter. | Brug grovere maling;amp with less pressure; clean filter. |
| Espresso brews too quickly / weak coffee | Coffee ground too coarse; not enough coffee; coffee tamped for let. | Use finer grind; increase coffee dose; tamp med mere pres. |
| Ingen damp fra damprør | Dampknappen er ikke aktiveret; dampdysen er tilstoppet. | Ensure steam function is on and heated; clean steam wand tip. |
| Maskinen tænder ikke | Ikke tilsluttet; problem med stikkontakten. | Kontrollér strømforbindelsen; prøv en anden stikkontakt. |
9. Specifikationer
- Mærke: Solis
- Model: Perfetta Plus
- Produktdimensioner: 17 x 7 x 12.5 tommer
- Varens vægt: 17.44 pund
- Kaffeindgangstype: Malet kaffe
- Driftstilstand: Fuldautomatisk
- Speciel funktion: Programmerbar
- Inkluderede komponenter: Filter
10. Garanti og support
The Solis Barista Perfetta Plus Espresso Machine comes with a manufacturer's warranty. For specific warranty terms, duration, and conditions, please refer to the warranty card included with your product or visit the official Solis webwebsted. For teknisk support, reservedele eller serviceforespørgsler, kontakt venligst Solis kundeservice via deres officielle kanaler.


