Indledning
This manual provides important information regarding the safe operation, maintenance, and troubleshooting of your KingHome 50-Pint Dehumidifier. Please read it thoroughly before using the appliance and retain it for future reference.
The KingHome 50-Pint Dehumidifier is designed to efficiently remove excess moisture from the air in spaces up to 4500 square feet, improving air quality and comfort. It features a built-in vertical pump for continuous drainage, an LED display, multiple fan speeds, and a timer function.
Vigtige sikkerhedsoplysninger
Følg altid grundlæggende sikkerhedsforanstaltninger ved brug af elektriske apparater for at reducere risikoen for brand, elektrisk stød og personskade.
- Sørg for, at enheden er placeret på en plan og stabil overflade.
- Brug ikke affugteren med en beskadiget ledning eller stik.
- Hold luftindtags- og udløbsgitrene fri for blokeringer.
- Stik ikke fingre eller fremmedlegemer ind i ristene.
- Tag stikket ud af enheden, før du rengør eller udfører vedligeholdelse.
- Dette apparat er kun til privat brug.
Produkt overview
Familiarize yourself with the components of your KingHome 50-Pint Dehumidifier.

Figur 1: Front view of the KingHome 50-Pint Dehumidifier, showing the air intake grille and the water tank with a visible water level indicator.
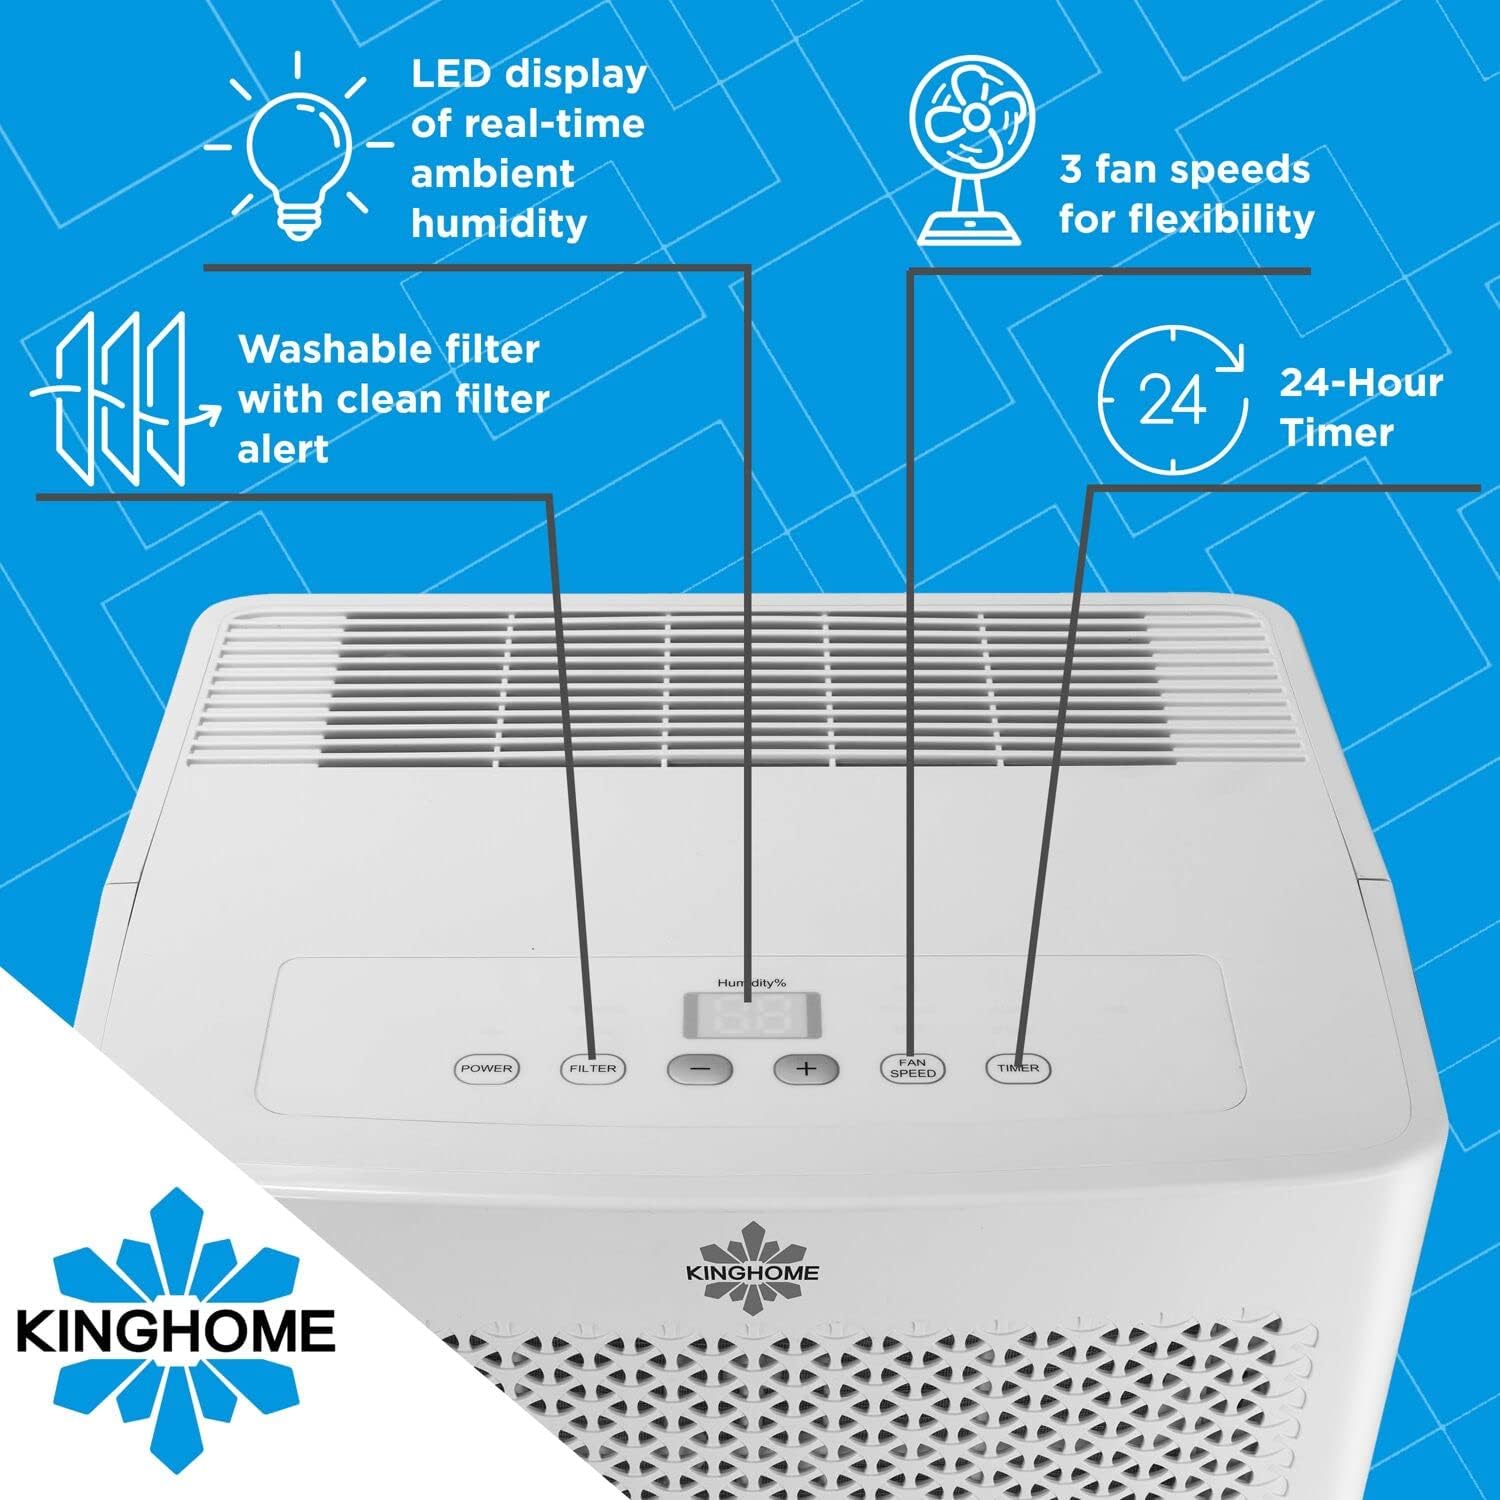
Figur 2: Close-up of the top control panel, highlighting the LED display for real-time ambient humidity, power button, filter alert, humidity adjustment buttons, fan speed button, and 24-hour timer button.

Figur 3: Diagram illustrating the dimensions of the dehumidifier: approximately 14.8 inches wide, 11.4 inches deep, and 24 inches high.
Opsætning og installation
Udpakning
- Tag forsigtigt affugteren ud af emballagen.
- Fjern alt emballagemateriale, inklusive tape eller beskyttelsesfilm.
- Undersøg enheden for eventuelle forsendelsesskader. Hvis den er beskadiget, må den ikke anvendes, og du skal kontakte kundesupport.
Placering
- Place the dehumidifier on a firm, level surface that is strong enough to support the unit with a full water tank.
- Ensure there is at least 8 inches (20 cm) of space around the unit for proper air circulation. Do not block the air inlet or outlet.
- Undgå at placere enheden i nærheden af varmekilder eller i direkte sollys.
Strømtilslutning
- Sæt netledningen i en jordet stikkontakt. Sørg for, at lydstyrken er korrekt.tage matches the rating label on the back of the unit.
Afløbsmuligheder
Your KingHome dehumidifier offers two drainage methods: manual emptying of the water tank or continuous drainage using the built-in pump.
Manual Drainage (Water Tank)
- The unit will automatically stop operating when the water tank is full and an alert will sound.
- Carefully pull out the front-removable water tank using its built-in pull-up handle.
- Empty the water, then reinsert the tank firmly into the unit.
Continuous Drainage (Built-in Pump)
For continuous operation without emptying the tank, use the built-in vertical pump.
- Locate the external drain connector on the back of the unit.
- Connect a standard garden hose (not included) to the external drain connector.
- Route the hose to a suitable drain location, such as a sink or out a window, ensuring the hose is sloped downwards to allow for gravity drainage. The built-in pump will lift water vertically if needed.
- Ensure the hose is securely connected to prevent leaks.

Figur 4: Image showing a garden hose connected to the external drain connector on the side of the dehumidifier for continuous water removal.

Figur 5: Illustrative diagram demonstrating the continuous draining setup, where a garden hose is connected to the unit and directs water to an external drain point.
Betjeningsvejledning
Kontrolpanel funktioner
- Power knap: Tænder eller slukker for enheden.
- Knapper til indstilling af fugtighed (+/-): Adjusts the desired humidity level from 30% to 90% relative humidity (RH) in 5% increments. The LED display shows the real-time ambient humidity.
- Ventilatorhastighedsknap: Cycles through 3 fan speeds (Low, Medium, High) for flexible operation.
- Timer knap: Sets the auto-on or auto-off timer for up to 24 hours.
- Filter Alert: Lyser, når luftfilteret skal rengøres.
Indledende drift
- Tilslut affugteren.
- Tryk på Magt knappen for at tænde enheden.
- Brug +/- buttons to set your desired humidity level. A lower setting will result in more moisture removal.
- Select your preferred fan speed using the Blæserhastighed knap.
- The unit will begin to operate and display the current room humidity.
Intelligent hukommelsesfunktion
The unit is equipped with an intelligent memory function that saves your last settings (humidity level, fan speed, timer) after a power outage. When power is restored, the dehumidifier will resume operation with these saved settings.
Opretholdelse
Regelmæssig vedligeholdelse sikrer optimal ydeevne og forlænger levetiden på din affugter.
Rengøring af luftfilteret
The dehumidifier features a washable and reusable air filter. A "Filter Alert" light on the control panel will indicate when cleaning is required.
- Sluk for affugteren, og tag stikket ud af stikkontakten.
- Locate the air filter, typically behind the front grille.
- Fjern forsigtigt filteret.
- Vask filteret med varmt sæbevand. Skyl grundigt.
- Lad filteret lufttørre helt, før det monteres igen. Brug ikke en tørretumbler eller direkte varme.
- Sæt tørfilteret i enheden igen.
- Plug in the unit and press the "Filter" button (if available) or power on to reset the filter alert.
Rengøring af enhedens yderside
- Tør ydersiden af enheden af med en blød, damp klæde.
- Brug ikke skrappe kemikalier, slibende rengøringsmidler eller opløsningsmidler.
Langtidsopbevaring
- Empty the water tank and ensure all internal components are dry.
- Rengør luftfilteret.
- Store the unit upright in a cool, dry place, away from direct sunlight.
Fejlfinding Guide
Før du kontakter kundesupport, bedes du se følgende tabel for almindelige problemer og løsninger på disse.
| Problem | Mulig årsag | Løsning |
|---|---|---|
| Affugteren tænder ikke. | Ingen strøm; Netledningen er ikke sat i; Afbryderen er udløst. | Ensure unit is plugged into a live outlet; Check circuit breaker; Try a different outlet. |
| Enheden kører, men opsamler ikke vand. | Room humidity is too low; Temperature is too low; Air filter is clogged; Air inlet/outlet blocked. | Increase desired humidity setting; Ensure room temperature is above 41°F (5°C); Clean air filter; Clear obstructions. |
| Water tank is full, but unit continues to run. | Vandtanken er ikke korrekt monteret; Fejl på flydekontakten. | Remove and reinsert water tank firmly; Contact customer support if issue persists. |
| Enheden er støjende. | Enheden står ikke på en plan overflade; Luftfilteret er tilstoppet; Løse dele. | Place on a level surface; Clean air filter; Check for loose components. |
| Continuous drain pump not working. | Hose kinked or blocked; Hose not properly connected; Pump malfunction. | Check hose for kinks or blockages; Ensure secure connection; Contact customer support. |
Specifikationer
| Feature | Detalje |
|---|---|
| Mærke | KingHome |
| Modelnavn | KingHome Energy Star 50-Pint Dehumidifier for a Room up to 4500 Sq. Ft., KHD50BW |
| Modelnummer | KHD50BWP |
| Affugtningskapacitet | 50 pints om dagen |
| Anbefalet dækningsområde | Op til 4500 kvadratmeter |
| Vandtankkapacitet | 15 pints |
| Produktmål (D x B x H) | 11.4" D x 14.8" B x 24" H |
| Varens vægt | 22 pund |
| Antal hastigheder | 3 |
| Wattage | 770 watt |
| Driftstilstand | Sammenhængende |
| Særlige funktioner | Built-In Pump, Continuous Draining, Digital Display, Portable, Timer, Water Level Indicator, Washable Filter |
| Kølevæsketype | R410A |
| Energy Star vurderet | Ja |
Garanti og support
Garantioplysninger
This KingHome dehumidifier includes a manufacturer's warranty. Please refer to the warranty card included with your product for specific terms, conditions, and duration of coverage. Retain your proof of purchase for warranty claims.
Kundesupport
For technical assistance, troubleshooting beyond this guide, or warranty inquiries, please contact KingHome customer support. Contact details are typically provided in the included manual or on the manufacturer's official webwebsted.
When contacting support, please have your model number (KHD50BWP) and purchase date available.


