Indledning
Tak for købetasing the Salange Mini Projector. This portable projector is designed to provide a versatile and immersive viewing experience for various applications, from home entertainment to outdoor movie nights. Featuring Full HD support, high brightness, and multiple connectivity options, it offers a convenient solution for projecting content from smartphones, gaming consoles, and other media devices. This manual provides detailed instructions for setup, operation, maintenance, and troubleshooting to ensure optimal performance and longevity of your device.
Sikkerhedsoplysninger
Læs venligst alle sikkerhedsinstruktioner omhyggeligt, inden du bruger projektoren. Gem denne manual til senere brug.
- Bloker ikke ventilationsåbningerne. Sørg for tilstrækkelig luftgennemstrømning omkring projektoren for at forhindre overophedning.
- Se ikke direkte ind i projektorlinsen, når lamp er tændt. Det skarpe lys kan forårsage øjenskader.
- Use only the power adapter supplied with the projector. Using an unauthorized adapter may cause damage or fire.
- Udsæt ikke projektoren for regn, fugt eller ekstreme temperaturer.
- Undgå at placere projektoren på ustabile overflader.
- Frakobl strømkablet under tordenvejr eller når apparatet ikke bruges i længere perioder.
- Forsøg ikke at reparere projektoren selv. Overlad al service til kvalificeret personale.
Hvad er der i æsken
Bekræft at alle varer er til stede ved udpakning:
- 1 x Salange Mini Projector (Model P62H / HY300US)
- 1 x fjernbetjening
- 1 x HDMI kabel
- 1 x AV signalkabel
- 1 x strømkabel
- 1 x Brugermanual (dette dokument)

Figure 1: Salange Mini Projector with remote control.
Produkt overview
Familiarize yourself with the main components and ports of your Salange Mini Projector.

Figur 2: Top-down view of the Salange Mini Projector, highlighting its compact design.
Frontpanel
- Projektionsobjektiv: Sender billedet ud på skærmen eller væggen.
- Fokusring: Justerer klarheden af det projicerede billede.
- Keystone-korrektion: Corrects trapezoidal distortion of the image.
Rear Panel (Connectivity)

Figur 3: Bagside view of the projector, illustrating its multiple connection ports.
- HDMI-port: Connects to devices like laptops, gaming consoles (PS5), Fire TV Stick, Roku, etc.
- USB Ports (USB-1, USB-T): Connects USB drives for media playback.
- AV-port: Connects to older devices using an AV cable.
- VGA port: Connects to computers with VGA output.
- Lydudgang (3.5 mm): Tilsluttes eksterne højttalere eller hovedtelefoner.
- Strømindgang: Tilslutter strømadapteren.
Opsætning
1. Placering
Place the projector on a stable, flat surface. Ensure there are no obstructions to the projection path or the ventilation openings. The ideal projection distance ranges from 2.6 ft to 18.0 ft, yielding screen sizes from 30 inches to 176 inches. For optimal viewing, a darker environment is recommended.

Figure 4: Recommended projection distances and screen sizes for the projector.
3. Strømtilslutning
Connect the power cable to the projector's power input port, then plug the other end into a power outlet.
3. Fokus- og Keystone-justering
After powering on, adjust the focus ring on the top of the projector until the image is clear. If the image appears trapezoidal, use the keystone correction dial to square the image.
4. Tilslutning af enheder
Projektoren understøtter forskellige inputkilder:
- HDMI: Connect your laptop, gaming console, or streaming device (e.g., Fire TV Stick) using an HDMI cable.
- USB: Insert a USB flash drive into one of the USB ports for direct media playback.
- AV: Use the provided AV cable to connect to devices with AV output.
- VGA: Connect to a computer using a VGA cable.
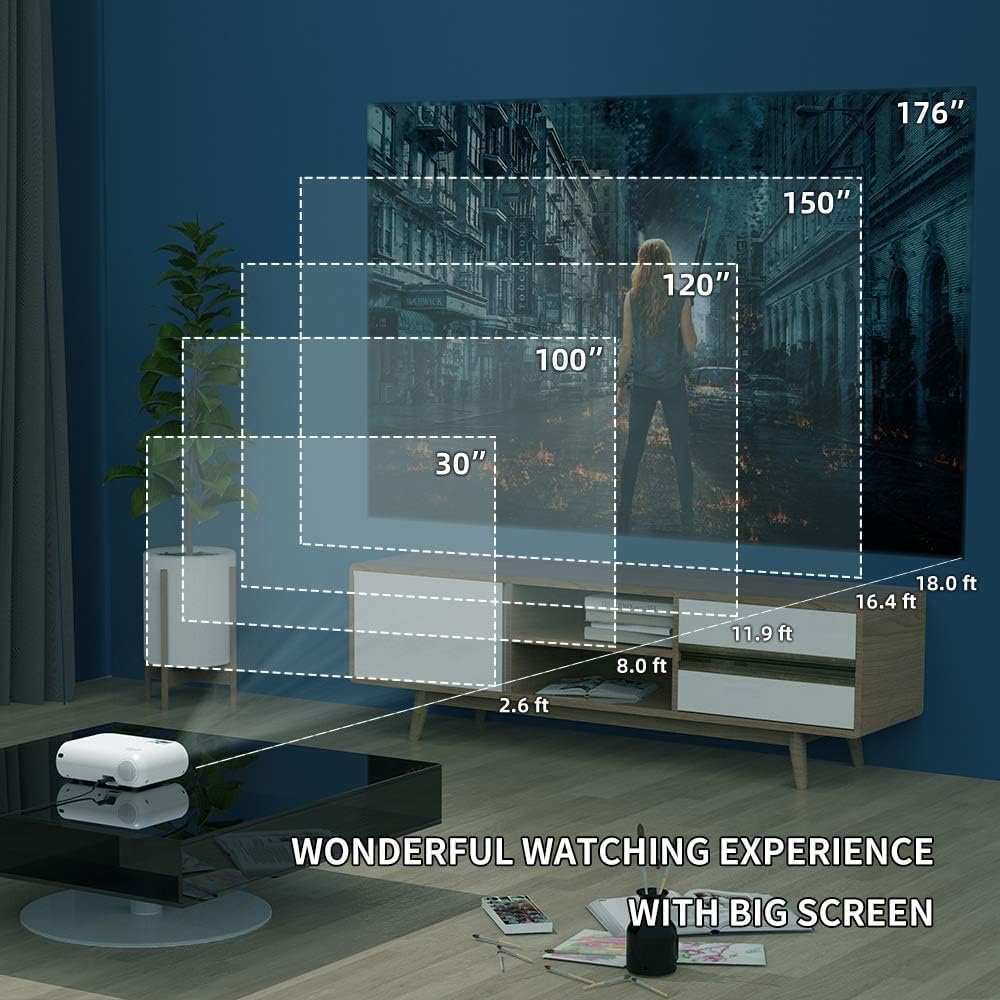
Figure 5: The projector's compatibility with multiple devices, including laptops, smartphones, and gaming consoles.
Betjeningsvejledning
1. Tænd/sluk
Tryk på tænd/sluk-knappen på projektoren eller fjernbetjeningen for at tænde eller slukke enheden.
2. Valg af inputkilde
Use the "Source" button on the remote or projector to cycle through available input sources (HDMI, USB, AV, VGA, WiFi).
3. Wireless Screen Mirroring (WiFi)
The Salange Mini Projector supports wireless screen mirroring for both iOS and Android devices via WiFi connection.

Figure 6: Wireless screen mirroring in action, showing a smartphone's display projected.
Til iOS-enheder:
- Select "Screen Mirroring for iOS System" on the projector's input menu.
- Connect your iOS device to the projector's WiFi network (e.g., "RKcast-xxxxxx"). The password is usually displayed on the projector screen.
- On your iOS device, open Control Center and tap "Screen Mirroring" (or "AirPlay Mirroring").
- Select the projector's name (e.g., "RKcast-xxxxxx") from the list to begin mirroring.
For Android-enheder:
- Select "Screen Mirroring for Android System" on the projector's input menu.
- On your Android device, enable "Wireless Display," "Multi-screen," "Smart View," or similar function (names vary by device).
- Select the projector's name from the detected devices to connect.
Note: Due to copyright restrictions, direct screen mirroring of certain streaming services like Netflix, Amazon Prime Video, and Hulu is not supported. For these services, it is recommended to use an external streaming device like an Amazon Fire TV Stick connected via HDMI.
Video 1: Official demonstration of the Salange Mini Projector's wireless screen mirroring capabilities and general usage.
4. Lydudgang
The projector has built-in Hi-Fi dual stereo speakers. For enhanced audio, connect external speakers or headphones to the 3.5mm audio out port.
Opretholdelse
1. Rengøring af linsen
Brug en blød, fnugfri klud, der er specielt designet til optiske linser. Brug ikke slibende rengøringsmidler eller klude, der kan ridse linsen.
2. Rengøring af projektorhuset
Tør ydersiden af med en blød, tør klud. Ved genstridige pletter, tør med en let tør klud.amp en klud kan bruges, efterfulgt af en tør aftørring.
3. Opbevaring
When not in use, store the projector in a cool, dry place, away from direct sunlight and excessive dust. It is recommended to use the original packaging for storage.
Fejlfinding
| Problem | Mulig årsag | Løsning |
|---|---|---|
| Intet billede projiceret | Strøm ikke tilsluttet; Forkert inputkilde; Objektivdæksel på. | Kontroller strømtilslutningen; Vælg den korrekte indgangskilde; Fjern linsedækslet. |
| Billedet er sløret | Out of focus; Incorrect projection distance. | Juster fokusringen; Juster projektionsafstanden. |
| Billedet er trapezformet | Projektoren er ikke vinkelret på skærmen. | Adjust keystone correction dial. |
| Ingen lyd | Volume too low; Muted; External audio device not connected or configured. | Øg lydstyrken; Slå lyden til; Kontroller eksterne lydforbindelser og indstillinger. |
| Trådløs spejling virker ikke | Incorrect WiFi connection; Device compatibility; App restrictions. | Ensure correct WiFi network and password; Verify device compatibility; Use HDMI for restricted content. |
Specifikationer
| Feature | Detalje |
|---|---|
| Mærke | Salange |
| Modelnummer | HY300US |
| Understøttet opløsning | 1920x1080P |
| Lysstyrke | 9600L |
| Kontrastforhold | 10000:1 |
| Forbindelsesteknologi | WIFI, HDMI, USB, AV, VGA |
| Højttaler type | Built-In Hi-Fi Dual Stereo Speakers |
| Lamp Liv | Op til 60,000 timer |
| Produktdimensioner | 6.69 x 3.74 x 3.74 tommer |
| Varens vægt | 3.08 pund |

Figure 7: Visual representation of the projector's upgraded brightness (9600 Lux) and color contrast.
Garanti og support
Salange provides lifetime professional technical support for this product. For any questions, issues, or warranty claims, please contact Salange customer service through the retailer's platform or the official Salange website. Please have your model number (HY300US) and purchase details ready when contacting support.
For mere information, besøg Salange Store on Amazon.


