1. Introduktion
Welcome to the world of automated cleaning with your new iRobot Roomba 697 Robot Vacuum Cleaner. Designed for convenience and efficiency, the Roomba 697 learns your cleaning habits to provide personalized schedules, ensuring your floors are consistently free from dirt, dust, and debris. Its advanced 3-stage cleaning system, coupled with Dirt Detect sensors, ensures a thorough clean across various floor types.
This manual will guide you through the setup, operation, and maintenance of your Roomba 697, helping you maximize its performance and longevity.
2. Sikkerhedsoplysninger
Please read all safety instructions carefully before using your Roomba 697. Failure to follow these instructions may result in electric shock, fire, or serious injury.
- Generel sikkerhed: Dette apparat kan bruges af børn i alderen 8 år og derover og personer med nedsatte fysiske, sensoriske eller mentale evner eller mangel på erfaring og viden, hvis de har fået opsyn eller instruktion i brugen af apparatet på en sikker måde og forstår de involverede farer. .
- Strøm og opladning: Use only the supplied charging station and power cord. Do not use with a damaged cord or plug.
- Miljø: Do not operate the robot in areas with exposed electrical outlets, standing water, or highly flammable materials.
- Forhindringer: Clear the cleaning area of loose power cords, small objects, and delicate items before operation to prevent entanglement or damage.
- Opretholdelse: Always turn off the robot and unplug it from the charging station before performing any maintenance or cleaning.
3. Hvad er der i æsken
Bekræft at alle komponenter er til stede i din pakke:
- iRobot Roomba 697 Robot Vacuum Cleaner
- Home Base Ladestation
- Linjeledning
- Dual Mode Virtual Wall Barrier (optional, may be sold separately)
- Ekstra filter
- Ekstra sidebørste

Image: The iRobot Roomba 697 robot vacuum cleaner from a top-down perspective.
4. Opsætning
4.1 Opladning af robotten
- Place the Home Base charging station on a hard, level surface against a wall, ensuring there are no obstacles for at least 0.5 meters (1.5 feet) on either side and 1.2 meters (4 feet) in front.
- Sæt ledningen i Home Base og derefter i en stikkontakt.
- Place your Roomba onto the Home Base, ensuring the metal charging contacts on the robot align with those on the Home Base. The light ring around the CLEAN button will pulse to indicate charging.
- Allow Roomba to charge for at least 3 hours before its first use. A solid green light indicates a full charge.
4.2 Connecting to Wi-Fi and the iRobot HOME App
For full control and smart features, download the iRobot HOME App.
- Download the iRobot HOME App from the App Store (iOS) or Google Play Store (Android).
- Open the app and follow the on-screen instructions to create an account and connect your Roomba to your home Wi-Fi network.
- The app will guide you through naming your robot and setting up initial cleaning preferences.

Image: The Roomba 697 from an angled perspective, highlighting its compact form.
5. Operating Your Roomba 697
5.1 Start af en rengøringscyklus
- Fra robotten: Press the large CLEAN button on top of the robot. Roomba will begin cleaning and automatically return to its Home Base when finished or when its battery is low.
- From the iRobot HOME App: Open the app and tap the 'CLEAN' button. You can also schedule cleaning times, customize cleaning preferences, and view rengøringshistorik.
- Stemmeassistent: If connected to a compatible voice assistant (e.g., Amazon Alexa, Google Assistant), simply say commands like "Alexa, ask Roomba to start cleaning."
5.2 Snavsdetekteringsteknologi
The Roomba 697 is equipped with patented Dirt Detect sensors that recognize concentrated areas of dirt, such as high-traffic zones. When Roomba encounters a dirtier area, it will perform a focused back-and-forth cleaning pattern to ensure thorough removal of debris.
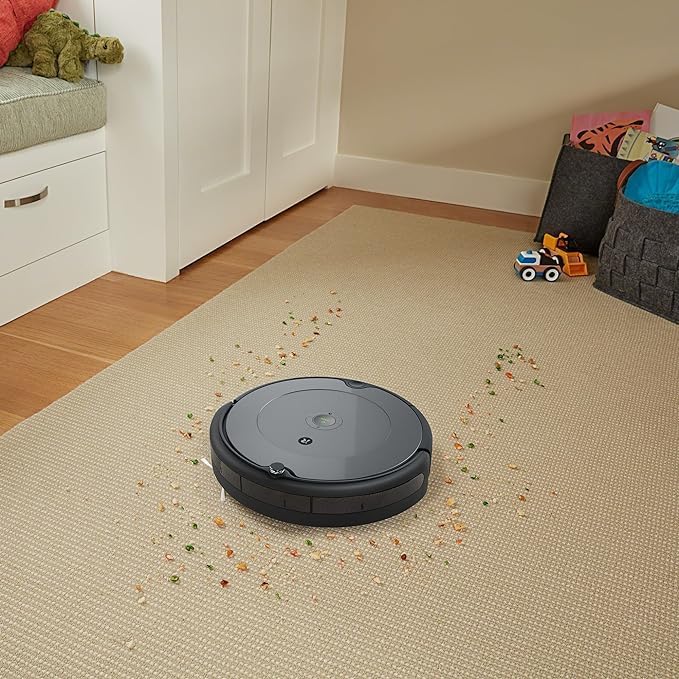
Image: The Roomba 697 actively cleaning a carpet, showing its effectiveness on scattered debris.
6. Vedligeholdelse
Regular maintenance is crucial for optimal performance of your Roomba 697. Always turn off the robot and unplug it from the Home Base before performing maintenance.
6.1 Tømning af støvbeholderen
- Press the bin release tab and pull the bin straight out.
- Open the bin door and empty all debris into a trash can.
- Tap the bin against the trash can to dislodge any remaining debris.
- Reinsert the bin into the robot until it clicks into place.
6.2 Rengøring af børsterne
The Roomba 697 features dual multi-surface brushes and a side brush.
- Multi-Surface Brushes: Pinch the yellow tabs on the brush frame, lift the frame, and remove the brushes. Remove any hair or debris wrapped around the brushes and their yellow caps. Reinstall the brushes.
- Sidebørste: Use a coin or small screwdriver to remove the screw holding the side brush. Remove any hair or debris from the brush and its post. Reinstall the brush.
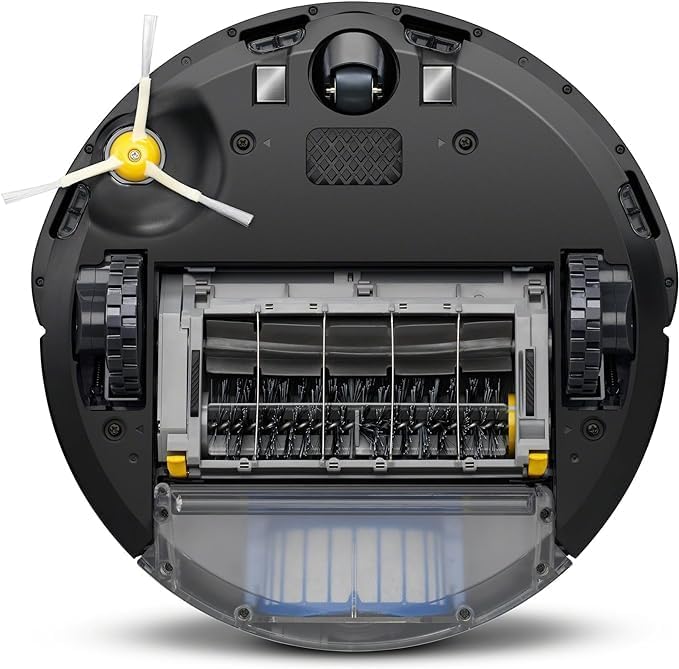
Image: The bottom of the Roomba 697, illustrating the brush system and dust bin.
6.3 Cleaning the Sensors
Wipe the following sensors with a clean, dry cloth:
- Cliff Sensors (located on the underside of the robot)
- Charging Contacts (on the robot and Home Base)
- Front Caster Wheel (remove and clean any hair or debris)
7. Fejlfinding
If your Roomba encounters an issue, it will play an audible alert and the CLEAN button light ring will flash. Consult the iRobot HOME App for more detailed information and troubleshooting steps.
| Problem | Mulig årsag | Løsning |
|---|---|---|
| Roomba not charging | Opladningskontakterne er snavsede eller forkert justerede. | Wipe charging contacts on both robot and Home Base. Ensure robot is properly seated. |
| Roomba gets stuck frequently | Loose cables, rugs with tassels, or cluttered areas. | Clear the cleaning area of obstacles. Use Virtual Wall barriers if needed. |
| Dårlig rengøringsydelse | Full dust bin, dirty brushes, or clogged filter. | Empty dust bin, clean brushes, and replace filter if necessary. |
| Robotten opretter ikke forbindelse til Wi-Fi | Forkert Wi-Fi-adgangskode, routerproblemer eller robotten er for langt fra routeren. | Verify Wi-Fi password, restart router, move robot closer to router, or try re-pairing via app. |
8. Specifikationer
| Feature | Detalje |
|---|---|
| Mærke | iRobot |
| Modelnavn | Roomba 697 |
| Speciel funktion | Continuous Suction |
| Farve | Lysegrå |
| Produktdimensioner | 33L x 33B x 7H cm |
| Forbindelse | Wi-Fi |
| Rengøringssystem | 3-Stage Rengøringssystem |
| Navigation | Advanced Sensors, Dirt Detect Technology |
9. Garanti og support
Your iRobot Roomba 697 comes with a limited warranty. Please refer to the warranty card included in your product packaging or visit the official iRobot webwebstedet for detaljerede garantivilkår og -betingelser, der er specifikke for din region.
For technical support, troubleshooting assistance, or to purchase replacement parts, please visit the iRobot support website or contact their customer service. You can find contact information and FAQs at www.irobot.com.


