Indledning
The Stanley FatMax SFMCH900B SDS-Plus Cordless Combination Hammer is a versatile and powerful tool designed for various drilling and chiseling applications. Its brushless motor technology ensures high performance, extended runtime, and maximum service life. This manual provides essential information for the safe and effective operation, setup, and maintenance of your tool.

Figure 1: Stanley FatMax SFMCH900B SDS-Plus Cordless Combination Hammer, showing its main body, auxiliary handle, and chuck.
Sikkerhedsoplysninger
Overhold altid grundlæggende sikkerhedsforanstaltninger for at reducere risikoen for brand, elektrisk stød og personskade, når du bruger elværktøj. Gem denne manual til senere brug.
- Sikkerhed på arbejdsområdet: Hold arbejdsområdet rent og godt oplyst. Brug ikke elværktøj i eksplosive atmosfærer, f.eks. i nærheden af brandfarlige væsker, gasser eller støv.
- Elektrisk sikkerhed: Undgå kropskontakt med jordforbundne overflader. Udsæt ikke elværktøj for regn eller våde forhold.
- Personlig sikkerhed: Brug altid øjenbeskyttelse, høreværn og passende arbejdshandsker. Klæd dig korrekt på; undgå løstsiddende tøj eller smykker.
- Brug og pleje af værktøj: Tving ikke elværktøjet. Brug det korrekte elværktøj til din opgave. Frakobl batteriet fra elværktøjet, før du foretager justeringer, skifter tilbehør eller opbevarer elværktøjet.
- Brug og vedligeholdelse af batteriværktøj: Genoplad kun med den oplader, der er angivet af producenten. Brug kun elværktøj med specifikt beregnede batteripakker.
Produkt overview og komponenter
Familiarize yourself with the key components of your Stanley FatMax SFMCH900B combination hammer.
- SDS-Plus Chuck
- Mode Selector Switch (Drill, Hammer Drill, Chisel)
- Hjælpehåndtag
- Dybdestop
- trigger Switch
- Batteriudløserknap
- Batteriport
- LED-batteriindikator

Figur 2: Side view of the combination hammer, highlighting the ergonomic design and main operational areas.
Opsætning
1. Installation og fjernelse af batteri
The tool operates on an 18V Stanley FatMax V20 Lithium-Ion battery (not included with the basic version).
- Installation: Align the battery pack with the battery port on the tool. Slide the battery pack into the tool until it clicks securely into place.
- Fjernelse: Press the battery release button (6) and pull the battery pack out of the tool.

Figure 3: Proper method for inserting the battery pack into the tool's base.

Figure 4: The 3-level LED indicator on the battery shows the remaining charge level.
2. Ekstra håndtagsmontering
The auxiliary handle provides additional control and stability during operation.
- Løsn hjælpehåndtaget ved at dreje det mod uret.
- Skub håndtaget på forsiden af værktøjshuset.
- Rotate the handle to the desired position for comfortable and secure grip.
- Tighten the handle by twisting it clockwise until it is firmly secured.

Figur 5: Justering af ekstrahåndtaget for optimalt greb og kontrol.
3. SDS-Plus Bit/Chisel Installation
This tool uses SDS-Plus bits for quick and secure accessory changes.
- Rengør skaftet på boret eller mejslet.
- Pull back the chuck collar (1) and insert the SDS-Plus bit into the chuck.
- Release the chuck collar. The bit should click into place. Pull on the bit to ensure it is securely locked. A slight axial play is normal for SDS-Plus systems.
- For at fjerne det, træk spændekraven tilbage og træk boret ud.

Figure 6: Inserting an SDS-Plus drill bit into the tool's chuck.
4. Justering af dybdestop
The depth stop allows for precise control over drilling depth.
- Insert the depth stop rod into the hole on the auxiliary handle.
- Adjust the rod to the desired drilling depth by sliding it in or out.
- Secure the depth stop by tightening the knob on the auxiliary handle.

Figure 7: Adjusting the depth stop for controlled drilling depth.
Driftstilstande
The SFMCH900B features a mode selector switch (2) to choose between different operating functions:

Figure 8: The mode selector switch allows selection of drilling, hammer drilling, or chiseling functions.
1. Hammer Drilling Mode (Hammer and Drill Bit Icon)
This mode is for drilling in concrete, masonry, and brick. It combines rotary action with powerful hammer blows for fast drilling progress.

Figure 9: Demonstrating hammer drilling into a wall.
2. Drilling Mode (Drill Bit Icon)
This mode provides rotary action only, suitable for drilling in wood, metal, plastics, and ceramics. The impact mechanism is disengaged.
3. Chiseling Mode (Chisel Icon)
This mode provides hammer action only with a rotary stop, ideal for light chiseling work in plaster, tiles, or for removing small amounts of material. Ensure a chisel bit is installed.
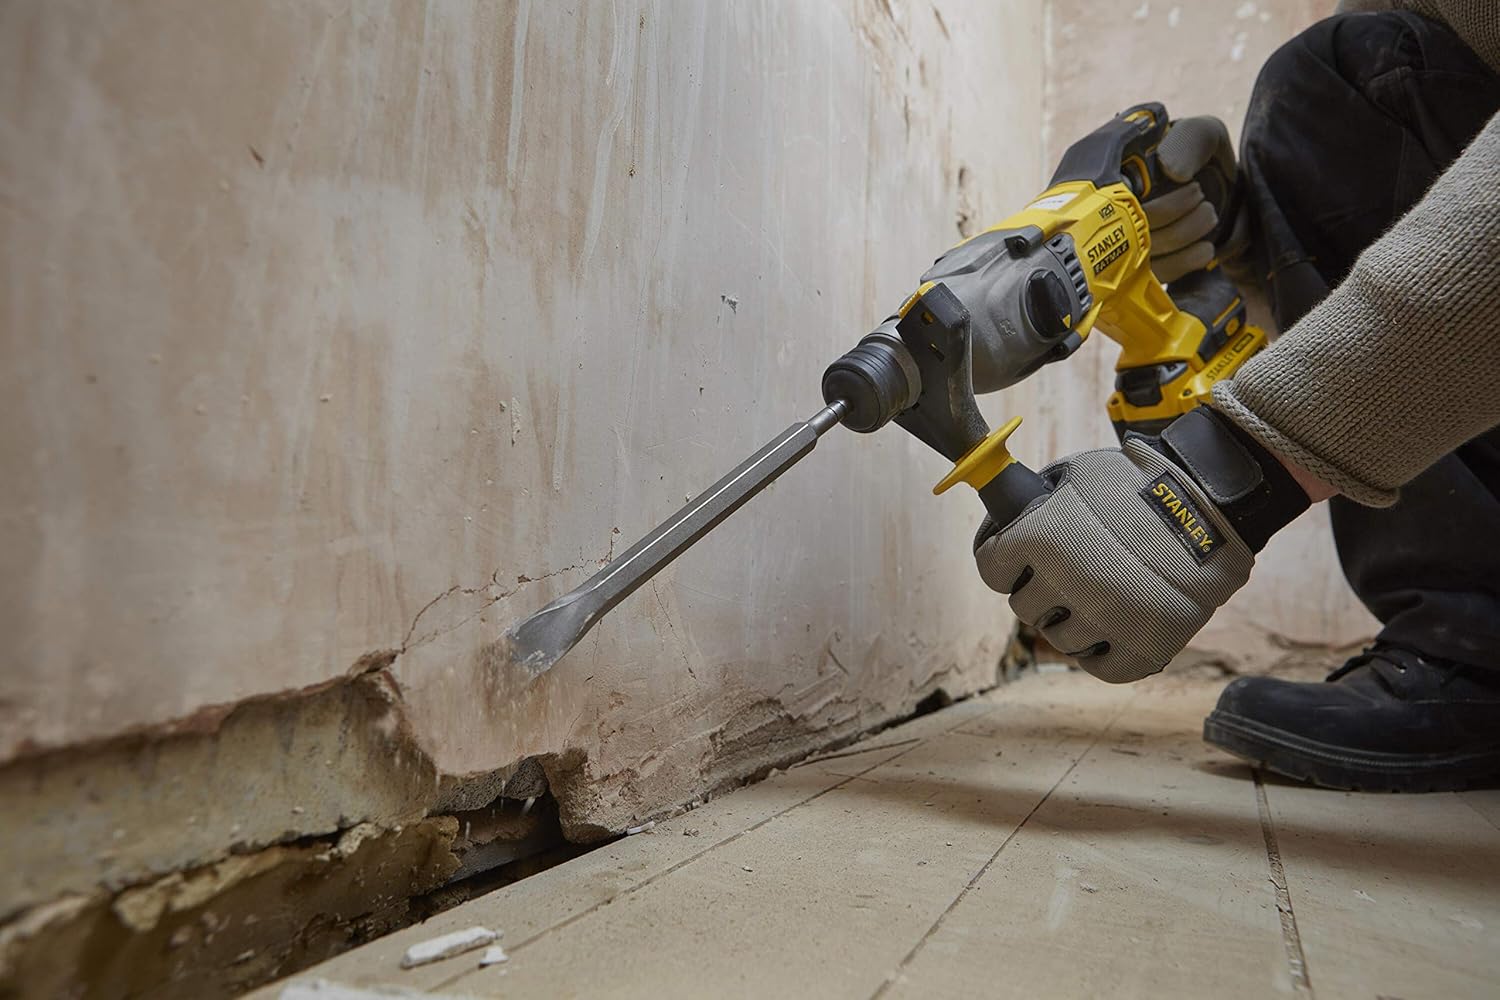
Figure 10: Performing light chiseling work with the tool.
To change modes, rotate the mode selector switch to the desired icon. Ensure the tool is off before changing modes.
Operation
Before starting any operation, ensure the work area is clear and you are wearing appropriate personal protective equipment.
- Start af værktøjet: Squeeze the trigger switch (5) to start the tool. The speed is variable depending on the pressure applied to the trigger.
- Stop værktøjet: Slip afbryderen for at stoppe værktøjet.
- Anvendelse af tryk: Apply steady, firm pressure to the tool. Do not lean into the tool excessively; let the hammer mechanism do the work.
- Overophedning: If the tool becomes excessively hot, run it without load for a few minutes to cool the motor.
Opretholdelse
Regelmæssig vedligeholdelse sikrer dit værktøjs levetid og optimale ydeevne.
- Rensning: Keep the ventilation slots clean and free from dust. Use a soft brush or dry cloth to clean the tool. Do not use water or chemical cleaners.
- Børsteløs motor: The brushless motor design significantly reduces maintenance requirements compared to traditional brushed motors, as there are no carbon brushes to replace.
- Opbevaring: Store the tool and battery in a cool, dry place, away from direct sunlight and moisture. Ensure the battery is removed from the tool before storage.
- Vedligeholdelse af tilbehør: Keep drill bits and chisels clean and sharp for best performance.

Figure 11: Storing the tool and accessories in a compatible TSTAK case for protection and organization.
Fejlfinding
| Problem | Mulig årsag | Løsning |
|---|---|---|
| Værktøjet starter ikke. | Batteriet er ikke opladet eller ikke isat korrekt. | Sørg for, at batteriet er fuldt opladet og isat sikkert. |
| Reduceret boreydelse. | Sløvt eller forkert bor; forkert tilstand valgt. | Replace with a sharp, appropriate bit. Verify mode selector is in the correct position. |
| Værktøjet overopheder. | Vedvarende kraftig brug; blokeret ventilation. | Allow tool to cool down. Clear ventilation slots. Reduce load. |
| Bit låser ikke i borepatronen. | Chuck collar not pulled back sufficiently; debris in chuck. | Pull chuck collar fully back. Clean chuck and bit shank. |
Specifikationer
| Feature | Specifikation |
|---|---|
| Mærke | STANLEY FATMAX |
| Modelnummer | SFMCH900B-XJ |
| Strømkilde | Batteridrevet |
| Voltage | 18 volt |
| Effektenergi | 2.0 Joule |
| Motortype | Børsteløs motor |
| Maks. borekapacitet (metal) | 22 millimeter |
| Hastighed | 2200 RPM |
| Varens vægt | 2.84 kilo (6.25 pund) |
| Produktdimensioner | 15.75 cm L x 6.3 cm B x 10.04 cm H |
| Materiale | Rubber (Handle and Grip), Metal (Body, Chuck, Key Components) |
| Inkluderede komponenter | Cordless combination hammer (Battery and Charger Not Included in basic version) |
Garanti og support
For warranty information, technical support, or service inquiries, please refer to the official STANLEY FATMAX webwebstedet eller kontakt deres kundeserviceafdeling. Gem din købsbevis til garantikrav.
Fabrikant: Stanley


