1. Vigtige sikkerhedsinstruktioner
Please read all instructions carefully before using the appliance and retain for future reference. Always follow basic safety precautions when using electrical appliances.
- Nedsænk ikke apparatet, ledningen eller stikket i vand eller anden væske.
- Sørg for, at voltage angivet på apparatet svarer til din lokale netspændingtage før tilslutning.
- Tæt opsyn er nødvendigt, når et apparat bruges af eller i nærheden af børn.
- Træk stikket ud af stikkontakten, når det ikke er i brug, og før rengøring. Lad det køle af, før du sætter dele på eller af.
- Betjen ikke noget apparat med en beskadiget ledning eller stik, eller efter at apparatet ikke fungerer korrekt eller er blevet beskadiget på nogen måde.
- Placer ikke apparatet op ad en væg eller op ad andre apparater. Der skal være mindst 10 cm fri plads på bagsiden og siderne og 10 cm fri plads over apparatet.
- Anbring ikke noget oven på apparatet.
- Brug ikke apparatet til andre formål end beskrevet i denne vejledning.
- Der skal udvises ekstrem forsigtighed ved flytning af et apparat, der indeholder varm olie eller andre varme væsker.
- Apparatet er kun til husholdningsbrug.
2. Produktet er slutview
2.1 Nøglefunktioner
- Large digital touch display for instant cooking mode adjustments.
- Smart knob for easy start/stop and precise time/temperature control.
- Powerful 1800W heating element with rapid hot air circulation for perfect cooking.
- Temperature range: 65-200°C for cooking, 30-80°C for dehydration.
- 8 preset cooking settings for various meals including chicken, seafood, and desserts.
- Spacious 12L cooking capacity with 3 rack levels for family-sized portions.
- Interior light to monitor cooking progress.
- Dishwasher-safe accessories for easy cleaning.
- Sleek black body with cool-touch silver handle.
- EU certified, LFGB food-safe material, PFOA and PTFE free.
2.2 Komponenter og tilbehør
Familiarize yourself with the main unit and included accessories:


Apparatet leveres med følgende tilbehør:
- 3 x Removable Air Flow Racks
- 1 x Rotisserie Spit and Forks
- 1 x Rotating Basket
- 1 x Retrieval Tool
- 1 x Removable Drip Tray
3. Opsætning og første brug
3.1 Udpakning
- Fjern forsigtigt al emballage og reklamemærkater fra airfryeren.
- Remove all accessories from inside the appliance.
- Gem emballagematerialerne til senere opbevaring eller bortskaffelse.
3.2 Rengøring før første brug
- Tør airfryerens yderside af med en ren, tør klud.amp klæde.
- Wash all removable accessories (air flow racks, rotisserie spit, rotating basket, drip tray) with warm, soapy water. Rinse thoroughly and dry completely. All accessories are dishwasher safe.
- Nedsænk ikke hovedenheden i vand.
3.3 Placering
- Placer airfryeren på en stabil, jævn, varmebestandig overflade.
- Ensure there is at least 10 cm of clear space around the back and sides, and 10 cm above the appliance for proper ventilation.
- Placer ikke airfryeren i nærheden af brandfarlige materialer eller varmekilder.
4. Betjeningsvejledning
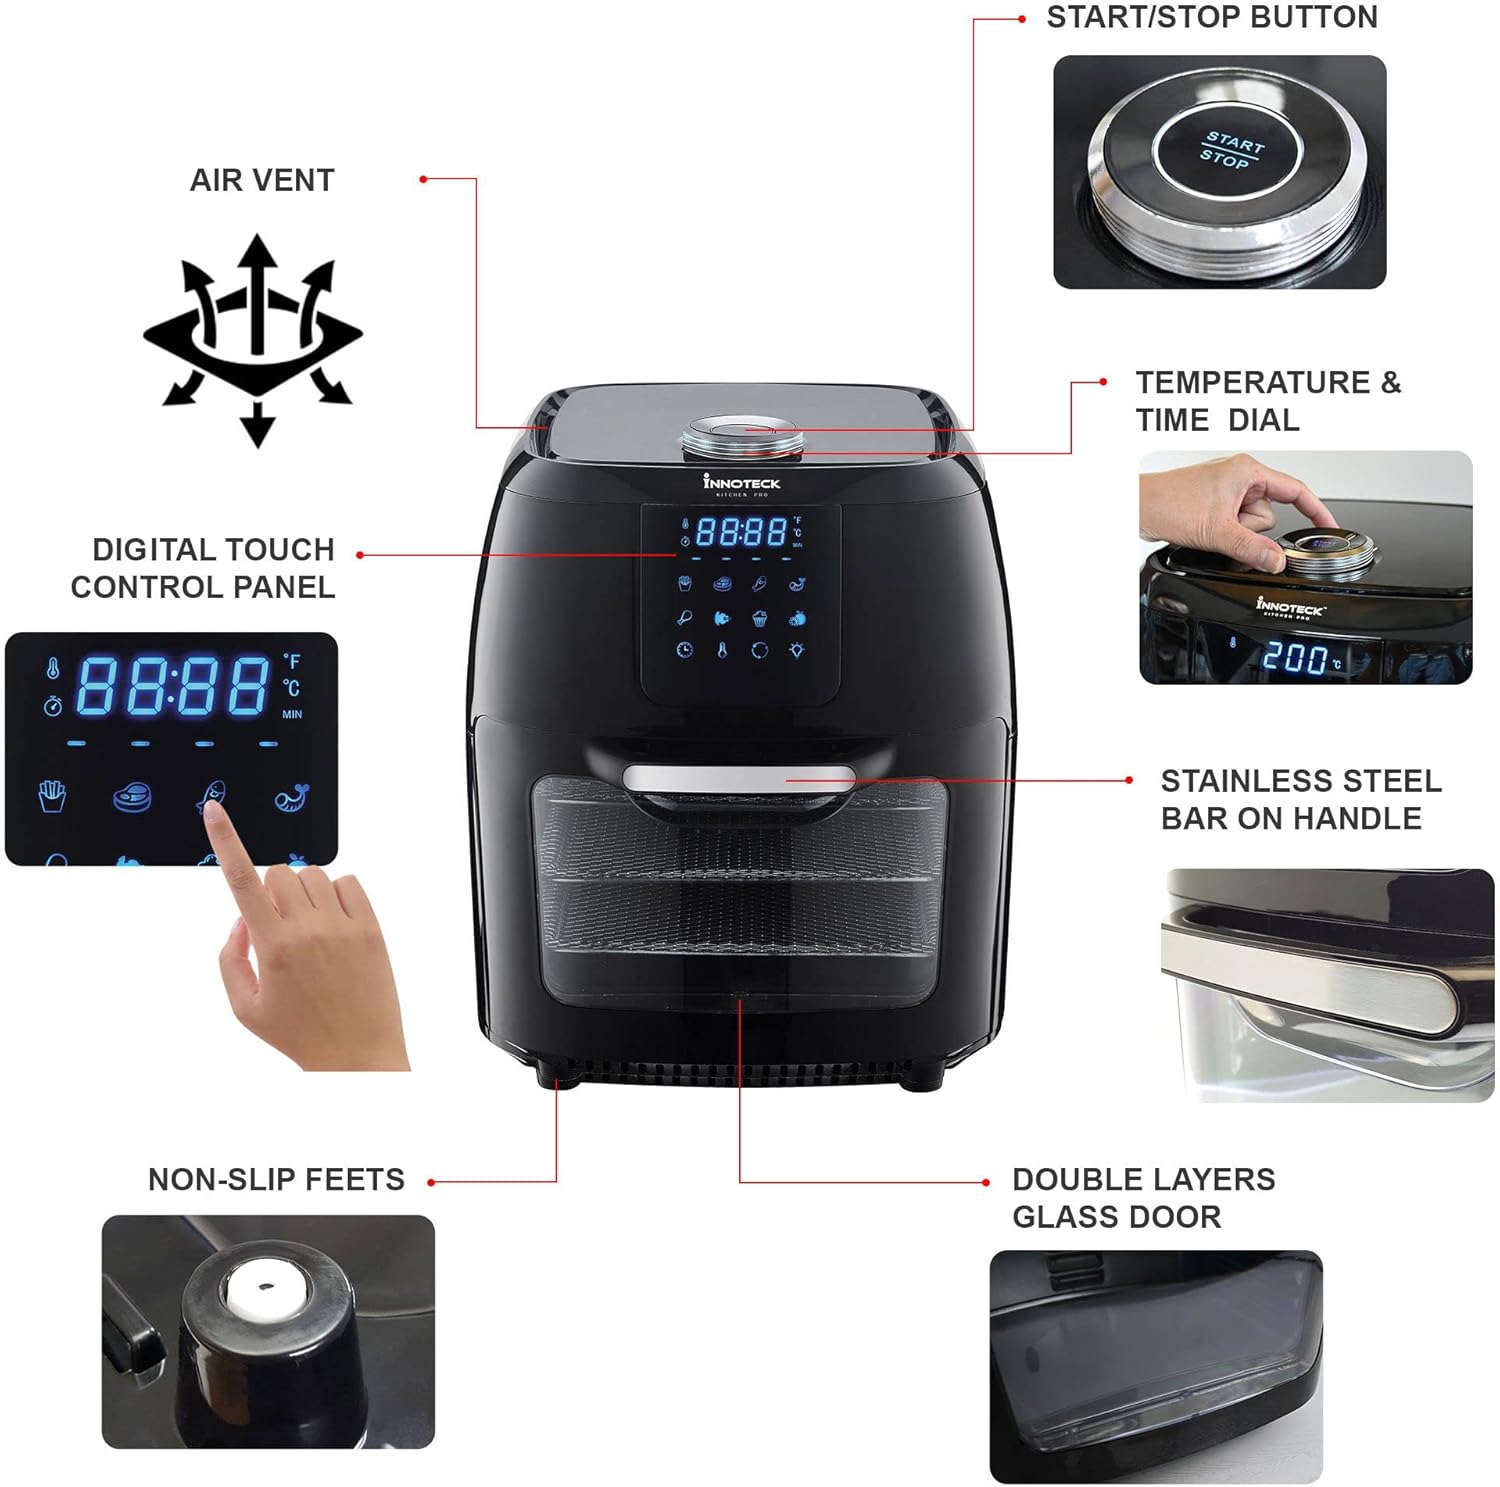
4.1 Digital kontrolpanel
The air fryer features a large digital touch display and a smart knob for intuitive control. Refer to Figure 2.2 for a visual guide.
- Power knap: Tryk for at tænde/slukke enheden.
- Forudindstillede ikoner: Touch an icon to select a pre-programmed cooking mode (e.g., Fries, Meat, Fish, Shrimp, Chicken, Rotisserie, Bake, Dehydrate).
- Temperatur-/tidsvisning: Viser den aktuelle temperatur og den resterende tilberedningstid.
- Smart Knob: Rotate to adjust temperature or time. Press to confirm selection or to start/pause cooking.
- Knap til intern lys: Tryk for at tænde/slukke det indvendige lys.
- Roter knap: Activates the rotisserie function for the rotating basket or rotisserie spit.
4.2 Cooking with Presets
The air fryer includes 8 optimized cooking presets for convenience:

- Place food inside the air fryer using the appropriate accessory (rack, basket, or spit).
- Luk apparatdøren forsvarligt.
- Tryk på tænd/sluk-knappen for at tænde for skærmen.
- Touch the desired preset icon on the digital display. The air fryer will automatically set the optimal temperature and time for that food type.
- If desired, you can adjust the preset time or temperature by rotating the smart knob.
- Press the smart knob or the Start/Stop button to begin cooking.
- The interior light can be turned on/off to check cooking progress.
- Når tilberedningen er færdig, bipper airfryeren og slukker automatisk.
4.3 Manuel madlavning
- Place food inside the air fryer and close the door.
- Tryk på Power-knappen.
- Rotate the smart knob to set the desired temperature (65-200°C). Press the knob to confirm.
- Rotate the smart knob again to set the desired cooking time. Press the knob to confirm and start cooking.
4.4 Brug af rotisseriefunktionen
The rotisserie function is ideal for whole chickens or using the rotating basket for fries or nuts.
- Prepare your food and secure it onto the rotisserie spit or place it inside the rotating basket.
- Insert the rotisserie assembly into the air fryer's internal slots.
- Select a cooking preset or set manual temperature and time.
- Press the 'Rotate' button on the control panel to activate the rotation.
- Monitor cooking through the glass door and interior light.
- Once cooking is complete, use the retrieval tool to safely remove the hot rotisserie assembly.
5. Vedligeholdelse og rengøring
Regelmæssig rengøring vil sikre din airfryers lange levetid og optimale ydeevne.
- Tag altid stikket ud af airfryeren, og lad den køle helt af, inden du rengør den.
- Hovedenhed: Tør det udvendige af med adamp klæde. Brug ikke slibende rengøringsmidler eller nedsænk i vand.
- Indre: Tør indvendigt af med adamp cloth and mild detergent if necessary. For stubborn food residue, use a non-abrasive sponge.
- Tilbehør: All removable accessories (air flow racks, rotisserie spit, rotating basket, drip tray) are dishwasher safe. Alternatively, wash them with warm, soapy water, rinse, and dry thoroughly.
- Drypbakke: Empty and clean the drip tray after each use to prevent smoke and odors.
- Sørg for, at alle dele er helt tørre, før du opbevarer eller bruger apparatet igen.
6. Fejlfinding
If you encounter any issues, please refer to the table below before contacting customer support.
| Problem | Mulig årsag | Løsning |
|---|---|---|
| Airfryer tænder ikke. | Appliance not plugged in; Power outlet not working; Power button not pressed. | Ensure plug is securely in outlet; Test outlet with another appliance; Press the Power button on the control panel. |
| Maden tilberedes ikke jævnt. | Too much food in the basket/on racks; Food not shaken/rotated during cooking; Incorrect temperature/time. | Cook in smaller batches; Shake/rotate food halfway through cooking; Adjust temperature and time as needed. |
| Der kommer hvid røg fra apparatet. | Grease residue from previous use; Fatty food being cooked. | Clean the drip tray and interior thoroughly; For fatty foods, add a small amount of water to the drip tray to prevent smoke. |
| Maden er ikke sprød. | Not enough oil (if applicable); Temperature too low; Cooking time too short. | Pensl maden let med olie; Øg temperaturen eller tilberedningstiden. |
7. Specifikationer
Detailed technical specifications for the Innoteck Kitchen Pro 12L Digital Air Fryer.

| Feature | Detalje |
|---|---|
| Mærke | Innoteck |
| Modelnummer | DS-5894 |
| Farve | Sort & Sølv |
| Produktmål (L x B x H) | 31 x 32 x 39 cm |
| Kapacitet | 12 liter |
| Strøm / Wattage | 1800 watt |
| Voltage | 230 volt |
| Materiale | Aluminium |
| Særlige funktioner | Temperaturkontrol |
| Varens vægt | 9.1 kilo |
| Anbefalede anvendelser | Roasting, Dehydrating, Baking |
| Første ledige dato | 13. maj 2022 |
8. Garanti og support
Your Innoteck Kitchen Pro 12L Digital Air Fryer comes with a standard manufacturer's warranty. Please refer to the warranty card included in your product packaging for specific terms and conditions.
For technical support, troubleshooting assistance, or warranty claims, please contact Innoteck Customer Service:
- Webwebsted: Visit the official Innoteck webwebsted for ofte stillede spørgsmål og supportressourcer.
- E-mail: Refer to your warranty card for the dedicated support email address.
- Telefon: Contact numbers may vary by region; please check the product packaging or website for local support lines.
When contacting support, please have your model number (DS-5894) and purchase date ready.


