1. Introduktion
This manual provides detailed instructions for the installation, operation, and maintenance of the Nivian NVS-SMARTSWITCH-W Smart WiFi Universal Switch. Please read this manual thoroughly before using the device to ensure proper functionality and safety.
2. Sikkerhedsoplysninger
- Installationen skal udføres af en kvalificeret elektriker eller i overensstemmelse med lokale el-forskrifter.
- Sørg for, at strømforsyningen er afbrudt før installation eller vedligeholdelse for at forhindre elektrisk stød.
- Overskrid ikke den maksimale belastningskapacitet på 10A / 2300W.
- Udsæt ikke enheden for fugt eller ekstreme temperaturer.
- Denne enhed er kun designet til indendørs brug.
3. Produktet er slutview
The Nivian NVS-SMARTSWITCH-W is a compact, intelligent WiFi switch designed to integrate into your existing electrical system, allowing you to control connected devices remotely via a smartphone application or set up automated schedules. Its small form factor allows for discreet installation.
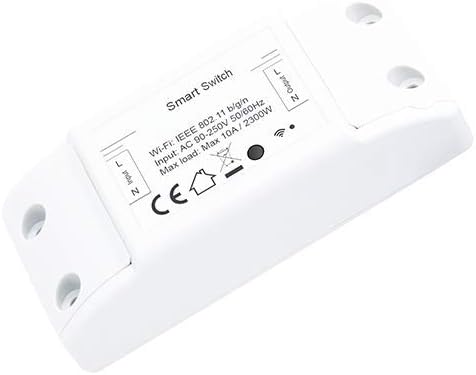
Figur 1: Nivian NVS-SMARTSWITCH-W Smart WiFi Universal Switch. The device features clearly labeled input (L, N) and output (L, N) terminals for wiring. Key specifications visible on the label include Wi-Fi standard (IEEE 802.11 b/g/n), input voltage (AC 90-250V 50/60Hz), and maximum load (Max 10A / 2300W). A Wi-Fi indicator and CE certification mark are also present.
4. Opsætning
4.1. Ledningsdiagram
Before proceeding, ensure the main power supply is turned off at the circuit breaker.
- Identify the Live (L) and Neutral (N) wires from your power source.
- Connect the Live (L) wire from the power source to the 'Input L' terminal on the switch.
- Connect the Neutral (N) wire from the power source to the 'Input N' terminal on the switch.
- Connect the Live (L) wire of the appliance or light fixture to be controlled to the 'Output L' terminal on the switch.
- Connect the Neutral (N) wire of the appliance or light fixture to the 'Output N' terminal on the switch.
- Fastgør alle forbindelser forsvarligt.
Refer to Figure 1 for a visual representation of the input and output terminals on the device.
4.2. Appinstallation og parring
- Download the appropriate smart home application (e.g., Tuya Smart, Smart Life) from your smartphone's app store (iOS or Android).
- Register or log in to your account within the application.
- Restore power to the switch at the circuit breaker. The Wi-Fi indicator on the switch should begin to blink rapidly, indicating it is in pairing mode. If not, press and hold the reset button (if available) for 5-10 seconds until it blinks rapidly.
- I appen skal du trykke på 'Tilføj enhed' eller på '+'-ikonet.
- Select 'Electrical Switch' or a similar category.
- Follow the on-screen instructions to connect the switch to your 2.4GHz Wi-Fi network. Ensure your smartphone is also connected to the same 2.4GHz Wi-Fi network during pairing.
- Once successfully paired, the Wi-Fi indicator will stop blinking and remain solid. You can now rename the device in the app for easier identification.
5. Betjeningsvejledning
5.1. Grundlæggende tænd/sluk-kontrol
Once paired, you can control the connected appliance or light fixture directly from the smart home application. Tap the device icon to toggle it on or off.
5.2. Timer funktion
The app allows you to set various schedules and timers for your switch:
- Skema: Set specific times for the switch to turn on or off daily or on selected days of the week.
- Nedtælling: Indstil en timer, så kontakten slukker efter en bestemt periode.
- Loop-timer: Configure the switch to cycle on and off repeatedly for set intervals.
5.3. App Control and Automation
Beyond basic control, the smart home app offers advanced features:
- Fjernbetjening: Control your switch from anywhere with an internet connection.
- Sceneoprettelse: Group multiple smart devices and control them with a single tap or voice command.
- Automatisering: Create rules for the switch to react to environmental conditions (e.g., turn on at sunset) or other smart devices.
- Stemmestyring: Integrate with popular voice assistants (e.g., Amazon Alexa, Google Assistant) for hands-free control.
6. Vedligeholdelse
- Hold enheden ren og fri for støv. Brug en tør, blød klud til rengøring.
- Regularly check the app for firmware updates to ensure optimal performance and security.
- Forsøg ikke selv at skille enheden ad eller reparere den. Kontakt kundesupport, hvis der opstår problemer.
7. Fejlfinding
- Enheden tænder ikke: Check wiring connections and ensure the circuit breaker is on.
- Kan ikke oprette forbindelse til Wi-Fi:
- Sørg for, at dit Wi-Fi-netværk er 2.4 GHz. 5 GHz-netværk understøttes ikke.
- Bekræft, at Wi-Fi-adgangskoden er korrekt.
- Flyt kontakten tættere på din Wi-Fi-router.
- Reset the switch by holding the reset button for 5-10 seconds until the Wi-Fi indicator blinks rapidly, then attempt pairing again.
- Enheden reagerer ikke i appen: Check your internet connection and ensure the switch's Wi-Fi indicator is solid, indicating a stable connection.
- Timer functions not working: Ensure the device's time zone is correctly set in the app.
8. Specifikationer
| Feature | Specifikation |
|---|---|
| Modelnummer | NVS-SMARTSWITCH-W |
| Varenummer | 53101-DI |
| Input bindtage | AC 90-250V 50/60Hz |
| Max belastning | 10A / 2300W |
| Wi-Fi-standard | IEEE 802.11 b/g/n (2.4GHz only) |
| Dimensioner | 9.6 x 7.7 x 2.9 cm |
| Vægt | 90 g |
| Batterier påkrævet | Ingen |
9. Garanti og support
Nivian products are designed for reliability and performance. For warranty information, please refer to the documentation provided at the time of purchase or visit the official Nivian website. If you encounter any issues or require technical assistance, please contact Nivian customer support through their official channels.


