1. Introduktion
This instruction manual provides essential information for the proper installation, operation, and maintenance of the PARTS 141-000045-962 Printhead. This printhead is specifically designed for use with Intermec PD41 and PD42 Thermal Label Printers, offering a 300dpi print resolution. Please read this manual thoroughly before installation to ensure optimal performance and longevity of your printhead.
2. Produktet er slutview
The 141-000045-962 Printhead is a genuine replacement component for Intermec PD41 and PD42 thermal label printers. It is engineered to deliver high-quality 300 dots per inch (dpi) resolution printing. This printhead is crucial for maintaining the print quality and efficiency of your thermal label printer.
Vigtig kompatibilitetsbemærkning:
This printhead is designed exclusively for Intermec PD41 and PD42 printers with 300dpi resolution. It is ikke kompatibel with Intermec PD41 or PD42 printers that operate at 203dpi, nor is it compatible with the Intermec PD43 printer. Verify your printer's specifications before proceeding with installation.

Figur 2.1: Forside view of the PARTS 141-000045-962 Printhead. This image shows the main body of the printhead, featuring its metallic casing and the visible print element.
3. Opsætning og installation
Installation of a printhead requires careful handling and adherence to the printer's specific service procedures. It is recommended that this procedure be performed by a qualified technician. Always refer to your Intermec PD41 or PD42 printer's service manual for detailed, step-by-step instructions.
3.1. Udpakning
Upon receiving your package, ensure it contains the following:
- 1x PARTS 141-000045-962 Thermal Genuine Printhead 300dpi
Inspect the printhead for any visible damage that may have occurred during shipping. If any damage is found, contact your supplier immediately.
3.2. Trin før installation
- Sluk: Completely power off and unplug the Intermec PD41 or PD42 printer from its power source.
- Køl ned: Allow the printer to cool down for at least 15 minutes if it has been recently in operation, as the old printhead can be hot.
- Adgang: Open the printer's cover to access the printhead assembly.
- Jording: Brug en antistatisk håndledsrem for at forhindre elektrostatisk udladning (ESD) på følsomme elektroniske komponenter.
3.3. Printhead Replacement
The general steps for replacing a printhead typically involve:
- Afbryd kabler: Carefully disconnect any ribbon cables or connectors attached to the old printhead.
- Fjern gammelt printhoved: Unlatch or unscrew the old printhead from its mounting bracket. Handle the old printhead carefully, as it may contain residual ink or thermal coating.
- Installer nyt printhoved: Position the new 141-000045-962 Printhead into the mounting bracket. Ensure it is seated correctly and securely.
- Tilslut kabler: Reconnect all cables and connectors to the new printhead, ensuring they are firmly attached and correctly oriented.
- Sikker: Fasten any latches or screws to secure the new printhead in place.

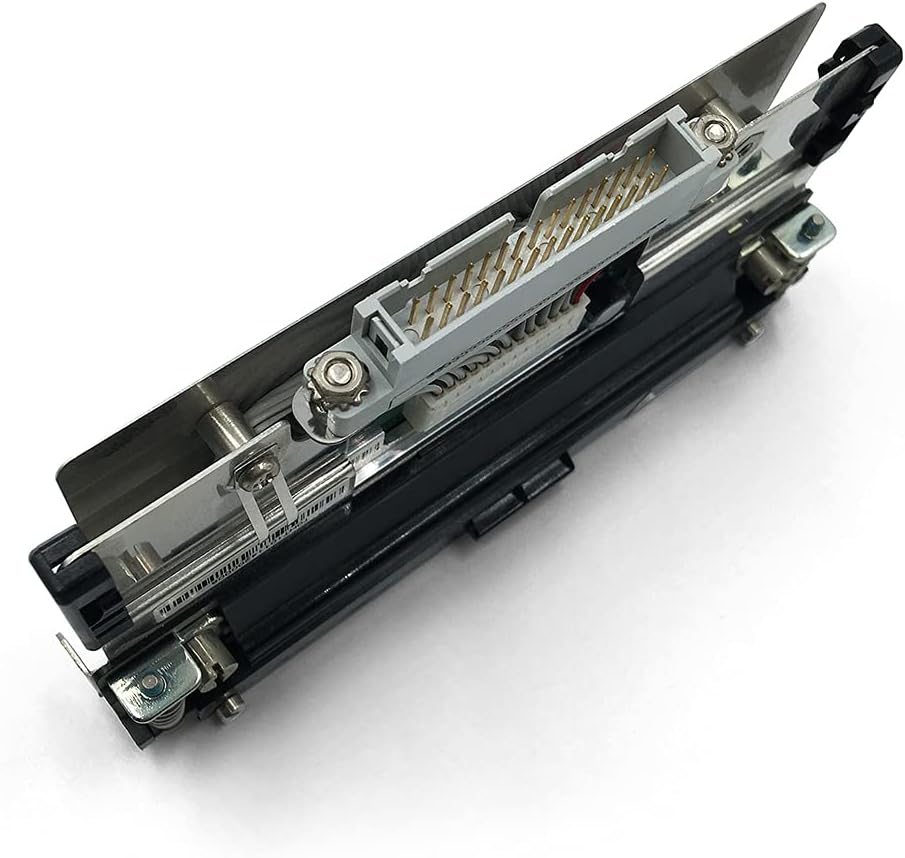
Figur 3.1: Vinklet view of the printhead, highlighting the electrical connector pins. Ensure these pins align correctly with the printer's receptacle during installation.
3.4. Efterinstallation
- Luk låg: Close the printer's cover.
- Tænd: Plug in the printer and power it on.
- Calibration/Test Print: Perform a calibration or test print according to your printer's manual to verify proper installation and print quality.
4. Betjeningsvejledning
As a component, the printhead itself does not have direct operating controls. Its function is integrated into the Intermec PD41 or PD42 thermal label printer. Once correctly installed, the printhead operates automatically as part of the printer's normal printing process.
Refer to your Intermec PD41 or PD42 printer's user manual for instructions on loading media, configuring print settings, and initiating print jobs.
5. Vedligeholdelse
Proper maintenance extends the life of your printhead and ensures consistent print quality. Always power off and unplug the printer before performing any maintenance.
5.1. Cleaning the Printhead
Dust, adhesive residue, and debris can accumulate on the printhead, leading to poor print quality or damage. Clean the printhead regularly, especially when changing label rolls or if print quality degrades.
- Use a lint-free cloth or a specialized printhead cleaning wipe.
- Apply a small amount of isopropyl alcohol (99% pure) to the cloth/wipe.
- Gently wipe the printhead's thermal element from one end to the other. Avoid touching the element with bare hands.
- Allow the printhead to dry completely before closing the printer cover and powering it on.

Figur 5.1: Side view of the printhead, illustrating the thermal element (the green strip) which is responsible for transferring heat to the thermal labels. This area requires careful cleaning.
5.2. Forebyggelse af skader
- Undgå at bruge slibende materialer eller skrappe kemikalier til rengøring.
- Ensure labels and ribbons are properly loaded to prevent creasing or tearing that could scratch the printhead.
- Do not touch the printhead's thermal element with your fingers, as oils and dirt can cause damage.
6. Fejlfinding
If you experience issues after installing the new printhead, consider the following common problems and solutions:
| Problem | Mulig årsag | Løsning |
|---|---|---|
| No print or blank labels | Printhead not properly seated; cables loose; incorrect media type. | Verify printhead installation and cable connections. Ensure you are using thermal labels. |
| Poor print quality (faded, lines, gaps) | Dirty printhead; damaged printhead element; incorrect print settings. | Clean the printhead (refer to Section 5.1). Check printer settings for darkness and speed. If issues persist, the printhead may be damaged. |
| Printer error messages related to printhead | Printhead not recognized; incorrect printhead type. | Ensure the printhead is fully compatible (300dpi for PD41/PD42). Reinstall the printhead. Consult your printer's manual for specific error codes. |
If troubleshooting steps do not resolve the issue, contact customer support or a qualified service technician.
7. Specifikationer
| Feature | Detalje |
|---|---|
| Varenummer | 141-000045-962 |
| Mærke | DELE |
| Kompatibilitet | Intermec PD41, Intermec PD42 (300dpi models only) |
| Opløsning | 300dpi (dots per inch) |
| Udskrivningsteknologi | Termisk |
| UPC | 880828192657 |
| ASIN | B087RLJ2RV |
Figur 7.1: Nederst view of the printhead, displaying the array of electrical contacts. These contacts facilitate communication and power delivery from the printer to the printhead.
8. Garanti og support
8.1. Garantioplysninger
This PARTS Genuine Printhead comes with a 3 måneders garanti from the date of purchase. This warranty covers manufacturing defects. Damage resulting from improper installation, misuse, accident, or unauthorized repair is not covered.
8.2. Kundesupport
For any product problems, questions, or concerns, please contact your supplier or the manufacturer's customer service. The supplier, GETPARTS Printer's Parts, offers a return and refund policy if the purchase is not satisfactory for any reason. Please reach out to them directly for assistance.
When contacting support, please have your purchase details, the printhead's part number (141-000045-962), and your printer model (Intermec PD41 or PD42 300dpi) readily available.


