1. Introduktion
This manual provides comprehensive instructions for the assembly, operation, and maintenance of your Yaheetech Magnetic Bicycle Trainer Stand. Please read this manual thoroughly before initial use to ensure proper setup and safe operation. Retain this manual for future reference.
2. Sikkerhedsoplysninger
- Ensure the trainer is placed on a flat, stable surface.
- Verify that your bicycle is securely mounted before beginning any training session.
- Hold børn og kæledyr væk fra træneren under brug.
- Wear appropriate cycling attire, including a helmet, even when training indoors.
- Do not touch the resistance unit or roller during or immediately after use, as they may be hot.
- Regularly inspect the trainer for any signs of wear or damage. Do not use if damaged.
3. Pakkens indhold
Før montering skal du sørge for, at alle komponenter er til stede:
- Bicycle Trainer Frame
- Magnetic Resistance Unit
- Quick Release spyd
- Forhjulsforhøjerblok
- Adjustable Foot Pads (pre-installed or separate)

Billede 3.1: Overview of the trainer stand components including the frame, resistance unit, quick release lever, and front wheel riser block.
4. Opsætningsvejledning
Follow these steps to assemble and set up your bicycle trainer stand:
- Fold rammen ud: Carefully unfold the trainer stand frame until it locks into its stable M-shape position.
- Juster fodpuderne: Ensure the four anti-slip foot pads are properly adjusted to level the trainer on your floor. Rotate the caps to select the appropriate thickness for stability.
- Install Quick Release Skewer: Replace your bicycle's rear wheel skewer with the provided quick-release skewer. This ensures a secure fit in the trainer.
- Mount Bicycle:
- Position your bicycle's rear wheel axle into the clamps on the trainer stand.
- Spænd clamps using the adjustment knobs on both sides until the bicycle is held firmly.
- Ensure the quick-release skewer is fully engaged and secured.

Image 4.1: A bicycle securely mounted on the trainer stand, ready for use.
- Position Front Wheel Riser Block: Place the front wheel riser block under your bicycle's front wheel. The curved groove in the block helps align and stabilize the front wheel, ensuring a level riding position.
- Adjust Resistance Unit: Adjust the pressure regulating device to ensure the roller of the magnetic resistance unit makes firm contact with the rear tire. This contact should be sufficient to prevent slippage during pedaling.

Image 4.2: The complete Yaheetech Bicycle Trainer Stand assembly, including the quick release skewer and front wheel riser block.
5. Betjeningsvejledning
Once the trainer is set up and your bicycle is securely mounted, you can begin your indoor cycling session.
- Start Cycling: Begin pedaling as you would on a regular bicycle. The magnetic resistance unit will provide a consistent workout.
- Juster modstand: The resistance level is primarily controlled by your bicycle's gears. Shift gears on your bike to increase or decrease the effort required.
- Oprethold stabilitet: Always maintain a balanced posture while cycling. The M-shaped design of the stand provides enhanced stability.

Image 5.1: An individual using the Yaheetech bicycle trainer for an indoor workout.
6. Vedligeholdelse
Regular maintenance ensures the longevity and optimal performance of your trainer stand.
- Rensning: Wipe down the trainer frame and resistance unit with a damp en klud efter hver brug for at fjerne sved og støv. Undgå slibende rengøringsmidler.
- Inspektion: Periodically check all bolts, nuts, and adjustment knobs to ensure they are tight and secure.
- Dæktilstand: Ensure your bicycle tire is clean and free of debris before mounting it on the trainer to prevent excessive wear on the roller. Consider using a dedicated trainer tire for reduced noise and extended tire life.
- Opbevaring: When not in use, the trainer can be folded for convenient storage. Store in a dry, cool place away from direct sunlight.

Image 6.1: The trainer stand in its folded configuration, demonstrating its compact storage capability.
7. Fejlfinding
This section addresses common issues you might encounter with your bicycle trainer stand.
- Overdreven støj:
- Årsag: The primary source of noise often comes from the bicycle tire rubbing against the resistance roller. Knobby mountain bike tires can be particularly noisy.
- Løsning: Use a smooth road bike tire or a dedicated trainer tire. Ensure the tire pressure is adequate. Placing the trainer on a mat can also help absorb vibrations and reduce noise.

Image 7.1: A chart illustrating typical noise levels for bicycle trainers, indicating that tire type significantly impacts sound output.
- Bicycle Slipping on Roller:
- Årsag: Insufficient pressure between the tire and the resistance roller.
- Løsning: Ensure the pressure regulating device is tightened sufficiently so the roller makes firm contact with the tire. Check tire pressure.
- Trainer Instability:
- Årsag: Uneven floor surface or improperly adjusted foot pads.
- Løsning: Adjust the rotating foot pads to compensate for uneven surfaces and ensure the trainer is level and stable.
8. Specifikationer
| Feature | Detalje |
|---|---|
| Model | YA-00096352 |
| Materiale | Iron, Steel Alloy, Aluminum |
| Farve | Sort |
| Modstandsmekanisme | Magnetisk |
| Kompatible hjulstørrelser | 26" - 28" and 700C |
| Maks. Belastningskapacitet | 120 kg (264 lbs) |
| Produktmål (L x B x H) | 54.5 x 60.5 x 37.5 cm (21.5 x 23.8 x 14.8 tommer) |
| Foldede mål (L x B x H) | 54.5 x 18 x 44 cm (21.5 x 7.1 x 17.3 tommer) |
| Vægt | 6.26 kg (13.8 lbs) |

Image 8.1: Detailed dimensions of the trainer stand for reference.
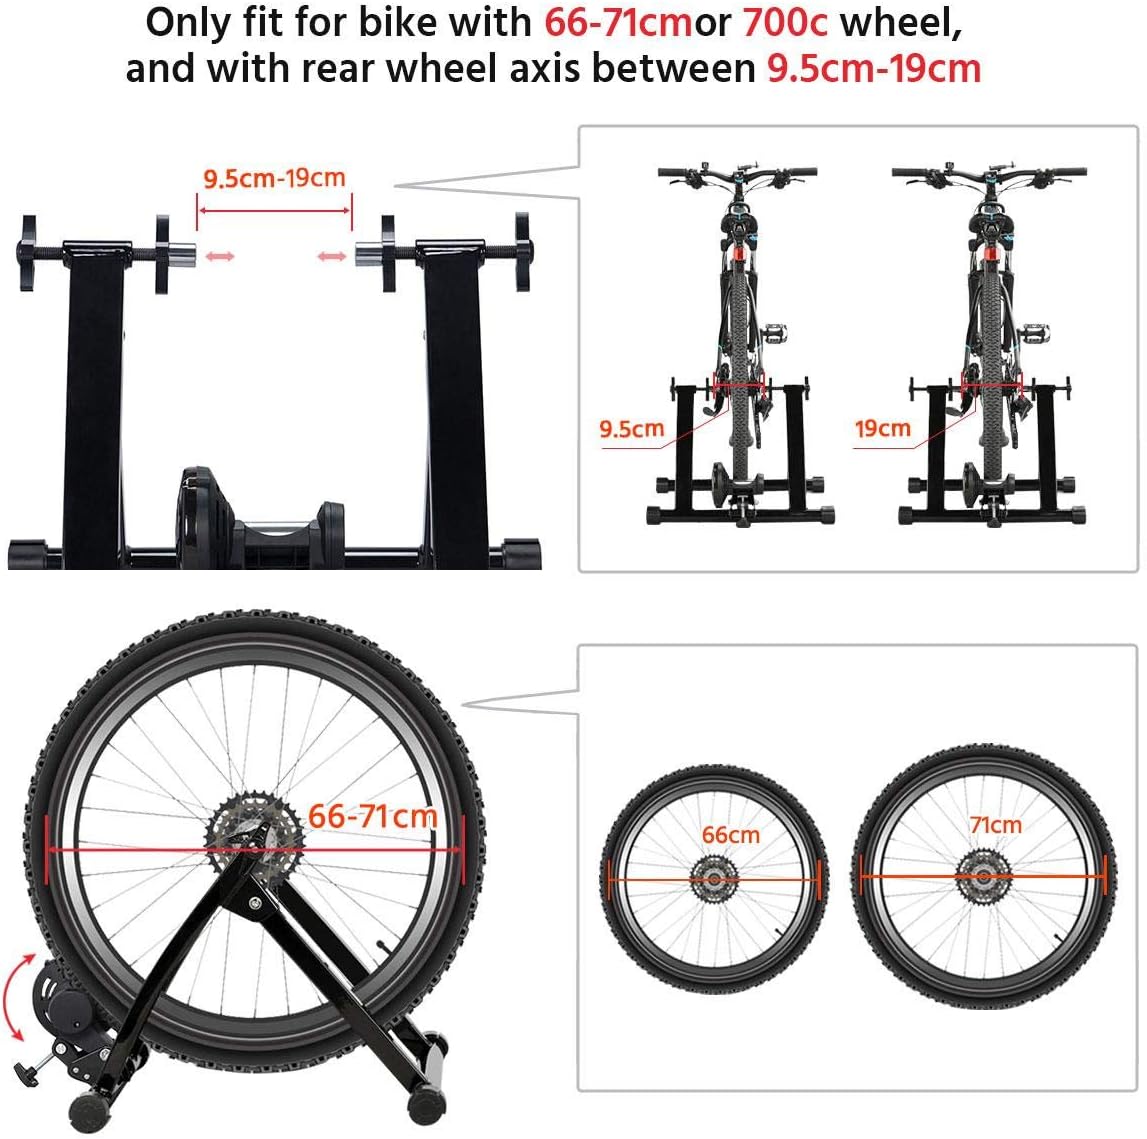
Image 8.2: Diagram illustrating compatible wheel sizes (26-28 inches and 700C) and axle width requirements (9.5cm-19cm).
9. Garanti og support
For warranty information and customer support, please refer to the documentation included with your purchase or contact Yaheetech customer service directly. Details can typically be found on the manufacturer's official webhjemmeside eller gennem din forhandler.


