1. Introduktion
Thank you for choosing the HBN Digital Programmable Timer Socket. This device is designed to automate the switching of electrical appliances, helping you save energy and enhance convenience. It features an LCD display, 8 configurable ON/OFF programs, and a random function for security. Please read this manual carefully before use to ensure proper operation and safety.
2. Sikkerhedsinstruktioner
- This timer socket is designed for indoor use only. Do not expose it to moisture, water, or extreme temperatures.
- Ensure the connected appliance's power consumption does not exceed the timer's maximum load capacity (16A / 3680W). Overloading can cause damage or fire.
- Skil ikke enheden ad eller forsøg at reparere den. Overlad al service til kvalificeret personale.
- Opbevares utilgængeligt for børn.
- Always insert the plug fully into the socket.
- Tag stikket ud af stikkontakten før rengøring. Rengør kun med en tør, blød klud.
3. Produktet er slutview
Familiarize yourself with the components of your HBN Digital Programmable Timer Socket.

Figur 3.1: Forside view of the timer socket, showing the LCD display, control buttons, and power outlet.

Figur 3.2: Tilbage view of the timer socket, displaying the model number BND-50/SG3-VC and electrical ratings.
Kontrolknapper:

Figur 3.3: Detaljeret view of the control buttons and LCD display.
- UR: Used to set the current time and exit programming mode.
- PROG: Enters and cycles through the 8 ON/OFF programming settings.
- R (Random): Aktiverer eller deaktiverer funktionen til tilfældig omskiftning.
- NULSTIL: Clears all settings and resets the timer to factory defaults.
- UGE: Selects the day(s) of the week for time and program settings.
- TIME: Adjusts the hour for time and program settings.
- MIN: Adjusts the minute for time and program settings.
- ON/AUTO/OFF: Manually switches the timer to ON, AUTO (programmed mode), or OFF.
LCD-skærm:
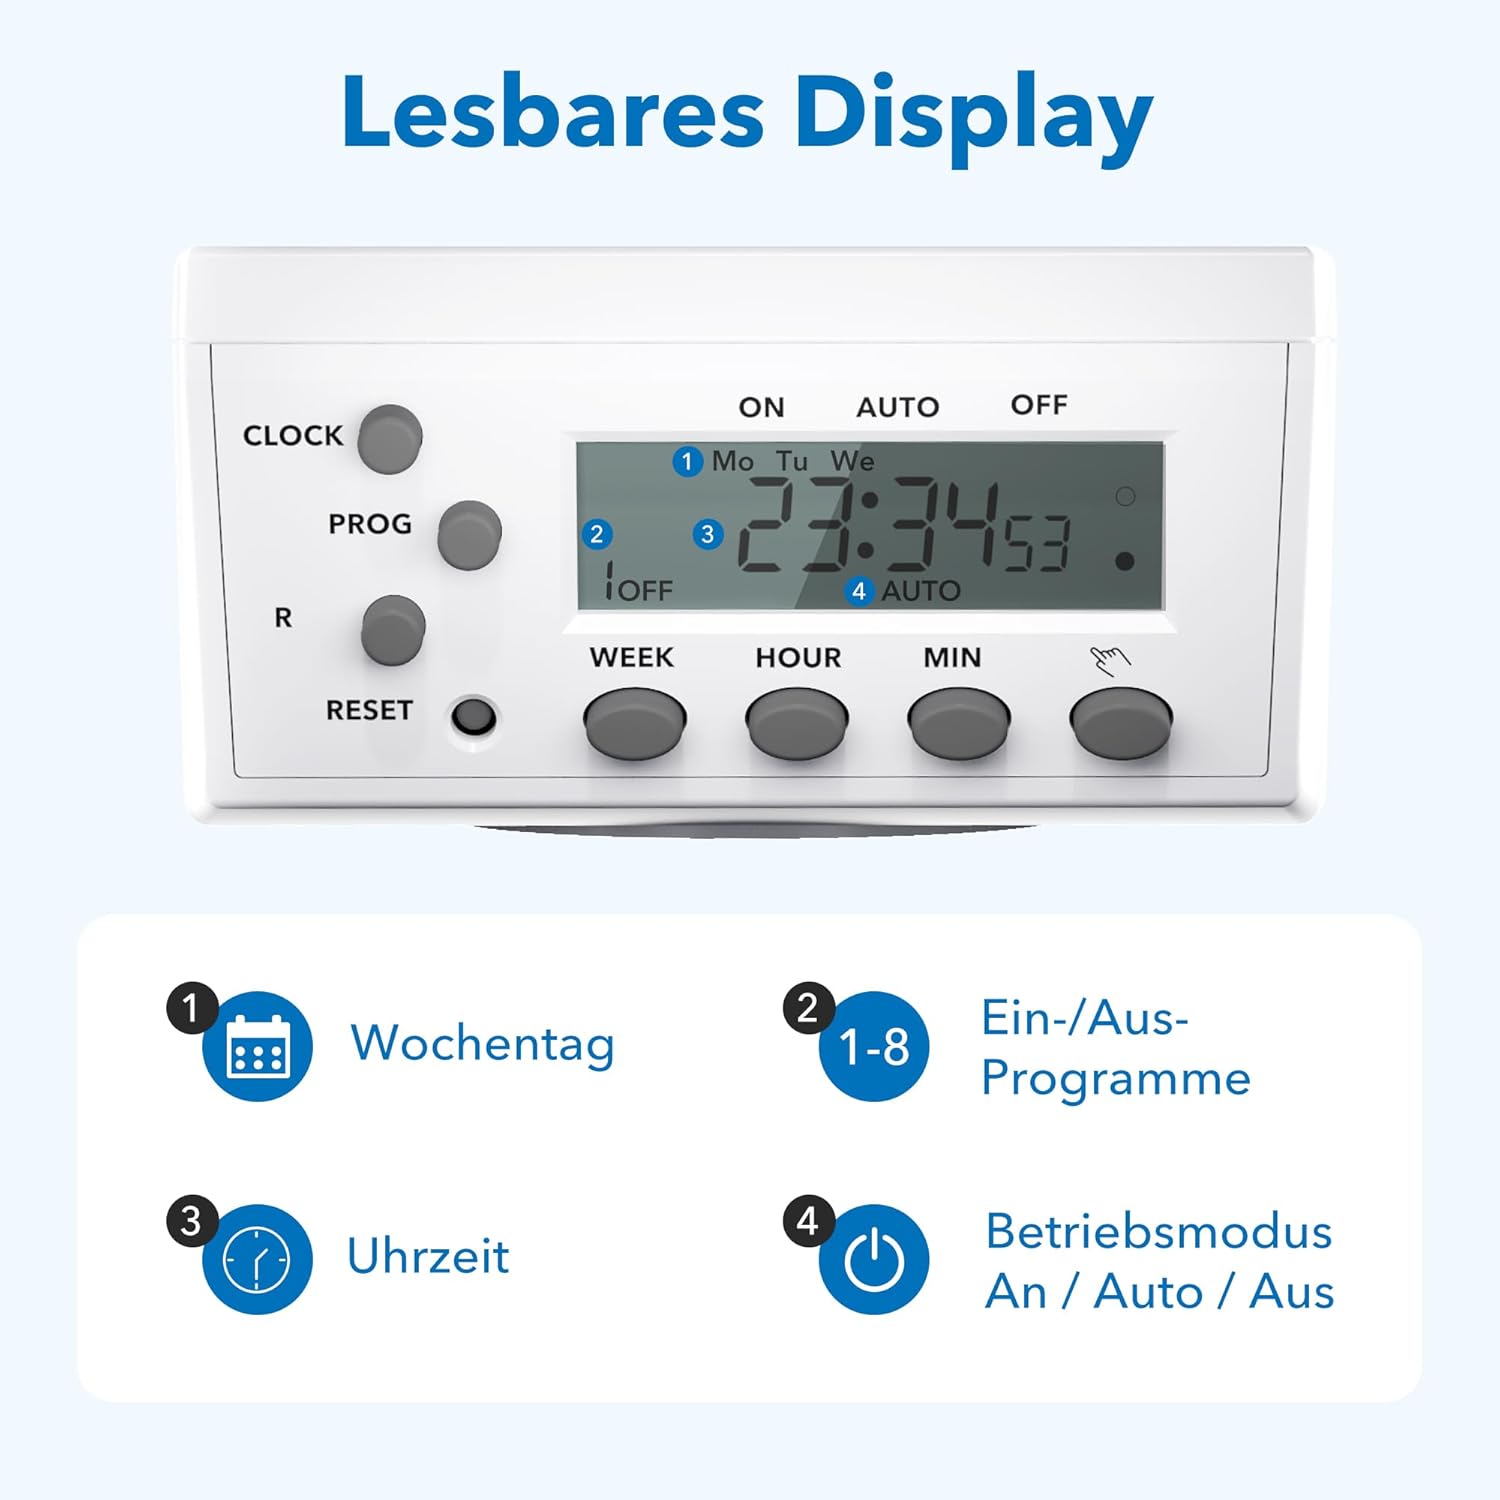
Figure 3.4: The LCD display shows current time, day, program status, and operating mode.
The LCD display provides clear information on the current time, day of the week, active program number, and the current operating mode (ON, AUTO, OFF).
4. Opsætning
4.1 Initial Charging and Reset
- Plug the timer socket into a live wall outlet for at least 15-30 minutes to charge its internal battery. This battery retains settings during power outages.
- After charging, use a pointed object (like a pen tip) to press the NULSTIL button. This clears all previous settings and ensures a fresh start. The display will show '0:00'.
4.2 Indstilling af det aktuelle klokkeslæt
- Tryk og hold på UR knap.
- Mens du holder UR, tryk på UGE button repeatedly to select the current day of the week (Mo, Tu, We, Th, Fr, Sa, Su).
- Mens du holder UR, tryk på TIME button repeatedly to set the current hour.
- Mens du holder UR, tryk på MIN knappen gentagne gange for at indstille det aktuelle minut.
- Slip UR knappen. Det aktuelle klokkeslæt er nu indstillet.
5. Betjeningsvejledning
5.1 Programmering af tænd/sluk-tider
The timer allows for up to 8 distinct ON/OFF programs. Each program consists of an ON time and an OFF time.
- Tryk på PROG én gang. Displayet viser '1 ON'.
- Trykke UGE to select the desired day(s) for this program. Options include individual days, weekdays, weekends, or all days.
- Trykke TIME for at indstille den ønskede ON-time.
- Trykke MIN for at indstille det ønskede ON-minut.
- Trykke PROG igen. Displayet vil vise '1 OFF'.
- Gentag trin 2-4 for at indstille den ønskede SLUKNINGstid for program 1.
- Trykke PROG again to move to '2 ON' and repeat the process for subsequent programs (up to 8).
- Når du har indstillet alle de ønskede programmer, skal du trykke på UR knappen for at afslutte programmeringstilstanden og vende tilbage til visning af det aktuelle klokkeslæt.
5.2 Manual Override (ON/AUTO/OFF)
Tryk på ON/AUTO/OFF knap til at gennemgå driftstilstandene:
- PÅ: Det tilsluttede apparat er konstant tændt og tilsidesætter alle programmer.
- BIL: Timeren fungerer i henhold til de programmerede ON/OFF-tider. Dette er standarddriftstilstanden for automatisk styring.
- OFF: Det tilsluttede apparat er konstant slukket og tilsidesætter alle programmer.
5.3 Random Function
The random function provides a security feature by switching the connected appliance ON and OFF at irregular intervals (2 to 30 minutes delay) around the programmed times. This can simulate presence when you are away.
- For at aktivere, tryk på R button. An 'R' indicator will appear on the display.
- For at deaktivere, tryk på R button again. The 'R' indicator will disappear.

Figur 5.1: Eksamples of versatile applications for the timer socket.
6. Vedligeholdelse
- Ensure the timer is unplugged from the power outlet before cleaning.
- Wipe the exterior with a soft, dry cloth. Do not use liquid cleaners or abrasive materials.
- Opbevar timeren på et køligt, tørt sted, når den ikke er i brug.
7. Fejlfinding
- Displayet er tomt: Ensure the timer is plugged into a live outlet. If it has been unplugged for an extended period, the internal battery may be depleted. Plug it in for 15-30 minutes to recharge.
- Apparatet tænder/slukker ikke som programmeret:
- Tjek om timeren er i gang AUTO mode. If it's in ON or OFF mode, programs are overridden.
- Bekræft, at de programmerede TIL/FRA-tider og -dage er korrekte.
- Ensure the current time is set accurately.
- Confirm the appliance itself is working and properly connected to the timer.
- Programs are lost after a power outage: The internal battery may not be fully charged or is at the end of its life. Ensure the timer is regularly plugged in to maintain battery charge.
- Timer is unresponsive: Tryk på NULSTIL button with a pointed object to clear all settings and restart the device. Then, reprogram the time and desired schedules.
8. Specifikationer

Figure 8.1: Technical data and dimensions of the timer socket.
| Specifikation | Værdi |
|---|---|
| Modelnummer | BND-50/SG3-VC |
| Nominel voltage | 230 V |
| Nominel strøm | 16 A |
| Maksimal belastning | 3680 W |
| Minimum skiftetid | 1 minut |
| Antal programmer | 8 ON/OFF-programmer |
| Produktdimensioner | 7.5 x 7.5 x 8 cm |
| Varens vægt | 150 gram |
| Materiale | Kunststof (Plastik) |
| Farve | Hvid |
| Fabrikant | Ergo I&E CO.,LTD |
9. Garanti og support
HBN products are manufactured to high-quality standards. For warranty information or technical support, please refer to the documentation provided with your purchase or contact your retailer. Keep your proof of purchase for warranty claims.


