1. Introduktion
This manual provides detailed instructions for the installation, operation, and maintenance of your Zalman S4 Mid-Tower ATX PC Case. Please read this manual thoroughly before beginning installation to ensure proper setup and safe use of the product. Retain this manual for future reference.
2. Sikkerhedsoplysninger
- Always disconnect the power supply from the wall outlet before performing any installation or maintenance inside the PC case.
- Handle components with care to prevent damage from static electricity. Consider using an anti-static wrist strap.
- Hold små dele og skruer væk fra børn.
- Avoid placing the PC case in direct sunlight, near heat sources, or in areas with excessive dust or moisture.
- Sørg for tilstrækkelig ventilation omkring kabinettet for at forhindre overophedning.
3. Pakkens indhold
Bekræft at alle komponenter er til stede i pakken:
- Zalman S4 Mid-Tower ATX PC Case
- 2 x 120mm Fans (pre-installed)
- Tilbehørsæske (skruer, afstandsstykker, kabelbindere osv.)
- Brugervejledning (dette dokument)
4. Komponentidentifikation
Familiarize yourself with the external features and I/O ports of the Zalman S4 case.

Figure 4.1: Front I/O Ports. This image displays a close-up of the top-front panel of the Zalman S4 PC case, highlighting the various input/output ports and buttons. From left to right, these include a USB 3.0 Port, Headphone Jack, Microphone Jack, two USB 2.0 Ports, a Reset Button, HDD/Power LED indicators, and the Power Button.
The front I/O panel provides convenient access to essential connections:
- USB 3.0-port: Til højhastigheds dataoverførsel.
- USB 2.0-porte (x2): Til tilslutning af periferiudstyr.
- Hovedtelefonstik: Til lydudgang.
- Mikrofonstik: Til lydindgang.
- Power knap: For at tænde/slukke systemet.
- Nulstil knap: For at genstarte systemet.
- HDD/Power LED: Indicators for hard drive activity and system power status.
5. Opsætning og installation
5.1. Forberedelse af sagen
- Placer etuiet på en flad, stabil overflade.
- Remove the side panels by unscrewing the thumbscrews at the rear of the case. The acrylic tinted side panel can be carefully lifted off.

Figure 5.1: Side Panel Removal. This image shows the Zalman S4 PC case with its acrylic tinted side panel detached, illustrating how the panel can be removed for internal access during component installation.
5.2. Installation af bundkort
The Zalman S4 supports ATX, Micro-ATX (mATX), and Mini-ITX motherboards.
- Installer I/O-skjoldet, der fulgte med dit bundkort, i den bageste åbning af kabinettet.
- Align the motherboard with the pre-installed standoffs. If necessary, install additional standoffs from the accessory box according to your motherboard's form factor.
- Fastgør bundkortet med de passende skruer.

Figure 5.2: Motherboard Compatibility. This diagram illustrates the internal layout of the Zalman S4 case, showing the compatible motherboard sizes: Mini-ITX, mATX, and ATX, indicating the spacious room available for various motherboard form factors.
5.3. Installation af strømforsyningsenhed (PSU)
- The PSU mounts at the bottom rear of the case.
- Skub din strømforsyning ind i det dertil indrettede rum fra bagsiden af kabinettet.
- Secure the PSU with screws from the outside of the case.
5.4. Installation af lagerdrev (HDD/SSD)
The case supports 2 x 3.5" HDDs (1 combo) and 1 x 2.5" SSD.
- 3.5" harddiske: Locate the drive cage near the PSU shroud. Slide the HDD into the bay and secure it with screws.
- 2.5" SSD'er: Mount the SSD to the designated bracket on the motherboard tray or drive cage using screws.
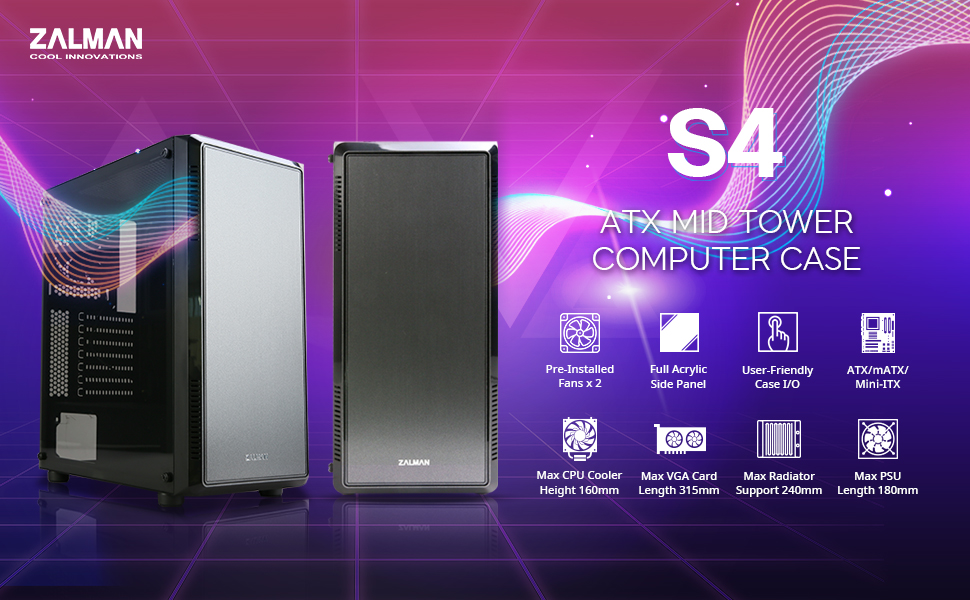
Figure 5.3: Drive and PSU Mounting Locations. Denne detaljerede interne view of the Zalman S4 case highlights the maximum CPU cooler height (160mm), maximum VGA card length (315mm without fan/radiator), maximum PSU length (180mm), and the locations for 3.5" HDDs and 2.5" SSDs.
5.5. Installation af udvidelseskort (f.eks. grafikkort)
- Fjern de nødvendige PCI-E-slotdæksler fra bagsiden af kabinettet.
- Insert your expansion card into the corresponding PCI-E slot on the motherboard.
- Fastgør kortet med en skrue.
5.6. Fan and Cooling System Installation
The Zalman S4 comes with two 120mm fans pre-installed and supports additional cooling options.
- Forudinstallerede blæsere: The case includes two 120mm fans for immediate cooling.
- Additional Fan Support: The case supports up to 8 additional 120mm fans. Refer to the diagram below for mounting locations.
- Radiatorstøtte: The case supports radiators up to 240mm in the front and 120mm in the rear.

Figure 5.4: Pre-installed Fans. This image shows two black 120mm Zalman fans, highlighting that the case includes two such fans pre-installed and supports up to 8 additional 120mm fans.
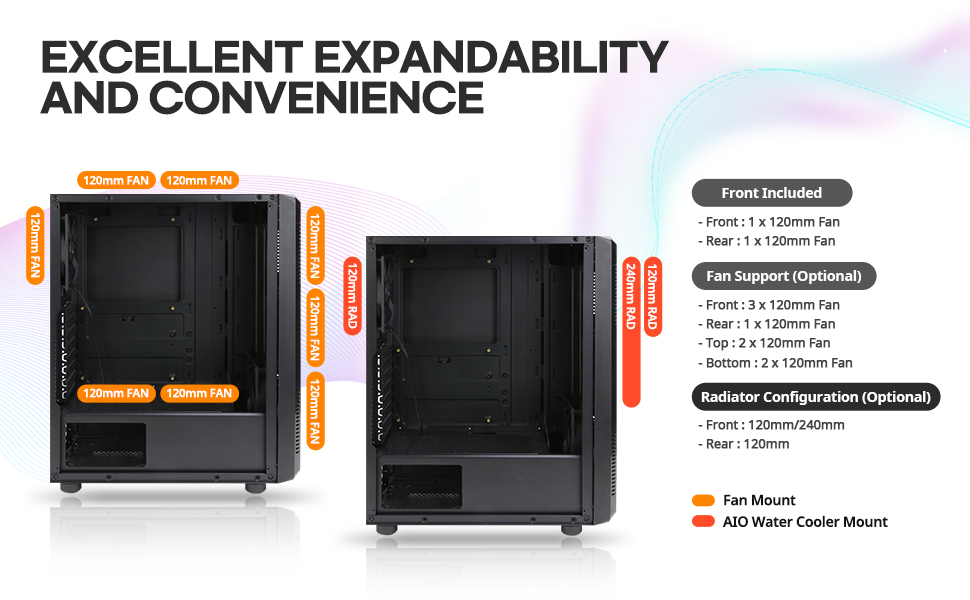
Figure 5.5: Fan and Radiator Configuration. This diagram illustrates the various fan and AIO water cooler mounting points within the Zalman S4 case, detailing support for 120mm fans and radiators (120mm/240mm) at the front, rear, top, and bottom.
5.7. Kabelforvaltning
Brug udskæringerne og fastgørelsespunkterne bag bundkortbakken til at føre og fastgøre kabler. Dette forbedrer luftgennemstrømningen og æstetikken.

Figure 5.6: Bezel Design for Optimal Airflow. This image highlights the front bezel design of the Zalman S4 case, which is engineered to facilitate optimal airflow into the system.
6. Betjening
After all components are installed and cables are connected, replace the side panels. Connect your monitor, keyboard, mouse, and power cable. Press the power button on the front I/O panel to start your system.
7. Vedligeholdelse
- Rensning: Regularly clean dust filters (if applicable) and internal components using compressed air. Ensure the system is powered off and unplugged before cleaning.
- Kabelstyring: Periodically check cable routing to ensure no cables are obstructing airflow or fan operation.
- Ventilation: Ensure the case's ventilation openings are not blocked.
8. Fejlfinding
Hvis du støder på problemer, kan du overveje følgende almindelige fejlfindingstrin:
- Systemet tænder ikke: Check all power connections, including the PSU to motherboard, CPU, and graphics card. Ensure the power button cable is correctly connected to the motherboard.
- Ingen visning: Verify that the monitor is connected to the graphics card (not the motherboard I/O, unless using integrated graphics) and that the graphics card is properly seated and powered.
- Overophedning: Ensure all fans are spinning correctly and are oriented for optimal airflow. Check for dust buildup on components and in filters.
- USB-porte virker ikke: Check the USB header connections from the front I/O panel to the motherboard.
9. Specifikationer
| Feature | Specifikation |
|---|---|
| Modelnavn | S4 |
| Sagstype | Mid-Tower |
| Bundkort kompatibilitet | ATX, Micro ATX, Mini ITX |
| Dimensioner (LxBxH) | 8.11 x 18.03 x 14.96 tommer |
| Varens vægt | 7.9 pund |
| Materiale | Acrylic, Alloy Steel, Plastic |
| Forudinstallerede ventilatorer | 2 x 120 mm |
| Fan størrelse | 120 millimeter |
| Afkølingsmetode | Air, Fan |
| Strømforsyningsmonteringstype | Bundmontering |
| Max CPU kølerhøjde | 160 mm |
| Max VGA-kortlængde | 315mm (without fan and radiator) |
| Max PSU-længde | 180 mm |
| USB 2.0 porte | 2 |
| USB 3.0 porte | 1 |
10. Garanti og support
For garantioplysninger og teknisk support henvises til den officielle Zalman-side. webwebstedet eller kontakt din lokale forhandler. Gem din købsbevis til garantikrav.


