1. Introduktion
1.1 Produkt overview
The AIDA PTZ-X12-IP is a Full HD IP Broadcast PTZ Camera designed for broadcast and conference applications. It features advanced IP streaming technology supporting H.264 and H.265 (HEVC) codecs. Integrated RS232 and VISCA over IP control ensure compatibility with most IP-based controllers, streamlining workflows and simplifying cable management. The camera offers multiple video output formats including 3G-SDI, HDMI, USB 3.0, and online video outputs like RTSP/RTMP.
1.2 Nøglefunktioner
- Full HD Progressive Scan sensor for sharp, vivid color in various lighting conditions.
- Advanced digital image processor providing detailed images with comprehensive feature access.
- Motion-compensated temporal noise reduction filter for effective noise reduction without motion blur.
- Versatile connectivity: 3G/HD-SDI, HDMI, RJ-45, USB 3.0, and USB 2.0 for seamless video performance.
- Powerful 12X Optical Zoom capability.
2. Sikkerhedsoplysninger
Please read this manual carefully before operating the device. Retain it for future reference. Observe all warnings and instructions marked on the product.
- Strømkilde: Use only the power adapter supplied with the unit. Ensure the power voltage er inden for det angivne område.
- Installation: Install the camera on a stable surface or mount it securely according to installation guidelines. Avoid placing it in direct sunlight, near heat sources, or in areas with high humidity or dust.
- Rensning: Afbryd strømmen før rengøring. Brug en blød, tør klud. Brug ikke flydende rengøringsmidler eller aerosolrengøringsmidler.
- Service: Forsøg ikke selv at servicere dette produkt. Overlad al service til kvalificeret servicepersonale.
- Vand og fugt: For at reducere risikoen for brand eller elektrisk stød må dette apparat ikke udsættes for regn eller fugt.
3. Pakkens indhold
Bekræft at alle varer er til stede i pakken:
- AIDA PTZ-X12-IP Camera Unit
- Strømadapter
- Fjernbetjening (hvis inkluderet i en specifik modelvariant)
- Monteringsbeslag (hvis medfølger)
- Brugervejledning (dette dokument)
4. Produktet er slutview
4.1 Kamera Views

Figur 4.1: Forsiden view of the AIDA PTZ-X12-IP camera, highlighting its compact design and the prominent lens.
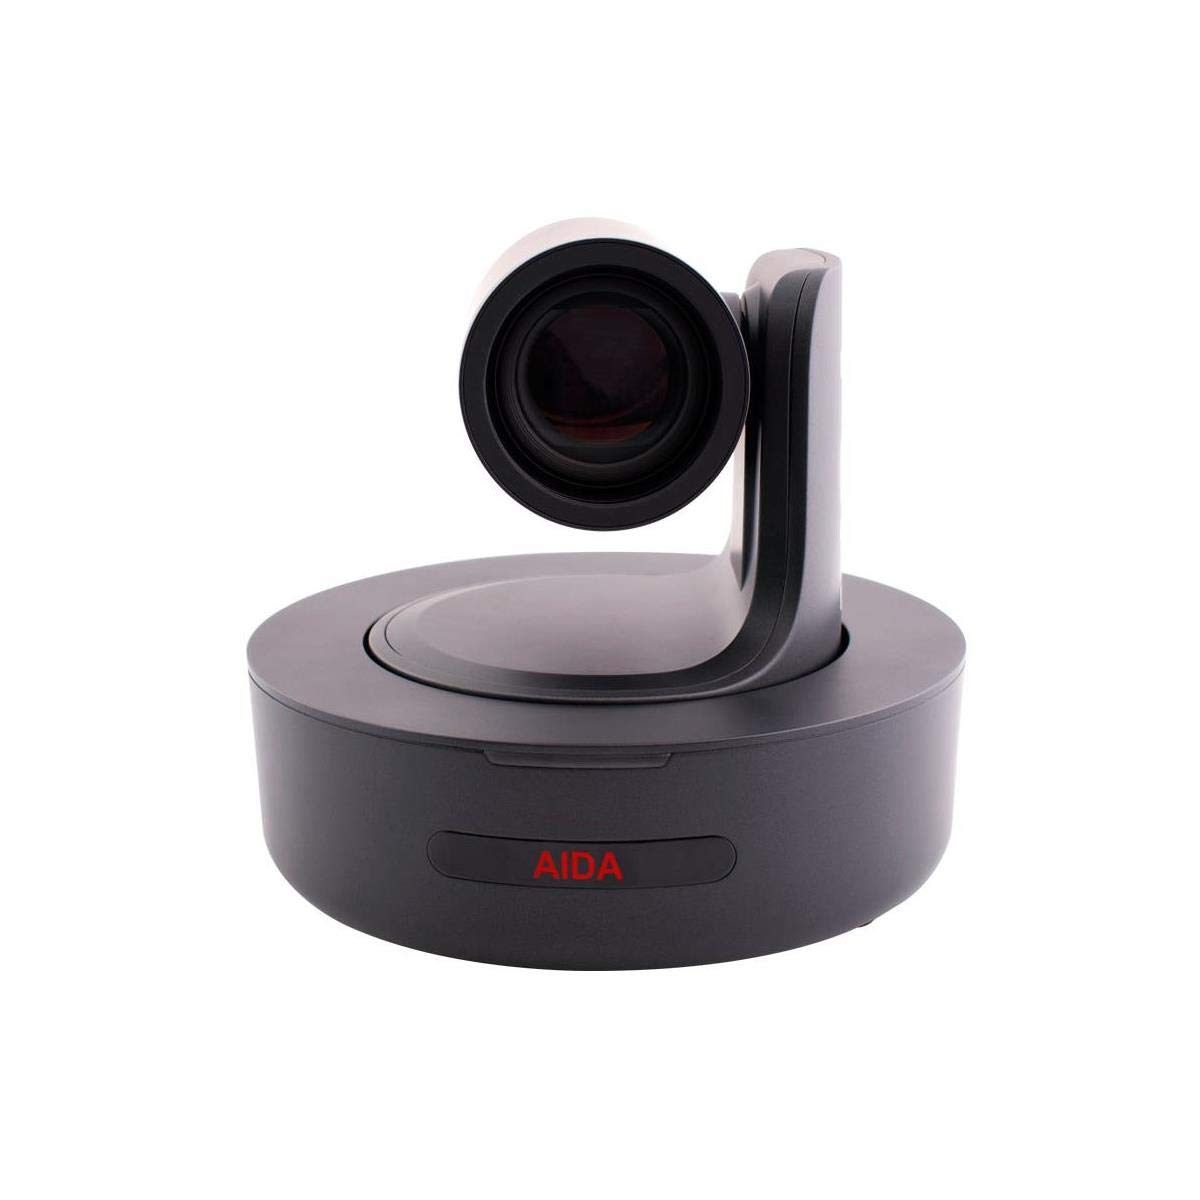
Figur 4.2: Direkte front view of the AIDA PTZ-X12-IP camera, emphasizing the lens and the camera's rotational base.

Figur 4.3: Bag view of the AIDA PTZ-X12-IP camera, detailing the various connectivity ports.
4.2 Porte og stik
Refer to Figure 4.3 for the location of the following ports:
- IN-RS232-OUT: RS232 serial control ports for daisy-chaining and external control.
- USB 3.0: High-speed USB connection for video output and control.
- LAN: RJ-45 Ethernet port for IP streaming, control (VISCA over IP), and power (PoE, if supported by model).
- DC12V: Power input for the included 12V DC power adapter.
- (Note: 3G-SDI and HDMI ports are typically located on the rear panel, though not explicitly labeled in Figure 4.3, they are standard for this model.)
5. Opsætning
5.1 Installation
- Placering: Position the camera on a flat, stable surface or mount it using a compatible bracket (sold separately or included). Ensure adequate ventilation around the unit.
- Strømtilslutning: Connect the supplied 12V DC power adapter to the DC12V port on the camera and then plug it into a power outlet.
- Første gang tændt: The camera will perform a self-test and the lens will move to its home position.
5.2 Forbindelser
Connect the camera to your video system using one or more of the following methods:
- 3G-SDI-udgang: Connect a 3G-SDI cable from the camera's 3G-SDI OUT port to a compatible SDI input device (e.g., switcher, recorder).
- HDMI udgang: Connect an HDMI cable from the camera's HDMI OUT port to an HDMI display or capture device.
- USB 3.0-udgang: Connect a USB 3.0 cable from the camera's USB 3.0 port to a computer for direct video capture and control.
- Ethernet-forbindelse (LAN): Connect an Ethernet cable from the camera's LAN port to a network switch or router for IP streaming and control.
- RS232 kontrol: For serial control, connect an RS232 cable to the IN-RS232-OUT ports and to your control device.
6. Betjening
6.1 Grundlæggende betjening
The PTZ-X12-IP camera can be controlled via its included remote control (if applicable), a dedicated PTZ controller, or via IP commands.
- Panorering/vip: Use the joystick or directional buttons on your controller to move the camera horizontally (pan) and vertically (tilt).
- Zoom: Use the zoom controls to adjust the 12x optical zoom. Zoom in (Tele) to magnify the image, zoom out (Wide) to broaden the field of view.
- Fokus: The camera typically features auto-focus. Manual focus adjustment may be available through the control interface.
- Presets: Store and recall specific camera positions (pan, tilt, zoom, focus) as presets for quick scene changes.
6.2 IP Control and Streaming
For advanced control and streaming capabilities, connect the camera to your network via the LAN port.
- IP-adresse: The camera will obtain an IP address via DHCP by default. You can find its IP address using a network scanner or by accessing the camera's web interface.
- Web Interface: Access the camera's settings and live view by entering its IP address into a web browser. This interface allows for detailed configuration of video settings, network parameters, and PTZ control.
- VISCA over IP: The camera supports VISCA over IP for integration with professional PTZ controllers and software. Refer to the camera's network settings for port information.
- RTSP/RTMP Streaming: Configure streaming protocols (RTSP/RTMP) through the web interface to stream video to compatible platforms or servers.
7. Vedligeholdelse
7.1 Rengøring
- Linse: Use a soft, lint-free cloth specifically designed for optical lenses. If necessary, use a small amount of lens cleaning solution. Avoid touching the lens with bare fingers.
- Kamerahus: Tør kamerahuset af med en blød, tør klud. Ved genstridigt snavs, tør letamp cloth can be used, but ensure no moisture enters the camera.
- Forbindelser: Keep connectors free of dust and debris. Use compressed air if needed.
7.2 Opbevaring
When not in use for extended periods, store the camera in a cool, dry place, away from direct sunlight and extreme temperatures. Use the original packaging or a protective case to prevent dust accumulation and physical damage.
8. Fejlfinding
Hvis du støder på problemer, kan du se følgende tabel for almindelige problemer og løsninger.
| Problem | Mulig årsag | Løsning |
|---|---|---|
| Ingen strøm | Strømadapteren er ikke tilsluttet eller defekt. | Kontrollér strømtilslutningerne. Sørg for, at stikkontakten fungerer. Prøv en anden strømadapter, hvis tilgængelig. |
| Ingen videoudgang | Incorrect cable connection; wrong input selected on display; camera not powered on. | Verify all video cables are securely connected. Select the correct input source on your display/switcher. Ensure camera is powered on. |
| PTZ-styring virker ikke | Control cable disconnected; incorrect control protocol/settings; IP address conflict. | Check RS232 or Ethernet cable connections. Verify control protocol (e.g., VISCA) and camera ID settings. Check for IP address conflicts on the network. |
| Billedet er sløret | Lens is dirty; focus is incorrect; lighting conditions are poor. | Clean the lens. Adjust focus manually if auto-focus is not performing correctly. Improve lighting in the environment. |
| IP stream not accessible | Network cable disconnected; incorrect IP settings; firewall blocking access. | Ensure Ethernet cable is connected. Verify camera's IP address and network settings. Check firewall rules on your computer/network. |
Hvis problemet fortsætter efter at have forsøgt disse løsninger, bedes du kontakte kundesupport.
9. Specifikationer
Technical specifications for the AIDA PTZ-X12-IP camera:
| Feature | Detalje |
|---|---|
| Modelnavn | PTZ-X12-IP |
| Produktdimensioner | 11.8 x 11 x 10.9 tommer |
| Vægt | 7.8 pund |
| Optisk zoom | 12x |
| Forbindelsesteknologi | Wired (3G-SDI, HDMI, USB 3.0, RJ-45) |
| Videooutputformater | 3G-SDI, HDMI, USB 3.0, RTSP/RTMP (IP) |
| Kontrolgrænseflader | RS232, VISCA over IP |
| IP Streaming Codecs | H.264, H.265 (HEVC) |
| Anbefalede anvendelser | Indoor, Outdoor (with appropriate protection) |
| Fabrikant | AIDA billedbehandling |
10. Garanti og support
10.1 Garantioplysninger
AIDA products are designed and manufactured to the highest quality standards. This product is covered by a limited warranty against defects in materials and workmanship. Specific warranty terms and duration may vary by region and retailer. Please retain your proof of purchase for warranty claims.
10.2 Kundesupport
For technical assistance, troubleshooting, or warranty inquiries, please contact AIDA customer support. You can find contact information and additional resources on the official AIDA webhjemmeside eller gennem din produktforhandler.
Besøg AIDA Store for mere information.


