1. Introduktion
Thank you for choosing the Kingdom Professional Wireless Microphone System SYSV54. This system is designed to provide clear and reliable audio for various applications, including speech, singing, presentations, and events. It features a 1000-channel UHF design, ensuring stable signal transmission and minimizing interference. This manual provides detailed instructions for setting up, operating, and maintaining your wireless microphone system.
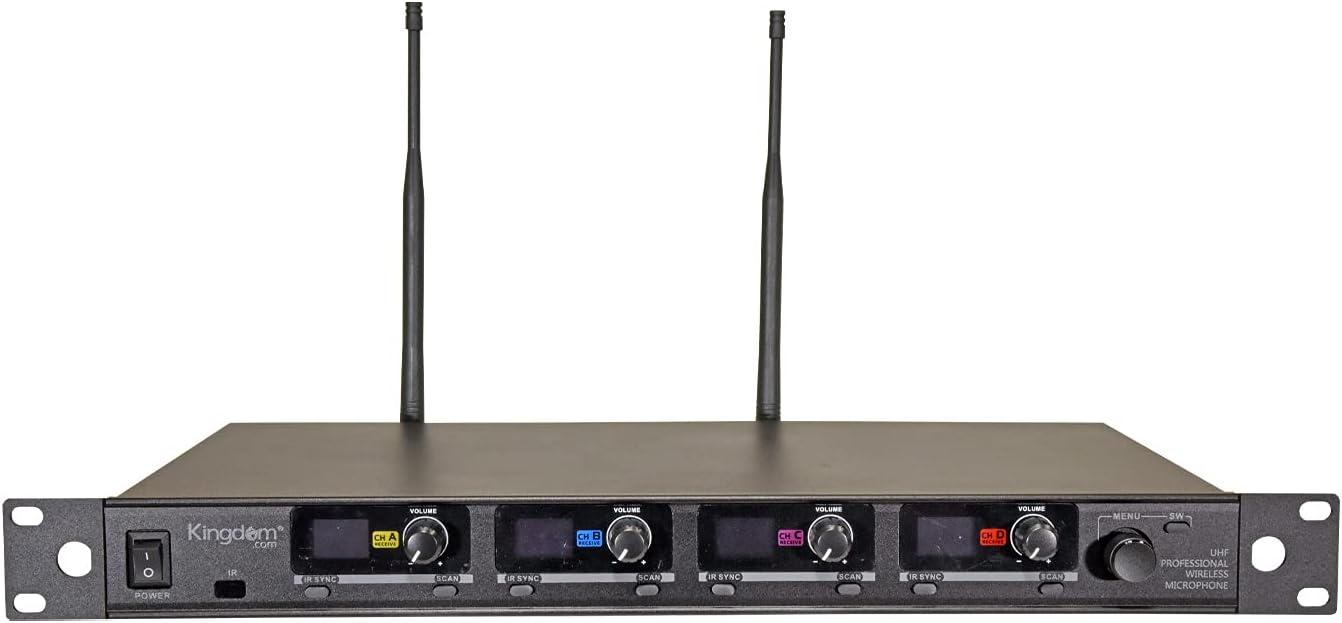
The system includes a metal UHF receiver, two handheld microphones, two bodypack transmitters, and two lavalier/lapel microphones, offering versatile audio capture options.
2. Sikkerhedsoplysninger
Please read and understand all safety instructions before operating this device. Keep this manual for future reference.
- Elektrisk sikkerhed: Use only the provided power adapter. Ensure the power source matches the voltage krav.
- Risiko for elektrisk stød: Åbn ikke enheden casing. Opening the device may result in serious injury and voids the warranty. Refer all servicing to qualified personnel.
- Vand og fugt: Do not expose the system to water, rain, or excessive moisture. Avoid using the system in high-humidity environments.
- Varmekilder: Keep the system away from heat sources such as radiators, heat registers, stoves, or other heat-producing appliances.
- Ventilation: Ensure proper ventilation around the receiver. Do not block any ventilation openings.
- Batterier: Use the correct type and size of batteries for the handheld microphones and bodypack transmitters. Do not mix old and new batteries, or different types of batteries. Dispose of used batteries responsibly.
- Rensning: Disconnect the power before cleaning. Use a dry cloth for cleaning. Do not use liquid cleaners or aerosol cleaners.
3. Pakkens indhold
Bekræft at alle varer er til stede i pakken:
- 1 × 1000-channel UHF Metal Receiver
- 2 × Handheld Microphones
- 2 × Bodypack Transmitters
- 2 × Lavalier/Lapel Microphones
- 2 × antenner
- 1 × Brugermanual (dette dokument)
- 1 × lydkabel
- 1 × External Wall Wart Power Supply
4. Opsætningsvejledning
4.1 Opsætning af modtager
- Placering: Place the receiver on a stable, flat surface, ensuring adequate ventilation. Position it within the desired operating range of the microphones, ideally with a clear line of sight.
- Tilslut antenner: Screw the two included antennas onto the ANT A-B and ANT C-D connectors on the rear panel of the receiver. Ensure they are securely tightened and positioned vertically for optimal signal reception.
- Tilslut strøm: Connect the external wall wart power supply to the DC INPUT port on the rear of the receiver, then plug the power supply into a suitable electrical outlet.
- Lydudgangsforbindelse: Connect the receiver to your audio mixer, amplifier, or sound system using the provided audio cable. You can use the MIX OUT (1/4" unbalanced) for a combined output, or the individual BALANCED A, B, C, D (XLR) outputs for separate channel control.

4.2 Microphone Setup (Handheld & Bodypack)
- Installer batterier: Open the battery compartment of each handheld microphone and bodypack transmitter. Insert two AA batteries (not included), ensuring correct polarity.
- Attach Lapel Microphones: For bodypack transmitters, plug the lavalier/lapel microphone into the input jack on the bodypack. Secure the lapel microphone to clothing, approximately 6-8 inches from the speaker's mouth.
- Tænd: Press and hold the power button on each handheld microphone and bodypack transmitter to turn them on. The display will illuminate.


4.3 Frekvenssynkronisering (IR-synkronisering)
To establish a wireless connection, the microphones/bodypacks must be synchronized with the receiver.
- Tænd modtager: Turn on the receiver using the POWER button on the front panel.
- Vælg kanal: On the receiver, select the desired channel (CH A, CH B, CH C, or CH D) for the microphone you wish to sync.
- Initiate Scan (Optional but Recommended): Press the 'SCAN' button on the receiver for the selected channel. The receiver will automatically search for an available, clear frequency.
- Activate IR Sync on Receiver: Press the 'IR SYNC' button on the receiver for the selected channel. The IR indicator on the receiver will flash.
- Align Transmitters: Hold the handheld microphone or bodypack transmitter with its IR window facing the IR window on the receiver, typically within a few inches.
- Confirm Sync: The display on the microphone/bodypack will show the synchronized frequency, and the RF indicator on the receiver will illuminate steadily, indicating a successful connection.
- Repeat this process for each microphone/bodypack.
5. Betjeningsvejledning
5.1 Tænd/sluk
- Modtager: Press the 'POWER' button on the front panel.
- Handheld Microphones/Bodypacks: Press and hold the 'POWER' button on the device until the display illuminates (for ON) or turns off (for OFF).
5.2 Lydstyrkekontrol
Each channel on the receiver has an independent volume control knob. Adjust these knobs to achieve the desired audio level for each microphone. Start with the volume low and gradually increase it to avoid sudden loud sounds.
5.3 Mute-funktion
Both handheld microphones and bodypack transmitters feature a MUTE function. Press the 'MUTE' button on the microphone/bodypack to temporarily silence the audio transmission without turning off the device. Press it again to unmute.
5.4 Channel Selection and Auto Scan
The system offers 1000 channels. If you experience interference, you can change the operating frequency:
- On the receiver, press the 'SCAN' button for the desired channel. The receiver will automatically find and select a clear frequency.
- Once a new frequency is displayed, perform an IR Sync (as described in Section 4.3) to synchronize the corresponding microphone/bodypack to the new frequency.
5.5 Brugstips
- Driftsafstand: Maintain a line of sight between the microphones/bodypacks and the receiver for optimal performance. The system has a working distance of up to approximately 200 feet.
- Undgå forhindringer: Walls, metal objects, and large crowds can reduce the effective range and cause signal drops.
- Batterilevetid: Monitor the battery indicators on the microphones/bodypacks. Replace batteries promptly when they are low to avoid interruptions during use.
- Forebyggelse af feedback: Position microphones away from speakers to prevent audio feedback. Adjust microphone gain and speaker volume carefully.
6. Vedligeholdelse
- Rensning: Use a soft, dry cloth to clean the exterior of the receiver and microphones. Do not use abrasive cleaners or solvents.
- Udskiftning af batteri: Replace AA batteries in handheld microphones and bodypacks as needed. Always use fresh batteries for best performance.
- Opbevaring: When not in use for extended periods, remove batteries from microphones/bodypacks and store the system in a cool, dry place, away from direct sunlight and extreme temperatures.
- Antenner: Ensure antennas are not bent or damaged. Handle them carefully.
7. Fejlfinding
Hvis du støder på problemer med dit trådløse mikrofonsystem, kan du se følgende almindelige problemer og løsninger:
| Problem | Mulig årsag | Løsning |
|---|---|---|
| Ingen lyd fra mikrofonen | Microphone/bodypack not powered on Lavt eller dødt batteri Microphone/bodypack muted Not synchronized with receiver Modtagerens lydstyrke er for lav Lydkabel frakoblet | Ensure microphone/bodypack is on Udskift batterierne Unmute microphone/bodypack Perform IR Sync (Section 4.3) Increase receiver channel volume Kontroller lydkabelforbindelserne |
| Interferens eller statisk støj | Andre trådløse enheder i nærheden Operating on a crowded frequency Forhindringer mellem sender og modtager | Flyt dig væk fra andre trådløse enheder Use Auto Scan to find a clear frequency and re-sync Ensure clear line of sight; reposition receiver/transmitters |
| Kort driftsområde | Svage batterier Antennas not properly positioned Excessive obstructions Miljømæssige faktorer | Udskift batterierne Ensure antennas are vertical and unobstructed Minimize obstructions; ensure line of sight Avoid areas with high RF noise |
| Mikrofondisplayet virker ikke | Lavt eller dødt batteri Enheden er ikke tændt | Udskift batterierne Ensure device is powered on |
8. Specifikationer
Key technical specifications for the Kingdom Professional Wireless Microphone System SYSV54:
- Modelnavn: SYSV54
- Bærebølgefrekvensområde: UHF 516.0 - 541.0 MHz
- Antal kanaler: 1000 (per mic)
- Arbejdsafstand: Up to ~200 feet (line of sight)
- Sendereffekt: Up to ~50mW
- Frequency Response (Handheld): 50Hz ~ 18KHz
- Vise: LCD (IR sync capable)
- Strømkilde: Corded Electric (Receiver), Battery Powered (Transmitters - AA batteries required, not included)
- Lydudgange: 1/4" Mix Out, 4x XLR Balanced Outputs
- Varens vægt: Cirka 10.08 pund
- Pakkedimensioner: 22.2 x 12.6 x 7.25 tommer
- UPC: 617407927696
9. Garantioplysninger
The Kingdom Professional Wireless Microphone System SYSV54 is warranted to be free of manufacturing defects for 1 year from the date of purchase. Additionally, a 30-day return policy is offered. This warranty covers defects in materials and workmanship under normal use. It does not cover damage caused by misuse, accident, unauthorized modification, or improper installation.
10. Kundesupport
If you have any questions, require assistance with setup, operation, or troubleshooting, or need to make a warranty claim, please contact Kingdom customer support. We are dedicated to ensuring your satisfaction and are always available to help.
Please refer to your purchase documentation or the official Kingdom webhjemmeside for de seneste kontaktoplysninger.


