1. Introduktion
This user manual provides comprehensive instructions for the installation, operation, and maintenance of your Immergas CARV2 Wireless Chronothermostat. Please read this manual thoroughly before using the device to ensure proper functionality and safety. This device is designed for precise temperature control in HVAC systems.
2. Sikkerhedsoplysninger
Overhold altid følgende sikkerhedsforanstaltninger:
- Installation bør kun udføres af kvalificeret personale i overensstemmelse med lokale el-forskrifter.
- Afbryd strømmen, før du udfører nogen form for installation eller vedligeholdelse.
- Udsæt ikke enheden for vand eller for høj luftfugtighed.
- Do not attempt to repair the device yourself. Refer all servicing to qualified service personnel.
- Ensure the power supply matches the device's specifications (230 Volts).
3. Produktet er slutview
The Immergas CARV2 is a wireless digital chronothermostat designed for efficient heating and cooling management. It features a clear display and intuitive controls for setting desired temperatures and programming schedules.
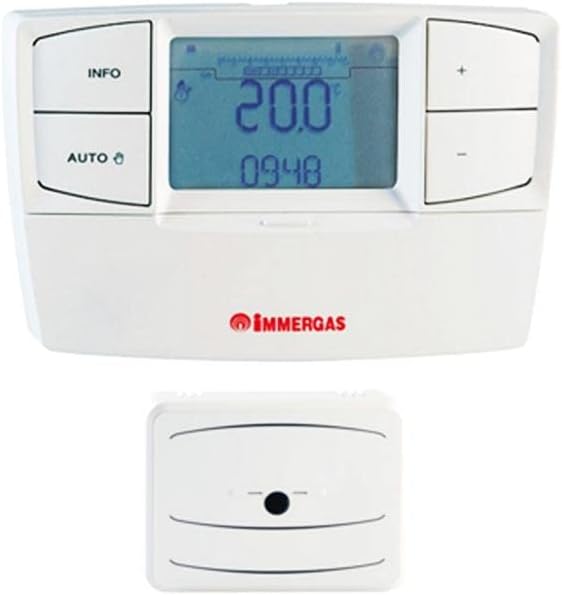
Figure 3.1: Immergas CARV2 Wireless Chronothermostat (top) showing the display with temperature and time, and control buttons (INFO, AUTO, +, -). Below it is the wireless receiver unit (bottom) with a small indicator light.
3.1 Komponenter
- Thermostat Unit: The main control unit with display and buttons.
- Wireless Receiver Unit: Connects to the HVAC system and communicates wirelessly with the thermostat unit.
3.2 Display og knapper
The thermostat unit features a digital display showing current temperature, set temperature, time, and operating mode. Control buttons include:
- INFO knap: Accesses information screens.
- AUTO knap: Toggles between automatic and manual operating modes.
- + knap: Increases temperature setting or navigates menus.
- - Knap: Decreases temperature setting or navigates menus.
4. Opsætning og installation
Proper installation is crucial for optimal performance. Refer to the detailed wiring diagrams provided with the product packaging for specific connections.
4.1 Receiver Unit Installation
- Ensure power to the HVAC system is turned off at the main breaker.
- Mount the receiver unit near your boiler or heating system, ensuring it is within wireless range of the thermostat unit.
- Connect the receiver unit to your HVAC system's control wiring according to the provided wiring diagram. This typically involves connecting to the boiler's thermostat terminals.
- Secure the receiver unit to the wall or mounting surface.
4.2 Placering af termostatenhed
- Place the thermostat unit in a central location within the heated area, away from direct sunlight, drafts, or heat sources (e.g., lamps, appliances).
- Ensure the location allows for accurate room temperature sensing.
- The thermostat unit is battery-powered (batteries not included, typically AA or AAA). Insert fresh batteries before initial use.
4.3 Første parring (hvis nødvendigt)
Some units may require initial pairing between the thermostat and receiver. Refer to the quick start guide for specific pairing instructions. Generally, this involves pressing a pairing button on both units within a short timeframe.
5. Betjeningsvejledning
5.1 Tænd og startdisplay
Once batteries are inserted and the receiver is powered, the thermostat display will illuminate, showing the current room temperature and time.
5.2 Indstilling af tid og dato
Access the settings menu (often by holding the INFO button) to set the correct time and date. Use the + and - buttons to adjust values and the INFO or AUTO button to confirm and move to the next setting.
5.3 driftstilstande
- Automatisk tilstand (AUTO): The thermostat follows the programmed weekly schedule. Press the AUTO button to activate this mode.
- Manuel tilstand: Allows you to set a constant desired temperature that overrides the schedule. Press the AUTO button until the manual mode indicator appears. Use + and - to adjust the temperature.
- Fra-tilstand: Turns off heating/cooling. Consult the manual for specific steps to enter this mode, often by setting a very low temperature or a dedicated off setting.
5.4 Temperaturjustering
In manual mode, or during a temporary override in auto mode, use the + og - buttons to increase or decrease the desired temperature. The new setpoint will be displayed.
5.5 Programming Weekly Schedule
The CARV2 allows for a detailed weekly programming schedule. This typically involves setting different temperatures for various times of the day across each day of the week.
- Enter programming mode (refer to your specific model's manual, often by holding INFO or AUTO for several seconds).
- Select the day of the week you wish to program.
- Set the desired temperature for specific time intervals (e.g., 6:00 AM - 8:00 AM, 8:00 AM - 5:00 PM, etc.).
- Repeat for all desired time intervals and days.
- Save and exit programming mode.
6. Vedligeholdelse
6.1 Rengøring
Clean the thermostat unit with a soft, dry cloth. Do not use abrasive cleaners, solvents, or spray directly onto the unit. Ensure no moisture enters the device.
6.2 Udskiftning af batteri
When the low battery indicator appears on the display, replace the batteries immediately. Use high-quality alkaline batteries (e.g., AA or AAA, depending on model). Open the battery compartment on the back of the thermostat unit, remove old batteries, and insert new ones, observing polarity.
7. Fejlfinding
| Problem | Mulig årsag | Løsning |
|---|---|---|
| Displayet er tomt. | No power to thermostat unit (dead batteries). | Udskift batterierne. |
| Termostaten styrer ikke opvarmning/køling. | Receiver unit not powered or not paired. Incorrect wiring. | Check power to receiver. Re-pair thermostat and receiver. Verify wiring connections. |
| Temperaturmålingerne virker unøjagtige. | Thermostat placed in an unsuitable location (direct sunlight, draft). | Relocate thermostat to a more central and stable temperature area. |
| Scheduled program not running. | Thermostat is in manual mode. Program not saved correctly. | Switch to AUTO mode. Re-enter and save the program. |
8. Specifikationer
| Feature | Detalje |
|---|---|
| Mærke | Immergas |
| Modelnummer | 7T.81.0.000.2301 |
| Farve | Hvid |
| Varens vægt | 1 kilo |
| Voltage | 230 volt |
| Forbindelsesteknologi | Trådløs |
| Strømkilde | Electric Cable (for receiver), Battery (for thermostat unit) |
| Controller type | Tryk knap |
| Temperaturkontrol type | Manual / Programmable |
| Specifikke anvendelser for produktet | VVS |
9. Garanti og support
For warranty information and technical support, please refer to the documentation included with your product or contact Immergas customer service directly. Spare parts availability information is not provided at this time.
Bemærk: Produktspecifikationer og funktioner kan ændres uden varsel.


