Indledning
Tak for købetasing the Trexonic Retro Record Player. This versatile audio system combines vintage aesthetics with modern functionality, allowing you to enjoy your favorite music from various sources including vinyl records, CDs, Bluetooth devices, AM/FM radio, and USB/SD cards. This manual provides detailed instructions for setup, operation, and maintenance to ensure optimal performance and longevity of your device.

Image: The Trexonic Retro Record Player, showcasing its classic design with the turntable lid open and a vinyl record in place.
Vigtige sikkerhedsoplysninger
Please read these safety instructions carefully before operating the unit. Keep this manual for future reference.
- Udsæt ikke dette apparat for regn eller fugt.
- Bloker ikke ventilationsåbninger. Installer i overensstemmelse med producentens anvisninger.
- Må ikke installeres i nærheden af varmekilder såsom radiatorer, varmeapparater, komfurer eller andre apparater (inklusive ampløftere), der producerer varme.
- Beskyt netledningen mod at blive trådt på eller klemt, især ved stik, stikkontakter og det sted, hvor de kommer ud af apparatet.
- Brug kun tilbehør/tilbehør specificeret af producenten.
- Træk stikket ud af dette apparat under tordenvejr, eller når det ikke skal bruges i længere perioder.
- Overlad al service til kvalificeret servicepersonale. Service er påkrævet, når apparatet er blevet beskadiget på nogen måde, såsom strømforsyningsledning eller stik er beskadiget, væske er blevet spildt, eller genstande er faldet ind i apparatet, apparatet har været udsat for regn eller fugt, ikke fungerer normalt , eller er blevet droppet.
Produktegenskaber
The Trexonic Retro Record Player is equipped with a variety of features for a comprehensive audio experience:
- 3-Speed Belt-Driven Turntable: Plays 33 1/3, 45, and 78 RPM vinyl records.
- Indbygget Bluetooth: Wirelessly stream music from compatible devices.
- CD-afspiller: Supports standard audio CDs.
- AM/FM radio: Integrated tuner with backlit display.
- USB/SD Input: For MP3 playback and recording vinyl to MP3.
- Aux-indgang (3.5 mm): Tilslut eksterne lydenheder.
- Hovedtelefonstik: Til privat lytning.
- RCA Line-Out: Connect to external speakers or audio systems.
- Alarm Clock with Timer: Programmable alarm and sleep timer functions.
- Indbyggede stereohøjttalere: Til øjeblikkelig lydafspilning.
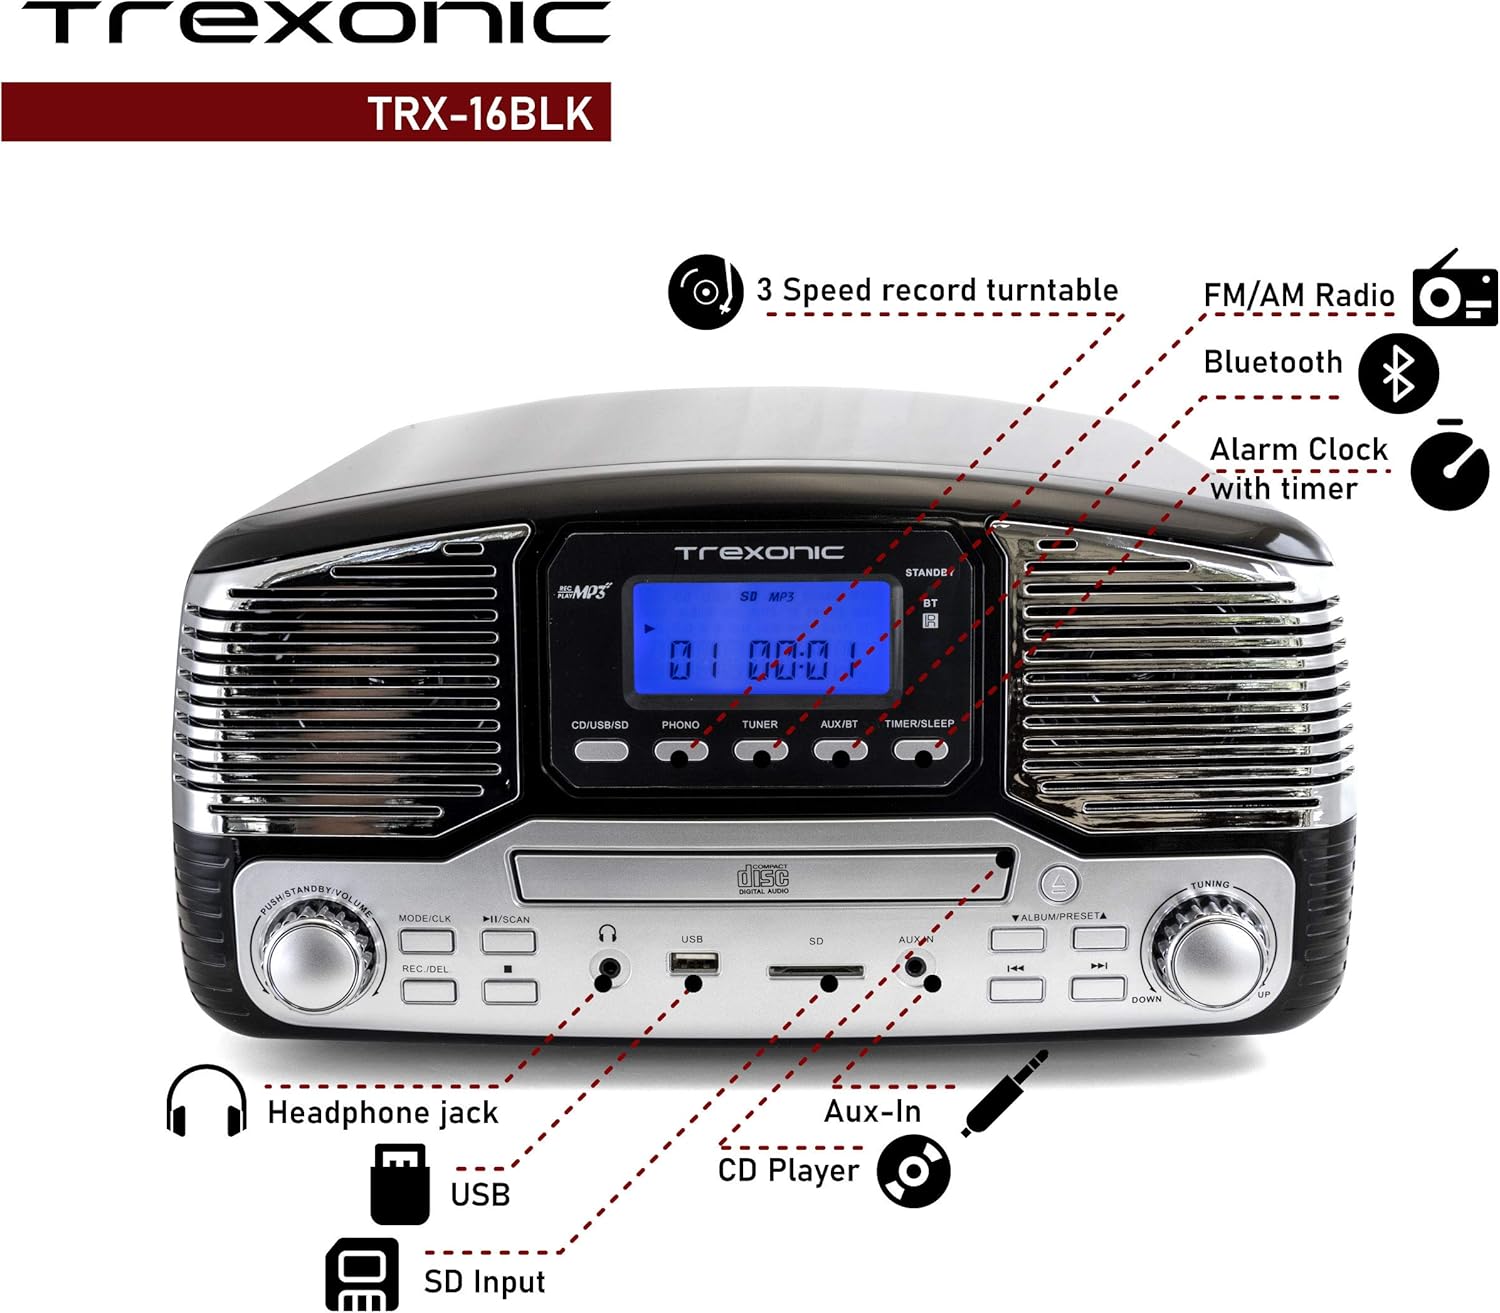
Image: A detailed diagram highlighting the key features and control locations on the Trexonic Retro Record Player.
Kontrol og funktioner
Familiarize yourself with the various controls and ports on your Trexonic Retro Record Player:

Billede: Nærbillede view of the digital display and mode selection buttons (CD/USB/SD, PHONO, TUNER, AUX/BT, TIMER/SLEEP).
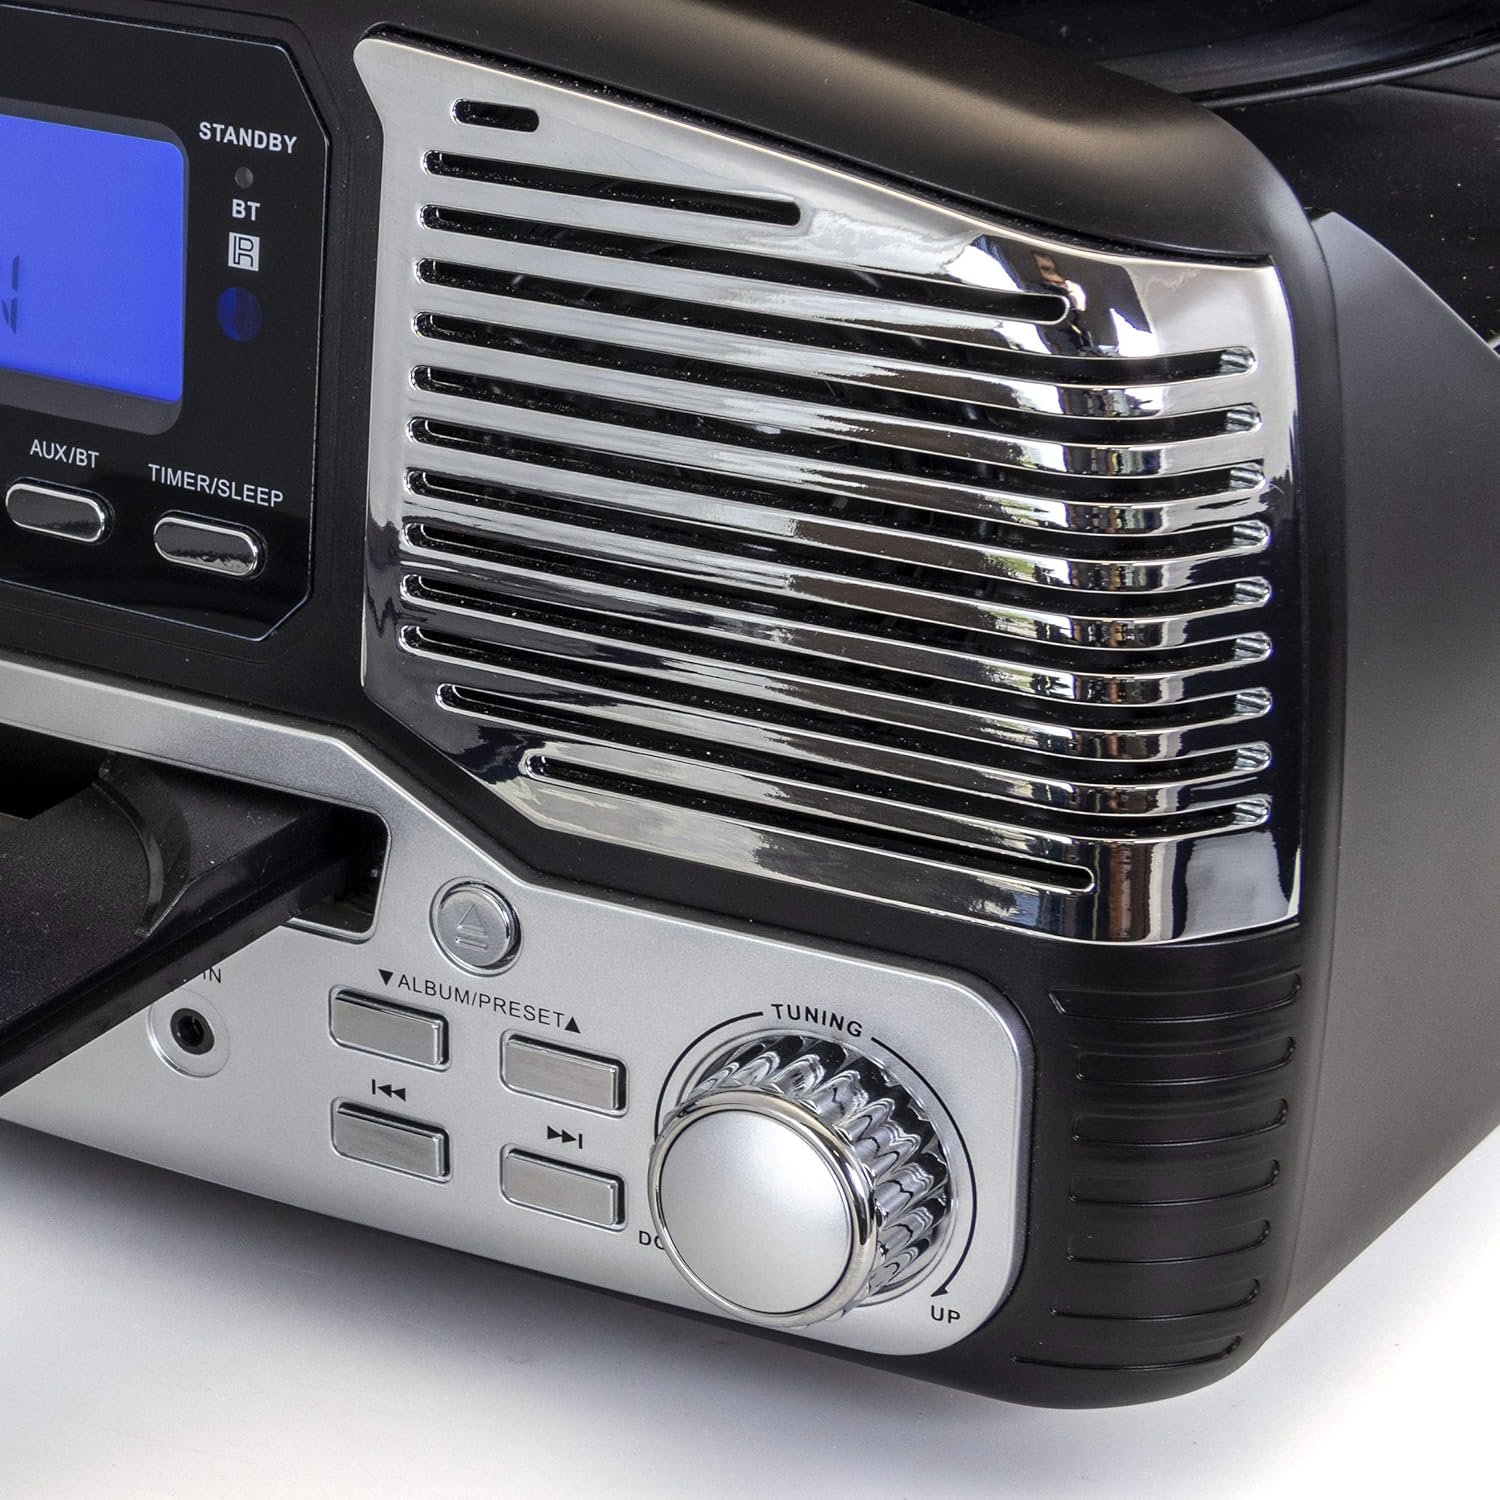
Billede: Nærbillede view of the tuning knob and track navigation buttons (SCAN, ALBUM/PRESET, UP, DOWN).
Nøglekontroller omfatter:
- Strøm-/lydstyrkeknap: Tænder/slukker enheden og justerer lydstyrken.
- Mode/CLK Button: Selects audio source (CD/USB/SD, PHONO, TUNER, AUX/BT) and sets clock.
- REC/DEL Button: Initiates recording to USB/SD or deletes files.
- Afspil/Pause, Stop, Spring over-knapper: Standard playback controls for CD/USB/SD.
- Tuning knap: For manual radio station selection.
- Timer/Sleep Button: Activates sleep timer or alarm settings.
- Hovedtelefonstik: 3.5 mm udgang til hovedtelefoner.
- USB-port: Til USB-flashdrev.
- SD-kortplads: Til SD-hukommelseskort.
- AUX IN -stik: 3.5 mm indgang til eksterne lydenheder.
- RCA Line Out (Rear): Forbinder til ekstern ampløftere eller elektriske højttalere.
- FM Antenna (Rear): Til FM-radiomodtagelse.
Indledende opsætning
Follow these steps to set up your Trexonic Retro Record Player:
- Udpakning: Tag forsigtigt enheden ud af emballagen. Gem emballagematerialerne til senere transport eller opbevaring.
- Placering: Placer enheden på en flad, stabil overflade væk fra direkte sollys, varmekilder og for meget støv eller fugt.
- Strømtilslutning: Connect the AC power adapter to the DC 12V IN (1000mA) jack on the rear of the unit, then plug the adapter into a standard wall outlet.
- FM-antenne: Extend the FM wire antenna located at the back of the unit for optimal radio reception.
- Eksterne forbindelser (valgfrit): If connecting to external speakers or an amplifier, use RCA cables to connect the LINE OUT jacks on the rear of the unit to the corresponding input jacks on your external audio equipment.

Image: The rear panel of the Trexonic Retro Record Player, illustrating the connection points for power, FM antenna, and RCA line-out.
Betjeningsvejledning
Afspiller vinylplader
This unit supports 33 1/3, 45, and 78 RPM records.
- Løft støvdækslet.
- Placer en plade på pladespillerens pladetallerken. Hvis du afspiller en 45 RPM single, skal du placere den medfølgende 45 RPM adapter på midterakslen.
- Set the speed selector switch to the appropriate speed (33, 45, or 78 RPM) for your record.
- Tryk på MODE/CLK button repeatedly until "PHONO" is displayed.
- Gently lift the tone arm from its rest and move it over the record. The platter will begin to rotate.
- Carefully lower the tone arm onto the desired track of the record.
- Juster lydstyrken ved hjælp af Strøm / lydstyrke knop.
- When the record finishes, the tone arm will automatically return to its rest (for most records). Lift the tone arm and return it to its rest manually if needed.

Billede: Et nærbillede view of the turntable in operation, showing the stylus tracking a vinyl record.
Playing Compact Discs (CD)
- Tryk på MODE/CLK button repeatedly until "CD" is displayed.
- Tryk på ÅBN/LUK knappen for at åbne CD-skuffen.
- Placer en cd i bakken med etiketten opad.
- Tryk på ÅBN/LUK button again to close the tray. The unit will read the CD and begin playback automatically.
- Brug AFSPIL/PAUSE, STOP, og SPRINGE knapper til at styre afspilning.

Image: The Trexonic Retro Record Player with its CD tray extended, ready for disc insertion or removal.
Tilslutning via Bluetooth
- Tryk på MODE/CLK button repeatedly until "BT" (Bluetooth) is displayed. The unit will enter pairing mode, indicated by a flashing Bluetooth icon on the display.
- Aktiver Bluetooth på din eksterne enhed (smartphone, tablet osv.), og søg efter tilgængelige enheder.
- Select "Trexonic" or "TRX-16BLK" from the list of devices.
- Once paired, the Bluetooth icon will stop flashing and remain solid. You can now stream audio wirelessly to the unit.
Brug af AM/FM-radio
- Tryk på MODE/CLK button repeatedly until "TUNER" is displayed.
- Drej på Tuning knob to manually select your desired AM or FM radio station.
- For better FM reception, adjust the position of the FM wire antenna on the rear of the unit.
USB/SD Card Functions (Playback & Recording)
The unit supports MP3 playback from USB flash drives and SD cards, and can record audio from vinyl to MP3 format.
- Afspilning: Insert a USB flash drive into the USB port or an SD card into the SD card slot. Press the MODE/CLK button until "USB" or "SD" is displayed. The unit will automatically detect and play MP3 files. Use playback controls to navigate.
- Recording (Vinyl to MP3):
- Sørg for, at der er isat et USB-drev eller SD-kort.
- Select "PHONO" mode.
- Begynd at spille din vinylplade.
- Tryk på REC/DEL button to begin recording. The display will indicate recording status.
- Trykke REC/DEL again to stop recording. The recorded MP3 file vil blive gemt på USB-drevet eller SD-kortet.
Connecting External Devices (AUX-In)
- Connect one end of a 3.5mm audio cable (not included) to the AUX IN jack on the front of the unit.
- Connect the other end of the cable to the headphone jack or audio output of your external device (e.g., MP3 player, smartphone).
- Tryk på MODE/CLK button repeatedly until "AUX" is displayed.
- Play audio from your external device. The sound will be routed through the Trexonic Retro Record Player's speakers.
Setting the Alarm and Sleep Timer
Detailed instructions for setting the alarm and sleep timer are typically found in the full product manual. Generally, these functions are accessed via the TIMER/SLEEP button and navigation controls.
- Indstilling af ur: Tryk og hold MODE/CLK to enter clock setting mode, then use navigation buttons to adjust time.
- Indstilling af alarm: Trykke TIMER/SLEEP to cycle through alarm settings (e.g., alarm time, source).
- Sleep timer: Trykke TIMER/SLEEP repeatedly to set a countdown timer for the unit to automatically turn off.
Opretholdelse
Proper care will ensure the longevity of your Trexonic Retro Record Player.
- Rengøring af enheden: Tør ydersiden af med en blød, tør klud. Brug ikke slibende rengøringsmidler eller opløsningsmidler.
- Rengøring af pennen: Use a soft brush (not included) to gently brush the stylus from back to front to remove dust. Do not touch the stylus with your fingers.
- Støvdæksel: Keep the dust cover closed when not in use to protect the turntable from dust and debris.
- Optagelsespleje: Keep your vinyl records clean and stored vertically in their sleeves to prevent warping and dust accumulation.
Fejlfinding Guide
If you encounter any issues, please refer to the following table before seeking professional service.
| Problem | Mulig årsag | Løsning |
|---|---|---|
| Ingen strøm | Netledningen er ikke korrekt tilsluttet. | Sørg for, at netledningen er korrekt tilsluttet enheden og stikkontakten. |
| Ingen lyd fra højttalerne | Lydstyrken er for lav eller slået fra. Forkert tilstand valgt. | Øg lydstyrken. Tryk MODE/CLK to select the correct audio source. |
| Turntable not spinning or sound distorted | Speed setting incorrect. Stylus dirty or damaged. Tone arm not properly lowered. | Check the speed selector. Clean or replace stylus. Ensure tone arm is fully lowered onto the record. |
| CD'en afspiller ikke | CD inserted incorrectly or disc is scratched/dirty. Incorrect mode. | Ensure CD is inserted label-side up. Clean or try another CD. Select "CD" mode. |
| Problemer med Bluetooth-parring | Device too far. Bluetooth not enabled on external device. | Move devices closer. Ensure Bluetooth is enabled and "Trexonic" is selected. |
| Dårlig radiomodtagelse | FM-antennen er ikke trukket ud eller placeret korrekt. | Fully extend and adjust the FM wire antenna. Try repositioning the unit. |
Tekniske specifikationer
| Feature | Specifikation |
|---|---|
| Modelnummer | TRX-16BLK |
| Strømindgang | DC 12V, 1000mA (via AC adapter) |
| Pladespiller hastigheder | 33 1/3, 45, 78 omdr./min |
| Forbindelse | Bluetooth, Wired (AUX-In, RCA Line-Out) |
| Mediesupport | Vinyl Records, Audio CDs, USB (MP3), SD Card (MP3) |
| Radiofrekvenser | AM/FM |
| Dimensioner (ca.) | 13 x 12 x 6 tommer (pakkemål) |
| Vægt (ca.) | 8 pund |
| Materiale | Plast |
Garantioplysninger og kundesupport
Trexonic products are designed and manufactured to the highest quality standards. For specific warranty details, please refer to the warranty card included with your purchase or visit the official Trexonic website. If you require technical assistance or have questions regarding your product, please contact Trexonic customer support through their official channels.
Gem venligst dit købsbevis for garantikrav.


