1. Introduktion
The BONTRAGER NODE2.1 is an advanced cycle computer designed to provide cyclists with essential ride data. This manual will guide you through the setup, operation, and maintenance of your NODE2.1 to ensure optimal performance and longevity.
Key features include real-time display of speed, distance, time, cadence, and heart rate (with compatible sensors). Its intuitive interface allows for easy navigation and data tracking during your rides.

Figur 1.1: Forside view of the BONTRAGER NODE2.1 Cycle Computer, showing the digital display with time, speed, and other metrics.
2. Pakkens indhold
Before proceeding with the setup, please verify that all items listed below are present in your package. If any items are missing or damaged, please contact BONTRAGER customer support.
- BONTRAGER NODE2.1 Cycle Computer Unit
- Handlebar/Stem Mount
- Speed/Cadence Sensor (DuoTrap S or similar, inferred from accessories)
- Heart Rate Monitor Strap (if included in specific bundle)
- Mounting Hardware (Zip ties, rubber pads, screws)
- Brugervejledning (dette dokument)

Figur 2.1: Overview of the BONTRAGER NODE2.1 Cycle Computer and its accessories, including the main unit, sensors, and mounting hardware, as packaged.
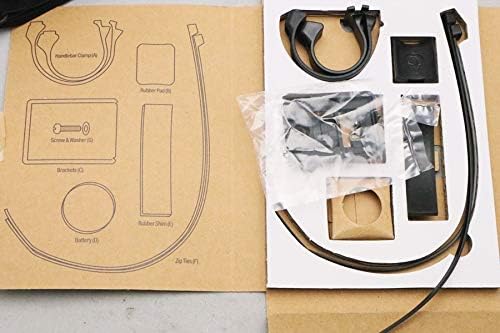
Figure 2.2: Close-up of the mounting hardware and additional accessories, including handlebar clamps, rubber pads, screws, brackets, and zip ties, essential for installation.
3. Opsætning
3.1 Batteriinstallation
The NODE2.1 uses a standard coin cell battery (e.g., CR2032). To install or replace the battery:
- Find batteridækslet på bagsiden af enheden.
- Use a coin or flat-head screwdriver to turn the battery cover counter-clockwise to the "OPEN" position.
- Remove the old battery (if replacing) and insert the new battery with the positive (+) side facing up.
- Align the battery cover and turn it clockwise to the "CLOSE" position until it clicks securely.
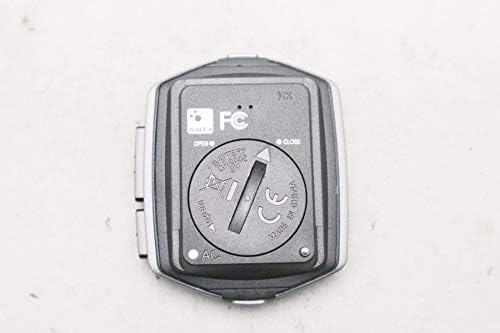
Figur 3.1: Bagside view of the NODE2.1 unit, highlighting the battery compartment with "OPEN" and "CLOSE" indicators for battery installation or replacement.
3.2 Mounting the Cycle Computer
The NODE2.1 can be mounted on your bicycle's handlebar or stem using the provided mount.
- Choose a suitable location on your handlebar or stem that provides clear visibility and does not obstruct your riding.
- Attach the mount using the provided zip ties or screws, ensuring it is secure and stable.
- Slide the NODE2.1 unit onto the mount until it clicks into place.
3.3 Sensor Installation and Pairing
For speed, cadence, and heart rate data, you will need to install and pair compatible ANT+ sensors (e.g., Bontrager DuoTrap S for speed/cadence, or a separate heart rate strap).
- Speed/Cadence Sensor: Follow the sensor's specific instructions for installation on your bike's chainstay or wheel. Ensure the sensor is correctly aligned with the magnets.
- Pulsmåler: Wear the heart rate strap directly on your skin, just below your chest muscles. Moisten the electrodes for better conductivity.
- Parring: Refer to the NODE2.1's on-screen menu for sensor pairing. Typically, you will navigate to a "Sensors" or "Pairing" menu, activate the sensor (e.g., spin the wheel, wear the HR strap), and select it when it appears on the computer's display.

Figure 3.2: The BONTRAGER heart rate monitor strap, designed to be worn around the chest for accurate heart rate tracking during cycling.
4. Betjeningsvejledning
4.1 Tænd/sluk
- Tænd: Press any button to wake the unit from sleep mode or power it on.
- Sluk: The unit typically enters sleep mode automatically after a period of inactivity to conserve battery. To manually power off, hold down a specific button (refer to on-screen prompts or quick start guide).

Figur 4.1: Sideprofile of the NODE2.1, illustrating the placement of a control button and the "node 2.1" branding.
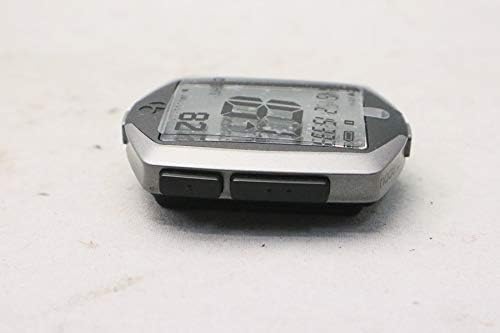
Figur 4.2: En alternativ side view of the NODE2.1, highlighting the array of control buttons on the unit's side, used for navigation and function selection.
4.2 Navigating Menus and Display Modes
The NODE2.1 features multiple display screens and menus to access various data and settings. Use the side buttons to navigate:
- Mode knap: Typically cycles through different display screens (e.g., current speed, average speed, distance, time, cadence, heart rate).
- Set/Enter Button: Bruges til at bekræfte valg eller åbne indstillingsmenuer.
- Op/Ned knapper: Used to scroll through options within menus.
Consult the on-screen prompts for specific button functions in different contexts.
4.3 Starting and Stopping a Ride
To record your ride data:
- Ensure all sensors are paired and active.
- The unit will typically start recording automatically when movement is detected or a sensor signal is received.
- To pause or stop a ride, press the designated button (often the "Mode" or "Lap" button, or a dedicated "Start/Stop" button).
- To save the ride, navigate to the "Save Ride" option in the menu.
5. Vedligeholdelse
5.1 Rengøring
To keep your NODE2.1 in optimal condition:
- Tør enheden af med en blød, damp klæde.
- Brug ikke slibende rengøringsmidler eller opløsningsmidler, da disse kan beskadige displayet ellerasing.
- Ensure the battery compartment is clean and dry when replacing the battery.
5.2 Udskiftning af batteri
Replace the battery when the low battery indicator appears on the display. Refer to Section 3.1 for detailed instructions on battery installation.
5.3 Opbevaring
If storing the unit for an extended period, remove the battery to prevent leakage and potential damage to the device.
6. Fejlfinding
| Problem | Mulig årsag | Løsning |
|---|---|---|
| Intet display/Enheden tænder ikke | Dead battery; Unit in sleep mode; Battery incorrectly installed. | Replace battery; Press any button to wake; Reinstall battery correctly. |
| No speed/cadence data | Sensor not paired; Sensor battery low; Sensor misaligned; Magnet missing. | Re-pair sensor; Replace sensor battery; Adjust sensor/magnet position; Ensure magnet is present. |
| Ingen pulsdata | HR strap not paired; HR strap battery low; Electrodes not moistened; Strap not positioned correctly. | Re-pair HR strap; Replace HR strap battery; Moisten electrodes; Adjust strap position. |
| Unøjagtige dataaflæsninger | Incorrect wheel size setting; Sensor interference; Loose sensor. | Verify wheel size in settings; Move away from strong electromagnetic sources; Secure all sensors. |
If you encounter issues not listed here, or if the suggested solutions do not resolve the problem, please contact BONTRAGER customer support.
7. Specifikationer
- Mærke: BONTRAGER
- Model: NODE2.1
- Forbindelse: ANT+ (for sensors)
- Vise: LCD
- Batteritype: CR2032 (main unit)
- Funktioner: Speed (Current, Average, Max), Distance (Trip, Odometer), Time (Ride, Clock), Cadence, Heart Rate (with compatible sensors)
- ASIN: B07X4FW26K
- Første tilgængelige dato: 2019/8/30
8. Garanti og support
For warranty information, product registration, or technical support, please visit the official BONTRAGER webwebstedet eller kontakt deres kundeserviceafdeling. Gem din købsbevis til garantikrav.
Officiel Webwebsted: www.trekbikes.com/us/en_US/bontrager/ (This is a general link, specific support page might vary)
Kundeservice: Se kontaktoplysningerne på den officielle webwebsted for din region.


