Indledning
Thank you for choosing the KitchenAid Artisan 2-Slot Electric Toaster. This manual provides essential information for the safe and efficient operation of your new appliance. Please read all instructions carefully before use and retain this manual for future reference.
The KitchenAid Artisan Toaster is designed to provide an ultimate toasting experience with its auto-sensor technology, which automatically lowers and lifts toast. It features multiple browning settings, a keep-warm function, and specialized modes for bagels and sandwiches, ensuring perfect results for various bread types.
Vigtige sikkerhedsforanstaltninger
Ved brug af elektriske apparater skal grundlæggende sikkerhedsforanstaltninger altid følges, herunder følgende:
- Læs alle instruktioner.
- Rør ikke ved varme overflader. Brug håndtag eller knopper.
- For at beskytte mod elektrisk stød må ledning, stik eller brødrister ikke nedsænkes i vand eller anden væske.
- Tæt opsyn er nødvendigt, når et apparat bruges af eller i nærheden af børn.
- Træk stikket ud af stikkontakten, når det ikke er i brug, og før rengøring. Lad det køle af, før du sætter dele på eller af.
- Brug ikke et apparat med en beskadiget ledning eller stik, eller efter at apparatet ikke fungerer korrekt, er blevet tabt eller beskadiget på nogen måde. Returner apparatet til den nærmeste autoriserede servicevirksomhed for undersøgelse, reparation eller justering.
- Brug af tilbehør, der ikke er anbefalet af apparatets producent, kan forårsage skader.
- Må ikke bruges udendørs.
- Lad ikke ledningen hænge ud over kanten af bordet eller bordpladen eller røre ved varme overflader.
- Må ikke placeres på eller i nærheden af en varm gas- eller elektrisk brænder eller i en opvarmet ovn.
- Der skal udvises ekstrem forsigtighed ved flytning af et apparat, der indeholder varm olie eller andre varme væsker.
- Brug ikke apparatet til andet end tilsigtet brug.
- For store fødevarer, metalfolieemballager eller bestik må ikke lægges i en brødrister, da de kan forårsage brand eller risiko for elektrisk stød.
- Der kan opstå brand, hvis brødristere er dækket eller rører brandbart materiale, herunder gardiner, gardiner, vægge og lignende, når de er i drift.
- Forsøg ikke at skubbe mad ud, når brødristeren er tilsluttet.
- Betjen ikke uden opsyn.
- Sæt altid stikket i apparatet først, og sæt derefter ledningen i stikkontakten. For at afbryde forbindelsen skal du slukke for en vilkårlig knap og derefter tage stikket ud af stikkontakten.
Dele og funktioner

Figur 1: Front view of the KitchenAid Artisan 2-Slot Electric Toaster in Cast Iron Black. This image highlights the sleek design, control panel with function buttons, browning control knob, and LED countdown timer.

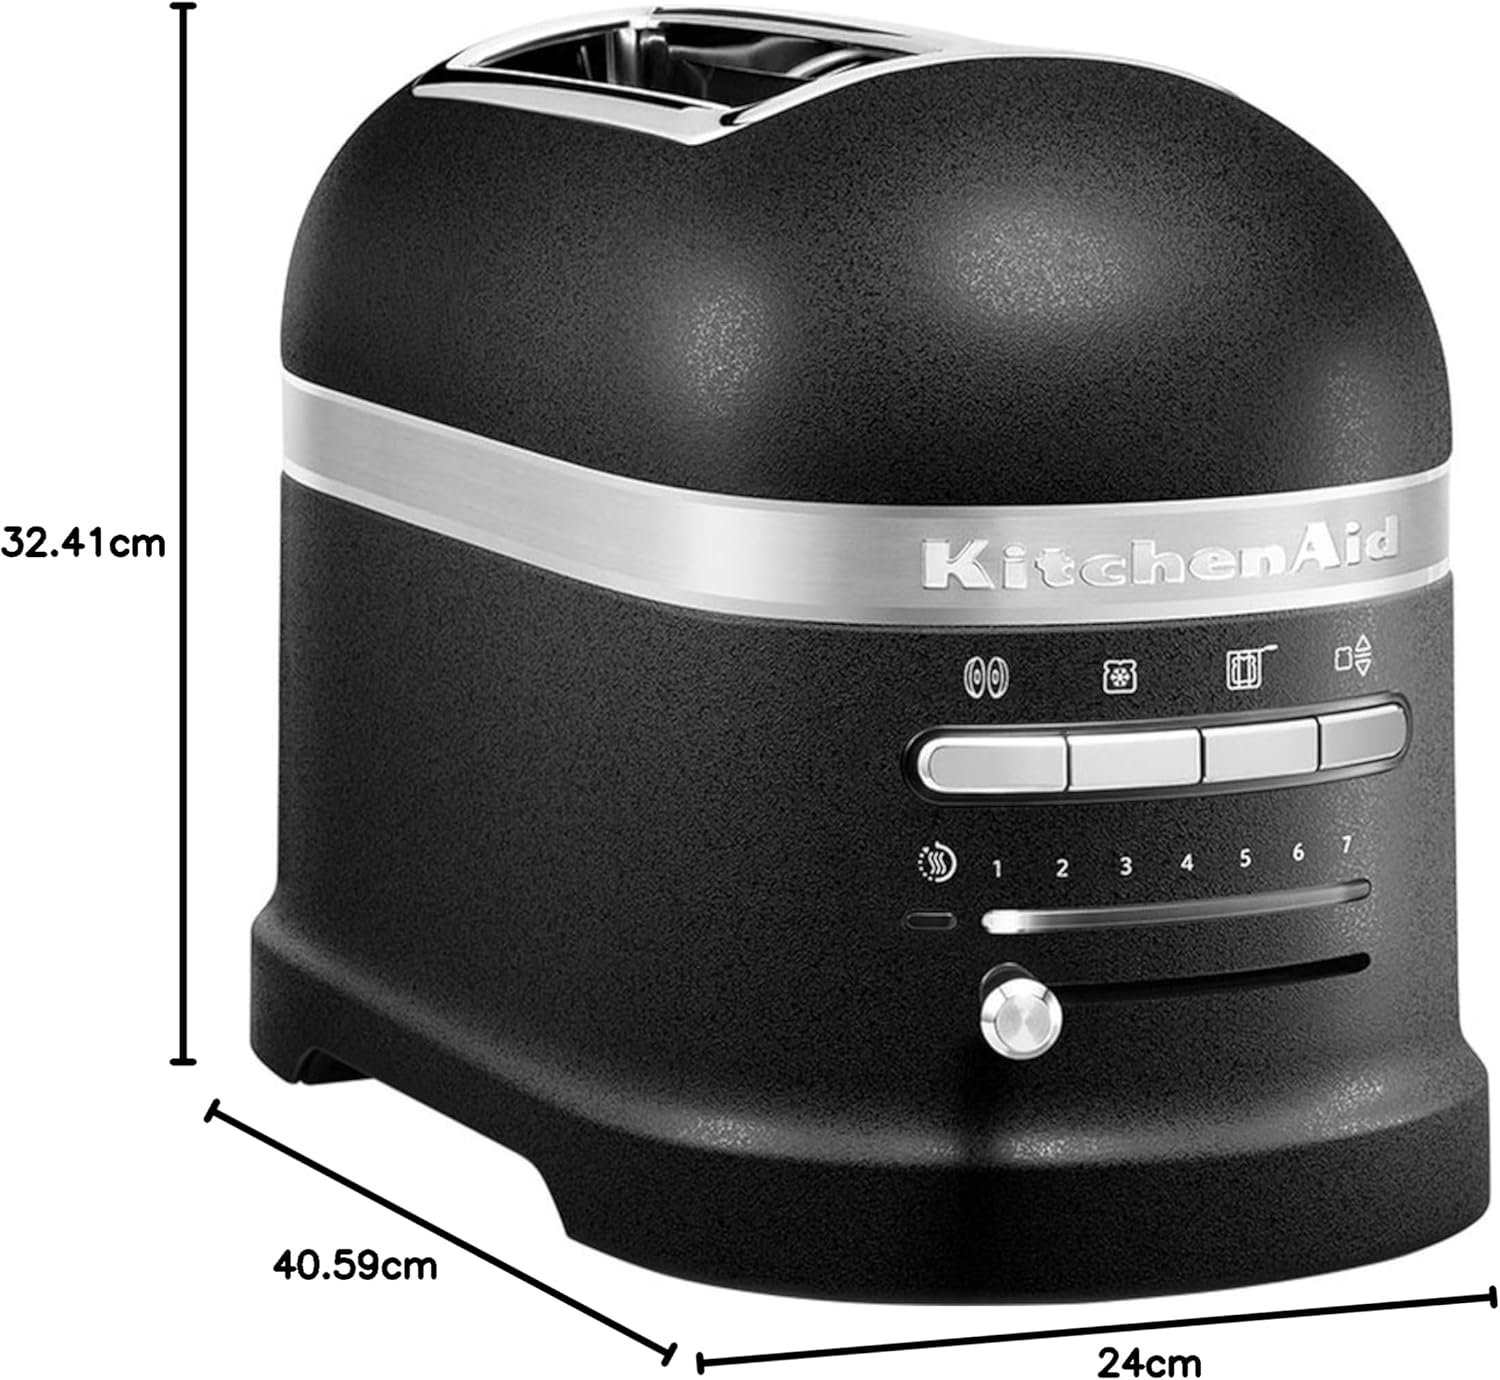
Figur 2: Side view of the KitchenAid Artisan 2-Slot Electric Toaster showing its approximate dimensions: 32.41 cm height, 40.59 cm depth, and 24 cm width. These measurements help in planning counter space.
- Ekstra brede ristepladser: Accommodates various bread types, including thick slices and bagels.
- Auto Sensor with Keep-Warm Feature: Automatically lowers and lifts toast, and keeps it warm if not removed promptly.
- 7 Browning Settings: Allows precise control over toast shade, from lightly toasted to dark.
- LED Countdown Timer: Visually indicates the remaining toasting time.
- Bagel funktion: Rister den skårne side af bagels, mens den forsigtigt varmer ydersiden op.
- Frozen Function: Gently defrosts and toasts frozen bread.
- Sandwich Function: Designed for use with the included sandwich rack.
- Annuller knap: Stopper ristningscyklussen når som helst.
- Aftagelig krummebakke: For nem rengøring.

Figur 3: The stainless steel sandwich rack accessory included with the KitchenAid Artisan Toaster. This rack is used to prepare delicious, no-drip toasted sandwiches.
Opsætning
- Udpakning: Carefully remove the toaster and all accessories from the packaging. Retain packaging for storage or future shipping.
- Placering: Placer brødristeren på en stabil, flad og varmebestandig overflade, væk fra brandfarlige materialer såsom gardiner eller vægge. Sørg for tilstrækkelig ventilation omkring brødristeren.
- Første brug: Before first use, operate the toaster without bread on the highest browning setting (7) to burn off any manufacturing residues. A slight odor or smoke may be present; this is normal and will dissipate. Ensure the area is well-ventilated.
- Strømtilslutning: Sæt netledningen i en jordet stikkontakt. Sørg for, at lydstyrken er korrekt.tage of your power supply matches the rating label on the toaster.
Betjeningsvejledning
Grundlæggende ristning
- Sæt brødskiverne i risteåbningerne.
- Select your desired browning level using the browning control knob (settings 1-7). A lower number yields lighter toast, a higher number yields darker toast.
- The auto sensor will automatically lower the bread into the toasting slots. The LED countdown timer will illuminate, indicating the progress of the toasting cycle.
- Once the cycle is complete, the toast will automatically be lifted. If the toast is not removed within 45 seconds, the keep-warm function will activate for up to 3 minutes.
- For at stoppe ristningscyklussen når som helst, tryk på knappen Annuller.
Brug af specielle funktioner
- Bagel funktion:
This function is ideal for bagels and buns. It toasts the cut side while gently warming the outer side.
- Insert the bagel halves with the cut side facing inwards.
- Vælg det ønskede bruningsniveau.
- Tryk på Bagel button. The indicator light for the Bagel function will illuminate.
- The toaster will automatically lower the bagel and begin the cycle.
- Frozen Function:
Use this function to defrost and toast frozen bread, waffles, or pastries.
- Sæt frossent brød i rillerne.
- Vælg det ønskede bruningsniveau.
- Tryk på Frossen button. The indicator light for the Frozen function will illuminate.
- The toaster will automatically lower the bread and adjust the toasting time for frozen items.
- Sandwich Function (with Sandwich Rack):
This function is specifically designed for preparing toasted sandwiches using the included sandwich rack.
- Prepare your sandwich and place it inside the sandwich rack.
- Insert the sandwich rack with the sandwich into the toasting slot.
- Vælg det ønskede bruningsniveau.
- Tryk på Sandwich button. The indicator light for the Sandwich function will illuminate.
- The toaster will automatically lower the sandwich rack and begin the cycle.
- Hold varm funktion:
If toast is not removed from the toaster within 45 seconds after the toasting cycle finishes, the toaster will automatically activate the Keep Warm function for up to 3 minutes. This ensures your toast remains warm until you are ready to retrieve it.
Vedligeholdelse og rengøring
Regular cleaning will help maintain the performance and appearance of your toaster.
- Tag altid stikket ud af brødristeren fra stikkontakten og lad den køle helt af, inden den rengøres.
- Krummebakke: Pull out the removable crumb tray located at the bottom of the toaster. Empty crumbs into a waste bin. Wipe the tray with a damp cloth and dry thoroughly before reinserting. Clean the crumb tray regularly to prevent crumb buildup, which can be a fire hazard.
- Ydre: Tør brødristerens yderside af med en blød, tør klud.amp cloth. Do not use abrasive cleaners or scouring pads, as they may scratch the surface. For stubborn marks, a mild detergent can be used, followed by wiping with a clean, damp klud og tør grundigt.
- Indre: Do not insert any objects into the toasting slots to clean. If food becomes lodged, unplug the toaster and carefully invert it to dislodge the food.
- Opbevaring: When not in use, store the toaster in a clean, dry place. You may wrap the power cord around the cord wrap (if available) on the bottom of the unit.
Fejlfinding
| Problem | Mulig årsag | Løsning |
|---|---|---|
| Brødristeren tænder ikke. | Ikke tilsluttet; strømmen er slukkettage; afbryderen er udløst. | Sørg for, at brødristeren er tilsluttet en stikkontakt, der virker. Kontroller husets afbryder. |
| Bread does not lower automatically. | Toaster is not plugged in or powered on; sensor obstruction. | Ensure toaster is plugged in and power is on. Check for any obstructions in the slots. |
| Toasten er for lys eller for mørk. | Browning setting is incorrect for bread type; bread moisture content varies. | Adjust the browning control knob to a higher or lower setting. Different bread types and freshness levels require different settings. |
| Røg kommer fra brødristeren. | Crumbs accumulated in crumb tray; food lodged in slots; first use burn-off. | Unplug immediately. Clean crumb tray. If food is lodged, unplug and carefully remove. Initial smoke is normal for first use. |
| Keep Warm function not activating. | Toast removed too quickly; malfunction. | Ensure toast remains in slots for at least 45 seconds after cycle completion. If issue persists, contact customer support. |
Hvis problemet fortsætter efter at have prøvet disse løsninger, bedes du kontakte KitchenAid kundeservice.
Specifikationer
- Model: 5KMT2204BBK
- Mærke: KitchenAid
- Farve: Støbejern Sort
- Materiale: Rustfrit stål
- Antal skiver: 2
- Voltage: 240 volt
- Produktdimensioner: Approximately 24 cm (width) x 40.59 cm (depth) x 32.41 cm (height)
- Varens vægt: 6.08 kg
- Særlige funktioner: LED Indicator, Auto Sensor, Keep Warm, Bagel Function, Frozen Function, Sandwich Function.
Garanti og support
The KitchenAid Artisan 2-Slot Electric Toaster comes with a 5 års garanti, ensuring peace of mind and long-lasting performance.
Figur 4: Official KitchenAid 5-Year Guarantee logo, signifying the extended warranty period for this product.
For warranty claims, technical support, or service inquiries, please visit the official KitchenAid website or contact their customer service department. Please have your model number (5KMT2204BBK) and proof of purchase ready when contacting support.
You can find more information and contact details on the official KitchenAid webwebsted: www.kitchenaid.com


