1. Introduktion
This manual provides detailed instructions for the installation, operation, and maintenance of your Antec NX210 Mid-Tower ATX Computer Cabinet. Please read this manual thoroughly before beginning assembly or use to ensure proper functionality and safety.
The Antec NX210 is designed to accommodate ATX, Micro-ATX, and ITX motherboards, offering ample space for components and efficient cooling with pre-installed ARGB fans.
2. Sikkerhedsoplysninger
Overhold følgende sikkerhedsforanstaltninger under installation og drift:
- Afbryd altid strømforsyningen fra stikkontakten, før du installerer eller fjerner komponenter, for at forhindre elektrisk stød.
- Håndter komponenterne forsigtigt for at undgå skader fra statisk elektricitet. Overvej at bruge en antistatisk håndledsrem.
- Keep the cabinet away from direct sunlight, heat sources, and moisture.
- Sørg for tilstrækkelig ventilation for at forhindre overophedning. Bloker ikke luftventilerne.
- Opbevar små dele og værktøj utilgængeligt for børn.
3. Pakkens indhold
Bekræft at alle varer er til stede i pakken:
- Antec NX210 Mid-Tower ATX Computer Cabinet
- 4 x 120mm ARGB Fans (3 pre-installed in front, 1 pre-installed in rear)
- Accessory Box (screws, cable ties, etc.)
- Brugervejledning (dette dokument)
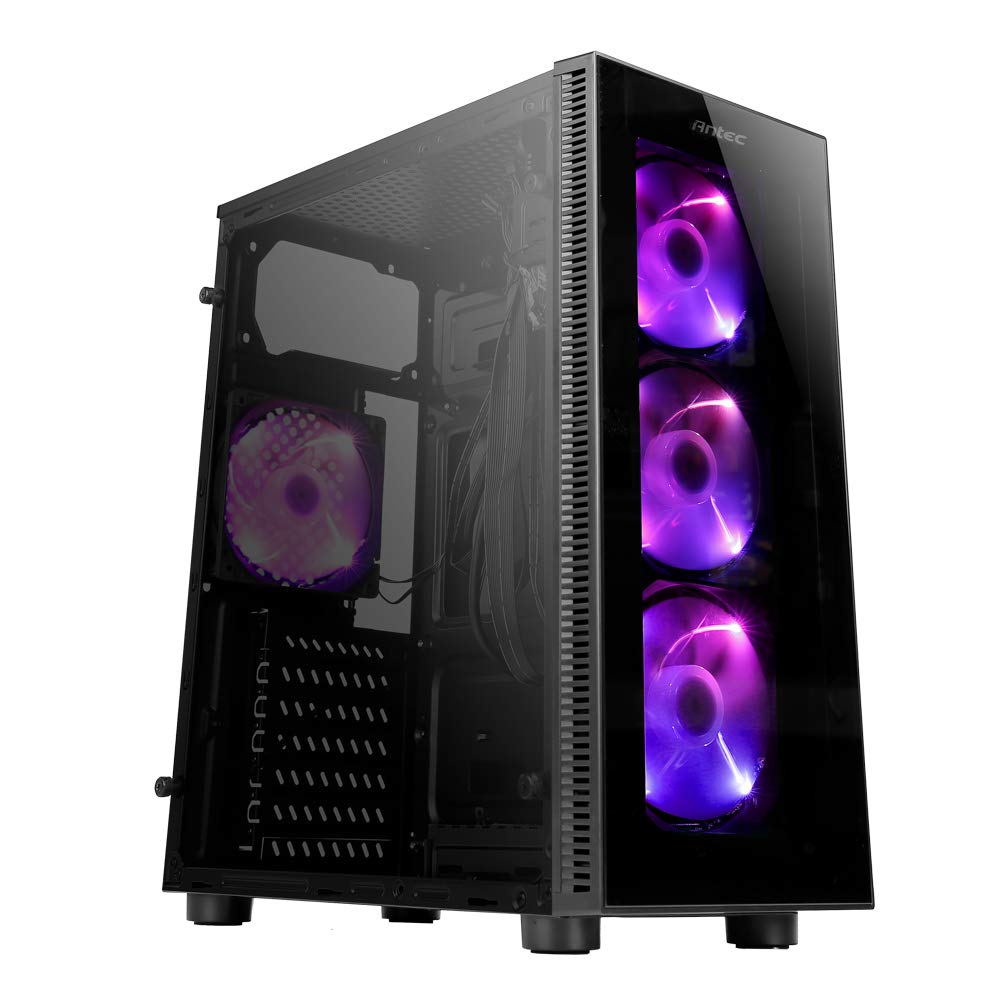
Image: Antec NX210 Mid-Tower ATX Computer Cabinet, showcasing its tempered glass side panel and front ARGB fans.
4. Product Features and Layout
4.1 Ekstern Views

Billede: Forside og bagside views of the Antec NX210 cabinet, highlighting the tempered glass front panel with ARGB fans and the rear I/O panel layout.

Image: Left side (tempered glass) and right side (solid panel) views of the Antec NX210 cabinet.
4.2 Øverste I/O-panel
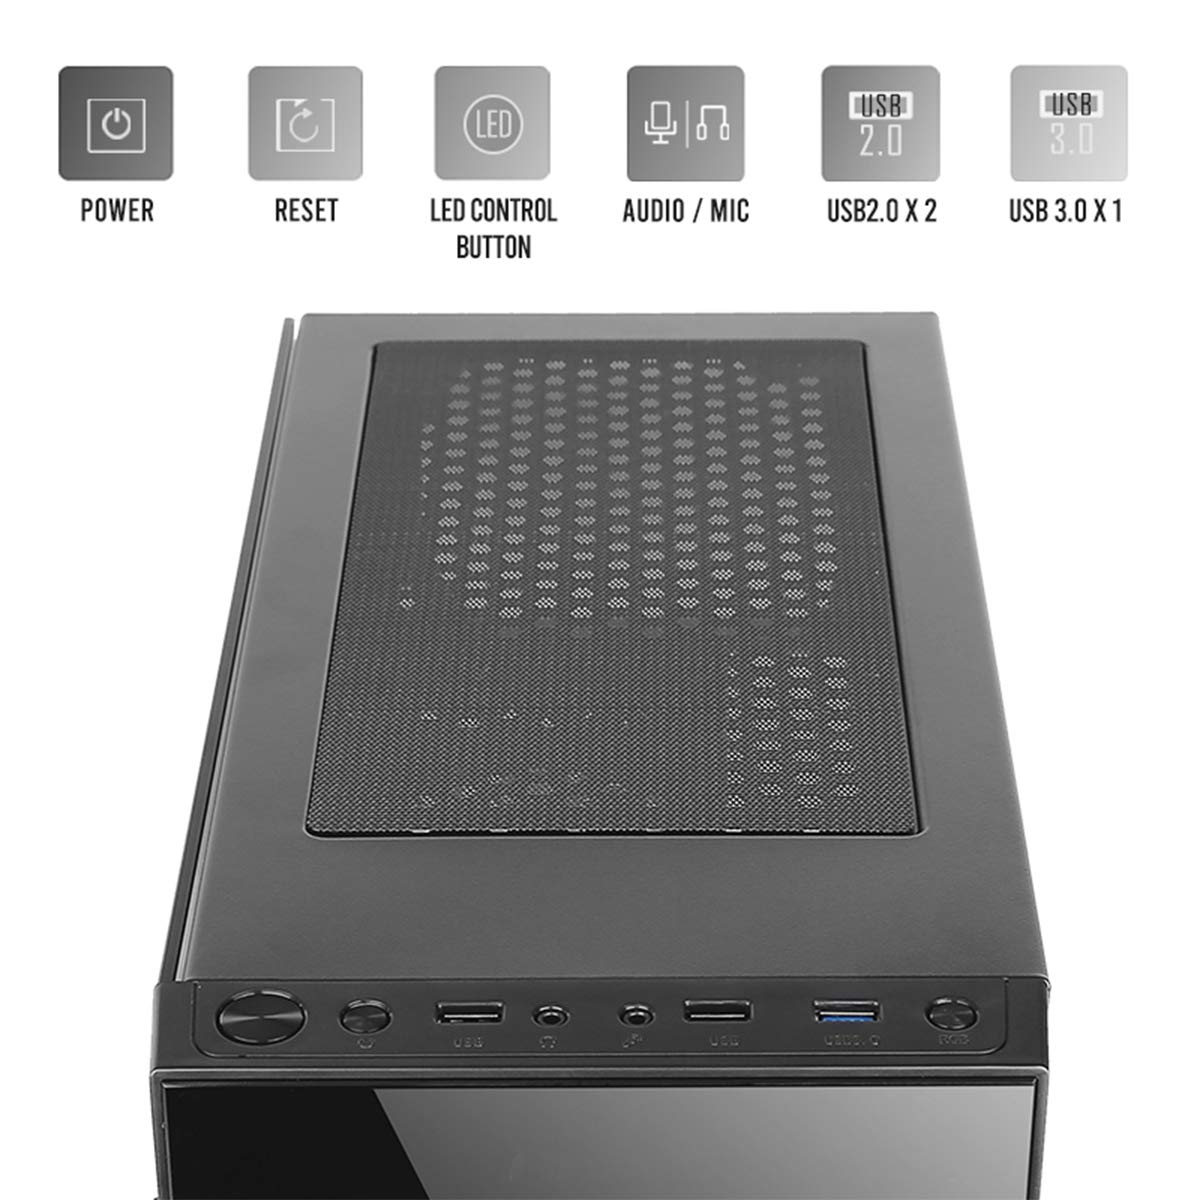
Image: Close-up of the top I/O panel, showing the Power button, Reset button, LED Control button, Audio/Mic jacks, 2x USB 2.0 ports, and 1x USB 3.0 port.
- Power knap: For at tænde eller slukke systemet.
- Nulstil knap: For at genstarte systemet.
- LED-kontrolknap: To cycle through ARGB lighting effects for the pre-installed fans.
- Audio / Mic Jacks: Til tilslutning af hovedtelefoner og mikrofoner.
- USB 2.0-porte (x2): Til tilslutning af USB 2.0-enheder.
- USB 3.0-port (x1): For connecting USB 3.0 devices, offering faster data transfer speeds.
4.3 Internal Layout and Component Support

Image: Diagram illustrating the internal layout of the Antec NX210, indicating locations for motherboard, SSDs, HDDs, GPU, CPU cooler, and PSU.
- Bundkort support: Up to ATX (also supports Micro-ATX, ITX).
- 2.5" SSD Support: 3 drive bays.
- 3.5" HDD Support: 1 drive bay.
- Grafikkortunderstøttelse: Up to 310mm in length.
- CPU-kølerunderstøttelse: Up to 155mm in height.
- PSU support: Up to 220mm in length (top-mounted).
4.4 Kølesystem

Image: Diagram showing fan and radiator mounting options for the Antec NX210, including pre-installed fans.
- Forudinstallerede blæsere: 4 x 120mm ARGB fans (3 in front, 1 in rear).
- Front Fan Support: 3 x 120 mm.
- Bageste ventilatorstøtte: 1 x 120 mm.
- Radiatorstøtte: Front up to 240mm, Rear up to 120mm.
5. Opsætning og installation
Follow these general steps for installing components into your Antec NX210 cabinet. Specific component manuals should be consulted for detailed installation instructions.
5.1 Klargøring af kabinettet
- Place the cabinet on a stable, flat surface.
- Remove the tempered glass side panel by unscrewing the thumbscrews at the rear and carefully pulling the panel away.
- Remove the right-side metal panel by unscrewing the thumbscrews at the rear.
5.2 Installation af bundkort
- Install the I/O shield into the rear opening of the cabinet.
- Align your motherboard with the standoffs inside the cabinet. Ensure the standoffs match your motherboard's form factor (ATX, Micro-ATX, ITX).
- Fastgør bundkortet med de medfølgende skruer.
5.3 Installation af strømforsyningsenhed (PSU).
- The Antec NX210 supports a top-mounted ATX PS2 power supply.
- Slide the PSU into the designated top compartment from the rear of the cabinet.
- Secure the PSU with screws from the rear of the cabinet.
5.4 Installation af lagerdrev (HDD/SSD)
- 3.5" harddisk: Locate the 3.5" drive bay. Slide the HDD into the bay and secure it with screws.
- 2.5" SSD: Locate the 2.5" SSD mounting points behind the motherboard tray. Secure the SSDs with screws.
5.5 Installation af grafikkort (GPU)
- Remove the necessary PCIe slot covers from the rear of the cabinet.
- Indsæt grafikkortet i det relevante PCIe-slot på bundkortet.
- Fastgør grafikkortet med skruer.
5.6 Kabelstyring
Brug kabelføringsudskæringerne og fastgørelsespunkterne bag bundkortbakken til at håndtere kabler. Dette forbedrer luftgennemstrømningen og æstetikken.
5.7 Connecting Front Panel Cables
Connect the front panel cables (Power SW, Reset SW, HDD LED, Power LED, USB 2.0, USB 3.0, HD Audio) to the corresponding headers on your motherboard. Refer to your motherboard manual for exact pin layouts.
6. Betjeningsvejledning
6.1 Tænd
After all components are installed and cables connected, close both side panels. Connect the power cable to the PSU and a wall outlet. Press the Power button on the top I/O panel to turn on your system.
6.2 ARGB-blæserstyring
The pre-installed ARGB fans are connected to an internal controller. Use the LED-kontrolknap on the top I/O panel to cycle through various lighting modes and effects. The fans will display a default lighting effect upon initial power-up.
7. Vedligeholdelse
Regular maintenance helps ensure optimal performance and longevity of your computer cabinet.
- Støvfiltre: The Antec NX210 features a dust filter on the top panel. Regularly remove and clean this filter to prevent dust buildup and maintain good airflow.
- Indvendig rengøring: Periodically open the side panels and use compressed air to remove dust from internal components and fan blades. Ensure the system is powered off and unplugged before cleaning.
- Udvendig rengøring: Tør de udvendige overflader af med en blød, damp klud. Undgå slibende rengøringsmidler eller opløsningsmidler.
8. Fejlfinding
Hvis du støder på problemer, kan du overveje følgende grundlæggende fejlfindingstrin:
- Ingen strøm:
- Sørg for, at strømforsyningen er korrekt tilsluttet stikkontakten, og at tænd/sluk-knappen på strømforsyningen er i 'ON'-positionen.
- Verify that the front panel Power button cable is correctly connected to the motherboard header.
- Check all internal power connections (24-pin ATX, 8-pin CPU, PCIe power for GPU).
- Fans Not Spinning / ARGB Not Working:
- Sørg for, at alle strømkabler til blæseren er korrekt tilsluttet til bundkortet eller blæsercontrolleren.
- Verify ARGB cables are correctly connected to the internal controller and the controller is powered.
- Try pressing the LED Control Button on the top I/O panel to cycle effects.
- USB-porte fungerer ikke:
- Check that the USB 2.0 and USB 3.0 front panel cables are correctly connected to the corresponding headers on your motherboard.
For more complex issues, consult the manuals for your individual components or seek professional assistance.
9. Specifikationer

Image: Diagram showing the physical dimensions of the Antec NX210 cabinet.
| Feature | Detalje |
|---|---|
| Model | NX210 |
| Sagstype | Mid Tower |
| Dimensioner (L x B x H) | 43.99 x 38.99 x 21.01 cm (ca. 395 x 210 x 445 mm) |
| Materiale | SPCC, hærdet glas |
| Bundkort support | ATX, Micro-ATX, ITX |
| Udvidelsesslots | 7 |
| Drive Bays | 1 x 3.5" harddisk, 3 x 2.5" SSD |
| Front I / O-porte | Power, Reset, LED Control Button, MIC/Audio, 2 x USB 2.0, 1 x USB 3.0 |
| Forudinstallerede ventilatorer | 4 x 120mm ARGB fans (3 front, 1 rear) |
| Ventilatorstøtte (foran) | 3 x 120 mm |
| Ventilatorstøtte (bag) | 1 x 120 mm |
| Kølerstøtte (foran) | Op til 240 mm |
| Kølerstøtte (bag) | Op til 120 mm |
| Max GPU-længde | 310 mm |
| Max CPU kølerhøjde | 155 mm |
| PSU support | ATX PS2 (Top Mounted), Max length 220mm |
| Støvfilter | Top |
| Varens vægt | 4.8 kg |
10. Garanti og support
The Antec NX210 Computer Cabinet comes with a 1 års garanti fra købsdatoen. Gem venligst din købsbevis i tilfælde af garantikrav.
For technical support or warranty inquiries, please contact Antec customer service or your local distributor.
Fabrikant: Antec Inc. 8F, No 107, Jhouzih St, Neihu District, Taipei City 114, Taiwan
Importør (Indien): Acro Engineering Company, Khasra No 522/1, Village Jonapur, Delhi - 110 030
Du kan finde flere oplysninger og supportressourcer på den officielle Antec-butik på Amazon.


