1. Introduktion
Thank you for choosing the Soundmaster Eliteline IR300SI Internet DAB+ FM Radio. This device offers a wide range of audio entertainment options, including Internet Radio, DAB+ digital radio, FM radio, Bluetooth connectivity, and USB playback. It also features Amazon Alexa compatibility for voice control and can be managed via the UNDOK app. This manual provides essential information for setting up, operating, and maintaining your radio.
2. Sikkerhedsoplysninger
- Læs alle instruktioner omhyggeligt før brug, og gem dem til senere brug.
- Udsæt ikke enheden for regn, fugt eller ekstreme temperaturer.
- Sørg for ordentlig ventilation; bloker ikke ventilationsåbninger.
- Brug kun den strømadapter, der følger med enheden.
- Forsøg ikke at åbne eller reparere enheden selv. Overlad al service til kvalificeret personale.
- Hold enheden væk fra stærke magnetiske felter.
3. Pakkens indhold
Kontroller venligst, at alle varer er til stede:
- Soundmaster Eliteline IR300SI Internet DAB+ FM Radio
- Strømadapter
- Fjernbetjening
- Brugervejledning (dette dokument)
- Installation material (e.g., antenna, if separate)
4. Produktet er slutview
Familiarize yourself with the various parts and controls of your Soundmaster IR300SI radio.

Figur 4.1: Forfra vinklet view of the Soundmaster IR300SI radio, showing the display, speakers, and control buttons.
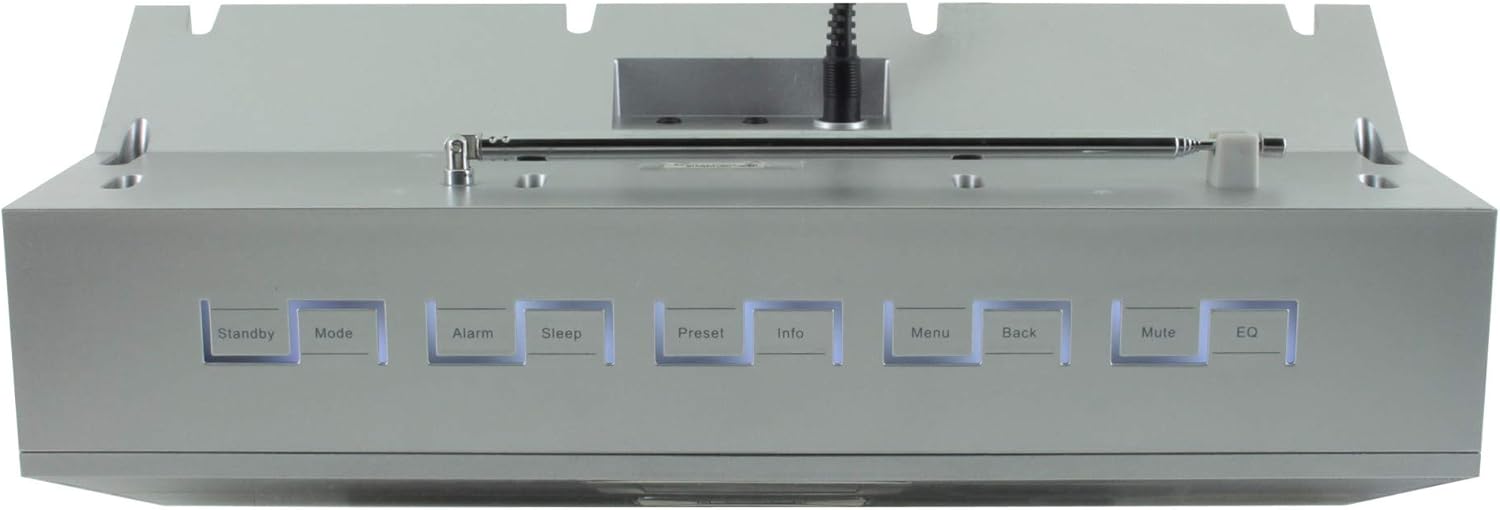
Figur 4.2: Øverst view of the Soundmaster IR300SI radio, highlighting the control buttons: Standby, Mode, Alarm, Sleep, Preset, Info, Menu, Back, Mute, and EQ.
Frontpanel
- 2.4" / 6 cm TFT Color Display: Shows station information, menus, and time.
- Højttalere: Stereo sound output.
- Kontrolhjul/knapper: Til navigation og valg.
Kontrolpaneler på øverste panel
- Standby: Tænd/sluk.
- Mode: Switch between Internet Radio, DAB+, FM, Bluetooth, USB, AUX.
- Alarm: Indstil og administrer alarmer.
- Sove: Activate sleep timer.
- Forudindstillet: Access and save favorite stations.
- Info: Vis yderligere oplysninger om den aktuelle udsendelse.
- Menu: Adgang til systemindstillinger og -valgmuligheder.
- Tilbage: Vend tilbage til den forrige menu.
- Stum: Slå lyd til/fra.
- EQ: Vælg equalizer-forudindstillinger.
Rear/Side Panel Connections
- Strømindgang: Tilslut den medfølgende strømadapter.
- Teleskopantenne: For DAB+ and FM reception.
- USB-port: Til MP3-afspilning fra USB-lagerenheder.
- 3.5mm Aux-In Port: Tilslut eksterne lydkilder.
- Hovedtelefonstik: Til privat lytning.
5. Opsætning
5.1 Strømtilslutning
- Connect the power adapter to the DC input on the rear of the radio.
- Sæt strømadapteren i en stikkontakt.
- Tryk på Standby button on the top panel or remote control to turn on the radio.
5.2 Antenneopsætning
Extend the telescopic antenna fully for optimal DAB+ and FM radio reception.
5.3 Initial Wi-Fi Network Setup
Upon first power-on, the radio will guide you through the initial setup wizard:
- Select your preferred language using the control dial and confirm.
- Radioen vil søge efter tilgængelige Wi-Fi-netværk.
- Vælg dit netværk fra listen.
- Enter your Wi-Fi password using the on-screen keyboard and control dial. Confirm to connect.
- Once connected, the radio will display the main menu.
6. Betjeningsvejledning
Brug Mode button to switch between different audio sources.
6.1 Internetradio
- Trykke Mode to select "Internet Radio".
- Navigate through categories (e.g., Location, Genre, Popular) using the control dial.
- Vælg en station for at starte afspilningen.
- For at gemme en station som forudindstilling skal du trykke på og holde Forudindstillet button, then select a preset number.
6.2 DAB+ radio
- Trykke Mode to select "DAB+ Radio".
- Radioen scanner automatisk efter tilgængelige DAB+-stationer.
- Use the control dial to browse and select stations.
- Tryk og hold Forudindstillet to save a station.
6.3 FM radio
- Trykke Mode to select "FM Radio".
- Radioen vil automatisk søge efter tilgængelige FM-stationer.
- Use the control dial to browse and select stations.
- Tryk og hold Forudindstillet to save a station.
6.4 Bluetooth-forbindelse
- Trykke Mode to select "Bluetooth". The radio will enter pairing mode.
- Aktiver Bluetooth på din mobilenhed (smartphone, tablet) og søg efter tilgængelige enheder.
- Select "Soundmaster IR300SI" from the list to pair.
- Når den er tilsluttet, kan du streame lyd fra din enhed til radioen.
6.5 USB-afspilning
- Indsæt en USB-lagerenhed (formateret som FAT32), der indeholder MP3 files i USB-porten.
- Trykke Mode to select "USB".
- Navigate through folders and select tracks using the control dial.
6.6 AUX-indgang
- Connect an external audio device (e.g., MP3 player) to the 3.5mm Aux-In port using an audio cable (not supplied).
- Trykke Mode to select "AUX".
- Styr afspilning fra din eksterne enhed.
6.7 Alarmer og sleeptimer
- Alarmer: Tryk på Alarm button to set up to two alarms. Configure time, source (buzzer, radio), and frequency (daily, weekdays, weekends).
- Sleep timer: Tryk på Sove button to set a countdown timer (e.g., 15, 30, 60 minutes) after which the radio will automatically turn off.
6.8 Equalizer (EQ)
Tryk på EQ button to cycle through pre-programmed sound settings (e.g., Normal, Jazz, Rock, Classical, Pop, News) to optimize audio output for different content.
6.9 Amazon Alexa and UNDOK App Control
- Amazon Alexa: The radio is compatible with Amazon Alexa. Follow the instructions in the Alexa app to link your Soundmaster IR300SI for voice control functionalities.
- UNDOK App: Download the UNDOK app from your mobile device's app store. Ensure your mobile device and the radio are on the same Wi-Fi network. The app allows you to control the radio, browse stations, and manage settings remotely.
7. Vedligeholdelse
7.1 Rengøring
- Tag altid stikket ud af radioen før rengøring.
- Brug en blød, tør klud til at tørre de udvendige overflader af.
- Brug ikke slibende rengøringsmidler, voks eller opløsningsmidler, da de kan beskadige finishen.
7.2 Opbevaring
If you plan to store the radio for an extended period, unplug it from the power source and store it in a cool, dry place, away from direct sunlight and extreme temperatures.
8. Fejlfinding
Hvis du støder på problemer, kan du se følgende almindelige problemer og løsninger:
| Problem | Mulig årsag | Løsning |
|---|---|---|
| Ingen strøm | Strømadapteren er ikke tilsluttet, eller der er en defekt stikkontakt. | Kontrollér strømtilslutningerne. Prøv en anden stikkontakt. |
| Ingen lyd | Lydstyrken er for lav, slået fra, eller der er valgt forkert kilde. | Øg lydstyrken. Tryk Stum. Ensure correct mode (Internet Radio, DAB+, etc.) is selected. |
| Kan ikke oprette forbindelse til Wi-Fi | Forkert adgangskode, svagt signal eller routerproblem. | Verify password. Move radio closer to router. Restart router. |
| Dårlig DAB+/FM-modtagelse | Antennen er ikke strakt ud, eller signalet er dårligt i området. | Fully extend the telescopic antenna. Reposition the radio. |
| Bluetooth-parring mislykkes | Radio not in pairing mode, or device too far. | Ensure radio is in Bluetooth mode. Move devices closer. Restart Bluetooth on both devices. |
9. Specifikationer
| Feature | Specifikation |
|---|---|
| Modelnavn | IR300SI |
| Mærke | Soundmaster |
| Forbindelsesteknologi | Bluetooth, USB, Wi-Fi |
| Særlige funktioner | Integrated Clock, Internet Radio, DAB+, FM, Bluetooth, USB MP3 Playback, AUX-In, Headphone Jack, 2 Alarms with Weekend Function, Sleep Timer, Equalizer, Amazon Alexa Compatible, UNDOK App Control, Network Music Player (DLNA) |
| Lydudgangstilstand | Stereoanlæg |
| Maksimal højttalerudgangseffekt | 2 x 10 Watt RMS |
| Vise | 2.4" / 6 cm TFT Color Display |
| Kontrolmetode | Remote Control, UNDOK App, On-device Buttons |
| Strømkilde | AC Powered (100 Volts input) |
| Produktmål (L x B x H) | 17 x 18 x 15 cm |
| Varens vægt | 2.3 kilo |
| Farve | Sølv |
| Kompatible enheder | Personal Computer, Television, Tablet, Smartphone, Laptop |
| Monteringstype | Bordplade |
10. Garanti og support
The Soundmaster Eliteline IR300SI comes with a spare parts availability period of 1 year from the date of purchase. For technical support, warranty claims, or further assistance, please contact your retailer or the Soundmaster customer service department. Refer to the contact information provided with your purchase documentation.


