1. Introduktion
Thank you for choosing the Oster OS-WDA3200 Water Dispenser. This manual provides essential information for the safe and efficient operation, installation, and maintenance of your new appliance. Please read these instructions thoroughly before use and retain them for future reference.
2. Sikkerhedsinstruktioner
For at sikre sikker drift skal du altid følge disse grundlæggende forholdsregler:
- Læs alle instruktioner før brug af apparatet.
- Betjen ikke noget apparat med en beskadiget ledning eller stik, eller efter at apparatet ikke fungerer korrekt eller er blevet beskadiget på nogen måde.
- Nedsænk ikke netledningen, stikket eller selve apparatet i vand eller andre væsker.
- Keep the appliance out of reach of children. The hot water dispenser features a child safety lock, but supervision is always recommended.
- Sørg for, at apparatet er placeret på en stabil, plan overflade.
- Do not block ventilation openings. Maintain adequate space around the dispenser for proper airflow.
- Unplug the dispenser from the power outlet before cleaning or performing any maintenance.
- Dette apparat er kun til indendørs brug.
3. Produktet er slutview
The Oster OS-WDA3200 is a floor-standing water dispenser designed to provide hot, ambient, and cold water. It features compressor cooling for efficient performance and a child safety lock for the hot water tap.
Nøglefunktioner:
- Three Water Outlets: Hot, Ambient, and Cold
- Efficient Compressor Cooling
- Børnesikring til varmt vand
- Removable Drip Tray for Easy Cleaning
- Floor Standing Design
Komponenter:

Figur 3.1: Forside View. This image displays the front of the Oster OS-WDA3200 water dispenser, showing the three water taps for hot, ambient, and cold water, along with the Oster branding and indicator lights.
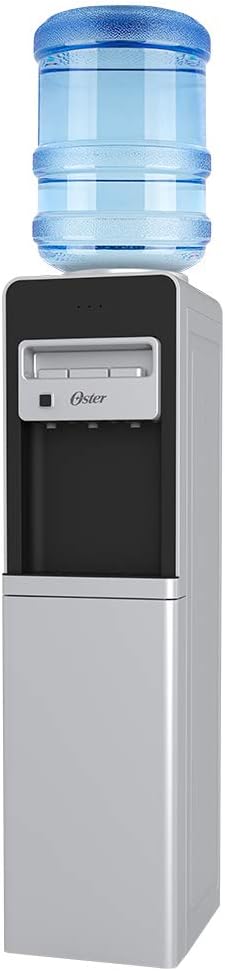
Figure 3.2: Water Bottle Installation. This image illustrates the Oster OS-WDA3200 water dispenser with a standard 5-gallon water bottle placed on top, ready for use.

Figure 3.3: Child Safety Lock. Et nærbillede view of the child safety lock button, located next to the hot water tap, designed to prevent accidental dispensing of hot water.

Figure 3.4: Storage Compartment. This image shows the lower door of the dispenser open, revealing a convenient storage compartment.

Figur 3.5: Bagside View. The back of the dispenser, displaying the compressor unit, cooling coils, and power switches for heating and cooling functions.
4. Opsætning
4.1 Udpakning
- Tag forsigtigt dispenseren ud af emballagen.
- Fjern alt emballagemateriale, tape og beskyttelsesfilm.
- Inspect the dispenser for any signs of damage. If damaged, do not use and contact customer service.
4.2 Placering
- Place the dispenser on a firm, level surface capable of supporting its weight when full.
- Ensure there is at least 10 cm (4 inches) of space between the back and sides of the dispenser and any walls or other objects for proper ventilation.
- Avoid placing the dispenser in direct sunlight or near heat sources (e.g., ovens, radiators) to maintain cooling efficiency.
- Do not place the dispenser in an area where the temperature will drop below 10°C (50°F).
4.3 Water Bottle Installation
- Rengør halsen på en ny 3- eller 5-gallons vandflaske.
- Remove the protective cap from the water bottle.
- Carefully lift the water bottle and place it upright onto the support collar on top of the dispenser. Ensure it is seated firmly.
- Water will begin to flow into the dispenser's internal reservoirs.
4.4 Initial Power-On and Flushing
- Once the water bottle is installed and water has filled the reservoirs (this may take a few minutes), plug the dispenser into a grounded 120V electrical outlet.
- Locate the power switches on the back of the unit (refer to Figure 3.5). Turn on the cooling switch (usually blue or green) and the heating switch (usually red).
- Before consuming water, flush the system: Dispense and discard at least two cups of water from each tap (hot, ambient, cold) to ensure the system is clean and free of air bubbles.
- Allow approximately 15-30 minutes for the water to reach optimal cold and hot temperatures.
5. Betjeningsvejledning
5.1 Tapping af koldt vand
Place a cup under the cold water tap (typically blue). Press the cold water lever or button to dispense cold water. Release to stop.
5.2 Dispensing Ambient Water
Place a cup under the ambient water tap (typically gray or white). Press the ambient water lever or button to dispense room temperature water. Release to stop.
5.3 Udlevering af varmt vand
The hot water tap (typically red) is equipped with a child safety lock.
- Place a heat-resistant cup under the hot water tap.
- Simultaneously press the child safety lock button (refer to Figure 3.3) and the hot water lever/button.
- Release the lever/button to stop the flow of hot water. Release the safety lock button.
WARNING: Hot water can cause severe burns. Always use caution and ensure the child safety lock is engaged when not in use.
6. Vedligeholdelse
6.1 Rengøring af drypbakken
The drip tray (located below the taps) collects spilled water and should be emptied and cleaned regularly.
- Carefully remove the drip tray by pulling it forward.
- Tøm alt opsamlet vand ud, og vask bakken med mild sæbe og varmt vand.
- Skyl grundigt og tør inden udskiftning.
6.2 Rengøring af ydersiden
Tør dispenserens yderside af med en blød, tør klud.amp klud. Brug ikke slibende rengøringsmidler, opløsningsmidler eller stærke kemikalier, da disse kan beskadige overfladen.
6.3 Draining the Unit (for storage or extended non-use)
- Tag stikket til dispenseren ud af stikkontakten.
- Fjern vandflasken.
- Place a large bucket or container under the drain plug, usually located at the back or bottom of the unit.
- Remove the drain plug to allow all water to empty from the reservoirs.
- Når den er tømt, skal du sætte aftapningsproppen ordentligt på.
- Dispense water from all taps until no more water comes out.
- Allow the interior to air dry completely before storing.
7. Fejlfinding
If you encounter issues with your water dispenser, refer to the following common problems and solutions:
| Problem | Mulig årsag | Løsning |
|---|---|---|
| Intet koldt vand | Cooling switch off; water bottle empty; dispenser unplugged; ventilation blocked. | Ensure cooling switch is on; replace water bottle; check power connection; clear ventilation. |
| Intet varmt vand | Heating switch off; water bottle empty; dispenser unplugged. | Ensure heating switch is on; replace water bottle; check power connection. |
| Vand lækker | Vandflasken er revnet eller sidder forkert; aftapningsprop er løs. | Replace water bottle; reseat bottle; tighten drain plug. |
| Dispenseren larmer | Normal compressor operation; dispenser not level. | This is normal during cooling cycles. Ensure dispenser is on a level surface. |
| Water has unusual taste | New dispenser (initial taste); old water bottle; dispenser needs cleaning. | Flush system thoroughly; replace water bottle; perform full cleaning. |
If the problem persists after attempting these solutions, please contact Oster customer service.
8. Specifikationer
| Feature | Detalje |
|---|---|
| Modelnummer | OS-WDA3200 |
| Mærke | Oster |
| Farve | Hvid |
| Materiale | Plast |
| Dimensioner (L x B x H) | 26 x 33 x 101 cm (10.2 x 13 x 39.8 tommer) |
| Vægt | 13.2 kg (29.1 lbs) |
| Voltage | 120 volt |
| Installationstype | Floor Standing |
9. Garanti og support
For warranty information, technical support, or service inquiries, please refer to the warranty card included with your product or visit the official Oster webwebstedet. Behold din købskvittering som købsbevis.


