1. Introduktion
The Audiolab 8300XP is a high-performance stereo power amplifier designed to deliver exceptional audio fidelity and power. It can operate in stereo mode, providing 280 Watts per channel, or be bridged to deliver 480 Watts as a monoblock amplifier. This manual provides essential information for the safe and optimal use of your 8300XP amplivligere.

Figure 1.1: Audiolab 8300XP Power Amplifier, front angled view. This image shows the sleek black chassis with the power button and Audiolab logo visible on the front panel.
2. Sikkerhedsoplysninger
Please read all safety instructions carefully before operating the amplifier. Gem denne vejledning til fremtidig reference.
- Strømkilde: Connect the unit only to an AC power source of the type marked on the rear panel. Ensure the voltage matcher din lokale strømforsyning.
- Ventilation: Do not block any ventilation openings. Ensure adequate airflow around the unit to prevent overheating.
- Vand og fugt: Udsæt ikke enheden for regn eller fugt. Placer ikke genstande fyldt med væsker, såsom vaser, på enheden.
- Varme: Placer ikke enheden i nærheden af varmekilder såsom radiatorer, varmeapparater, komfurer eller andre apparater (herunder ampløftere), der producerer varme.
- Service: Forsøg ikke selv at servicere dette produkt. Overlad al service til kvalificeret servicepersonale.
- Jording: Ensure the power cord is properly grounded to prevent electric shock.
3. Udpakning og indhold
Pak forsigtigt ud amplifier. Retain the packing materials for future transport. Inside the box, you should find:
- Audiolab 8300XP Power Amplivligere
- AC strømledning
- Brugervejledning (dette dokument)
If any items are missing or damaged, contact your dealer immediately.
4. Forbindelser
4.1 Frontpanel

Figure 4.1: Audiolab 8300XP Power Amplifier, front view. This image highlights the minimalist front panel design, featuring only the power button on the right and the Audiolab logo on the bottom right.
The front panel of the 8300XP is designed for simplicity and elegance. It features:
- Power knap: Located on the right side, used to turn the amplivligere til eller fra.
- Strømindikator LED: A small LED (typically red) indicates the power status of the unit.
4.2 Bagpanel
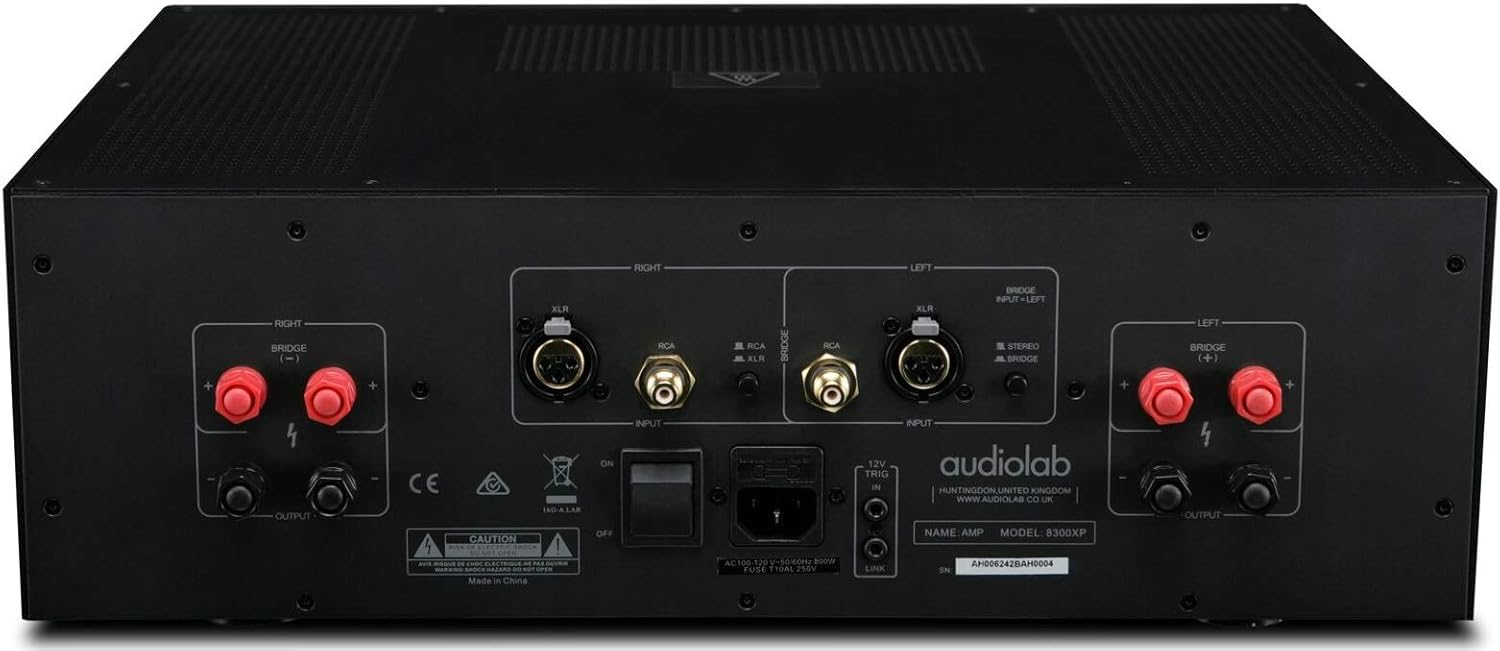
Figure 4.2: Audiolab 8300XP Power Amplifier, rear panel. This detailed view shows all input and output terminals, including XLR and RCA inputs, speaker terminals, and the power inlet.
The rear panel provides all necessary connections for integrating the 8300XP into your audio system:
- Balanced XLR Inputs (Left/Right): For connecting sources with balanced outputs, offering superior noise rejection.
- Unbalanced RCA Inputs (Left/Right): For connecting sources with unbalanced outputs.
- Speaker Outputs (Left/Right): High-quality binding posts for connecting your loudspeakers. Ensure correct polarity (+ to + and - to -).
- Bridge Mode Switch: A switch to select between Stereo and Bridged (Mono) operation. When in bridged mode, only use the designated input and speaker terminals.
- 12V trigger ind/ud: Allows for remote power control with other compatible components.
- AC strømindtag: For connecting the supplied AC power cord.
5. Opsætning
5.1 Placering
Place the 8300XP on a stable, level surface away from direct sunlight, heat sources, and excessive moisture. Ensure there is adequate space around the unit for ventilation, especially above and behind it.
5.2 Tilslutning af højttalere
- Sørg for amplifier is turned off and unplugged from the mains power.
- Connect your loudspeakers to the corresponding speaker output terminals on the rear panel.
- For stereo operation, connect the left speaker to the 'LEFT' terminals and the right speaker to the 'RIGHT' terminals. Ensure the positive (+) terminal on the amplifier connects to the positive (+) terminal on the speaker, and similarly for the negative (-) terminals.
- For bridged (mono) operation, set the 'BRIDGE' switch to 'ON'. Connect your single speaker to the designated bridged output terminals (refer to the markings on the rear panel).
5.3 Tilslutning af lydkilder
- Connect your pre-amplifier or audio source to either the Balanced XLR Inputs or Unbalanced RCA Inputs. Do not use both simultaneously for the same channel.
- If using balanced connections, ensure the XLR cables are securely connected.
- If using unbalanced connections, ensure the RCA cables are securely connected.
5.4 Strømtilslutning
- Once all audio and speaker connections are made, connect the supplied AC power cord to the AC inlet on the rear panel of the amplivligere.
- Plug the other end of the power cord into a suitable mains power outlet.
6. Betjeningsvejledning
6.1 Tænd/sluk
- For at tænde for amplifier, press the Power button on the front panel. The power indicator LED will illuminate.
- For at slukke for amplifier, press the Power button again. The power indicator LED will turn off.
6.2 Stereo vs. Bridged Mode
The 8300XP can operate as a two-channel stereo amplifier or a single-channel monoblock amplifier (bridged mode).
- Stereo-tilstand: For typical two-channel audio systems. Ensure the 'BRIDGE' switch on the rear panel is set to 'OFF'.
- Brokoblet tilstand: For higher power output to a single speaker. Ensure the 'BRIDGE' switch on the rear panel is set to 'ON'. When in bridged mode, use only the designated input (typically the Left channel) and the specified bridged speaker terminals. Consult the rear panel markings for precise connections.
Caution: Ensure the amplifier is powered off before changing the Stereo/Bridge mode switch to prevent damage to the amplivligere eller højttalere.
7. Vedligeholdelse
- Rensning: Brug en blød, tør klud til at rengøre amplifier's exterior. Do not use abrasive cleaners, waxes, or solvents.
- Ventilation: Kontrollér regelmæssigt, at ventilationsåbningerne er fri for støv og snavs.
- Strømledning: Inspect the power cord regularly for any signs of damage. If damaged, replace it with an approved cord of the same type.
8. Fejlfinding
If you experience issues with your Audiolab 8300XP, please consult the following table before contacting service personnel.
| Problem | Mulig årsag | Løsning |
|---|---|---|
| Ingen strøm | Power cord not connected; Power outlet faulty; Internal fuse blown | Check power cord connection; Try a different outlet; Contact service for fuse replacement |
| Ingen lyd | Input cables loose/incorrect; Speaker cables loose/incorrect; Source component off/faulty; Amplifier in standby mode | Check all cable connections; Ensure source is active; Press power button to exit standby |
| Forvrænget lyd | Input signal too high; Speaker impedance mismatch; Faulty cables | Reduce source volume; Check speaker impedance (should be 4-16 ohms); Replace cables |
| Overophedning | Insufficient ventilation; Blocked vents | Ensure adequate space around amplifier; Clear any obstructions from vents |
9. Specifikationer
Key technical specifications for the Audiolab 8300XP Power Amplivligere:
- Vare modelnummer: 8300 XP
- Fabrikant: Audiolab
- Voltage: 100 Volts, 12 Volts (Trigger)
- Monteringstype: Overflademontering
- Antal kanaler: 2 (stereo)
- Power Output (Stereo): 280 watt pr kanal
- Power Output (Bridged Mono): 480 watt
10. Garanti og support
Your Audiolab 8300XP amplifier is covered by a manufacturer's warranty. Please refer to the warranty card included with your product or visit the official Audiolab webwebstedet for detaljerede garantivilkår og -betingelser, der er specifikke for din region.
For technical support, service, or further inquiries, please contact your authorized Audiolab dealer or distributor. You can also find support information on the official Audiolab webwebsted: www.audiolab.co.uk


