1. Introduktion
The QIACHIP Universal WIFI Ceiling Fan Light Remote Control Kit is designed to upgrade your existing non-smart LED ceiling fan into a smart device. This kit allows for convenient control of fan speed and light functions via a 2.4G RF remote control, a mobile application, and voice commands through smart assistants like Alexa and Google Home. It offers enhanced control, scheduling capabilities, and smart scene integration for a modern home environment.

Figur 1: Overview of the QIACHIP Universal WIFI Ceiling Fan Light Remote Control Kit, including the remote, receiver, and a smartphone demonstrating app control.
2. Nøglefunktioner
- Smart opgradering: Transforms non-smart LED ceiling fans into smart, app-controlled devices.
- Bred kompatibilitet: Designed for three-speed motors and compatible with most well-known ceiling fan brands.
- Flere kontrolmetoder: Includes a 2.4G RF remote control, mobile app (iOS/Android), and voice control via Alexa and Google Home.
- Blæserhastighedskontrol: Adjust fan speed with three levels (1/2/3).
- Lysstyring: Turn lights on/off from anywhere.
- Planlægning og tidsplan: Set reservations or countdown timers for automated on/off functions.
- Delingskontrol: Share device control with family members through the app.
- Smart Scene-integration: Trigger fan or light actions based on environmental conditions or other smart home sensors.
- Nem installation: Color-coded and marked wires simplify the installation process.
- Status i realtid: Sync status provides real-time device information to the mobile app.
3. Pakkens indhold
Please ensure all items are present and in good condition upon opening the package:
- 1 x QIACHIP Universal WIFI Ceiling Fan Light Receiver (Model: KLCW-110v)
- 1 x 2.4G RF Remote Control
- Wire Nuts (for installation)
- Instruktionsmanual (dette dokument)
4. Produktspecifikationer
| Attribut | Værdi |
|---|---|
| Mærke | QIACHIP |
| Modelnavn | KLCW-110v |
| Farve | Hvid |
| Strømkilde | AC |
| Voltage | 110 volt |
| Wattage | 1000 watt |
| Produktdimensioner | 0.7"D x 1.97"W x 5.2"H (Receiver size: 4.53" x 2.13" x 1.1") |
| Varens vægt | 7 ounce |
| Kontrolmetode | App, fjernbetjening, stemme |
| Lys type | LED |
| Antal blæserhastigheder | 3 |
| Batterier kræves (fjernbetjening) | 2 AAA batterier (medfølger ikke) |
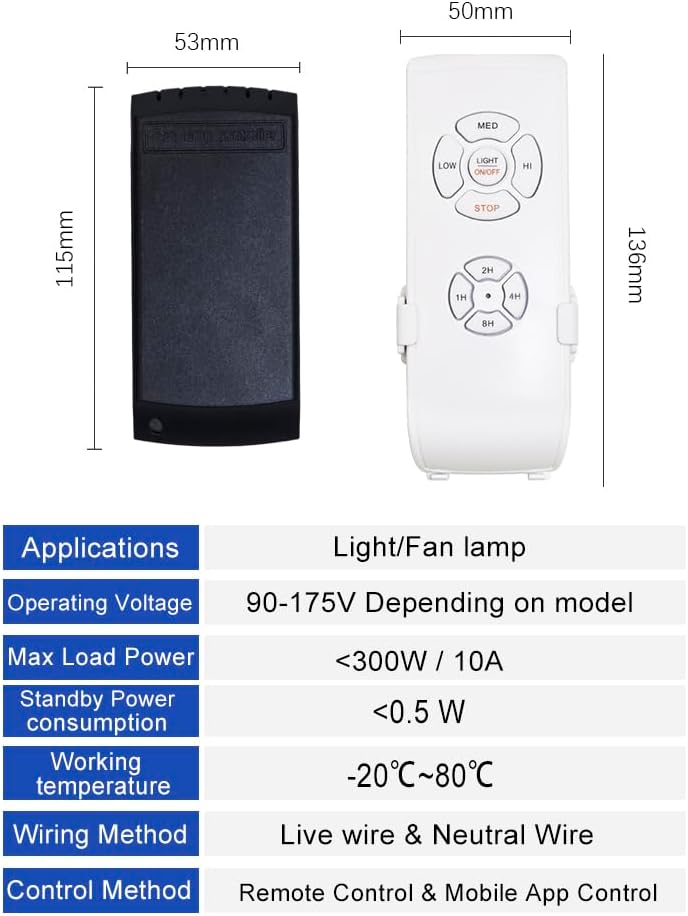
Figure 2: Detailed dimensions of the receiver and remote control.
5. Opsætning og installation
5.1. Installation of the Receiver
The QIACHIP receiver is designed for easy installation. All wires are color-coded and marked to simplify the process. Ensure power is turned off at the circuit breaker before beginning installation.
- Turn off power to the ceiling fan at the main circuit breaker.
- Remove the existing canopy or housing of your ceiling fan to access the wiring.
- Disconnect the existing wiring from the fan and light.
- Connect the QIACHIP receiver according to the wiring diagrams below. Match the color-coded wires:
- White: AC Neutral Line
- Black: AC Live Line
- Blue: Live Line to Light
- Black (from receiver): Live Line to Fan
Note: In some very old fans, wire colors may differ. Consult a professional electrician if unsure.
- Carefully tuck the receiver and wiring into the fan's housing or junction box. Ensure the antenna wire is not pinched and extends freely for optimal Wi-Fi signal.
- Reattach the fan canopy or housing.
- Gendan strømmen ved afbryderen.
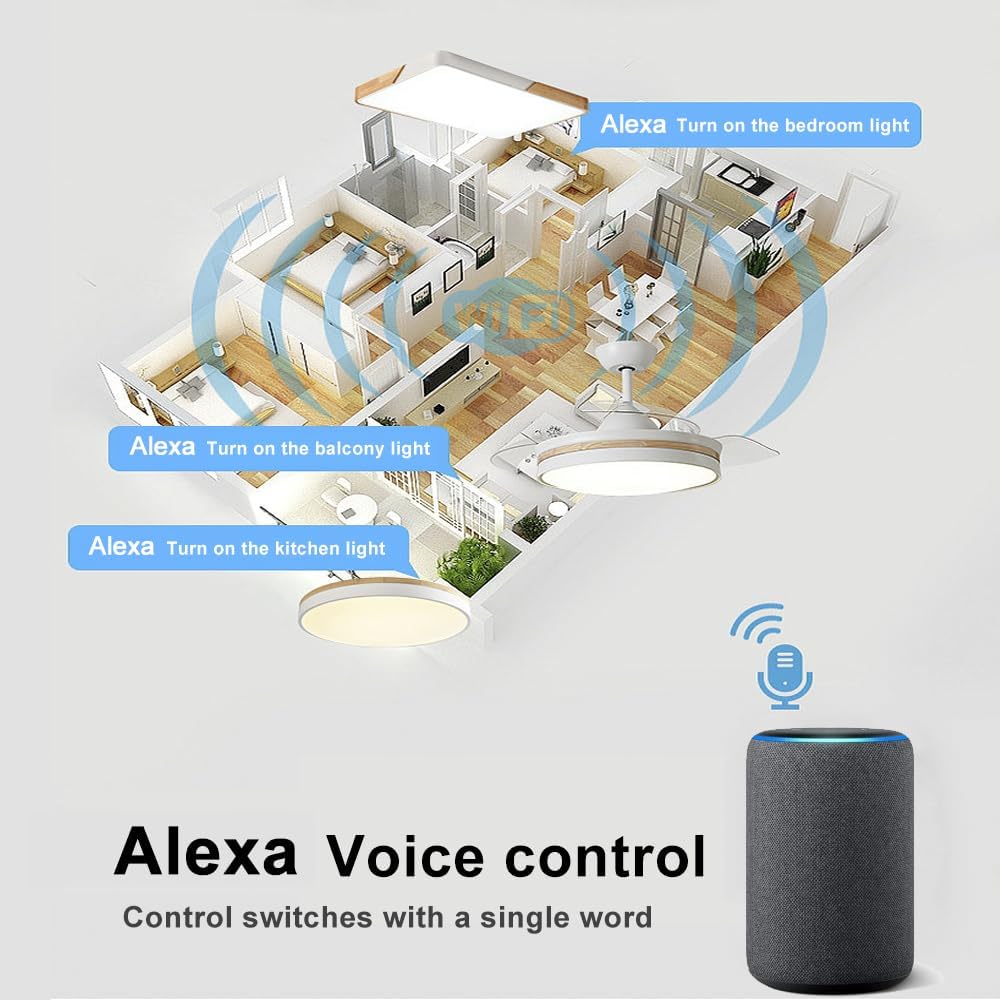
Figure 3: Detailed wiring instructions for the QIACHIP receiver.

Figure 4: Simplified wiring diagram showing connection from main power to receiver and then to fan and light.
5.2. Parring med fjernbetjening
The remote control should be pre-paired with the receiver. If not, or if you need to re-pair, follow these steps:
- Sørg for, at modtageren er tændt.
- On the remote control, press and hold the "Light" and "High Fan" buttons simultaneously for a few seconds until you hear 3 long beeps from the receiver. This indicates pairing mode.
- The remote should now be paired with the receiver.

Figure 5: Description of buttons on the QIACHIP remote control.
5.3. Mobile App Setup (Smart Life App)
To enable smart features and voice control, you need to connect the device to the Smart Life app.
- Download the "Smart Life" app from your mobile app store (iOS or Android).
- Registrer dig eller log ind på din Smart Life-konto.
- Ensure your mobile phone is connected to a 2.4 GHz Wi-Fi network. (Note: If your Wi-Fi is 5GHz, please set it to be 2.4GHz. Common router setting method.)
- In the Smart Life app, tap the "+" icon to add a device.
- Select "Electrical" > "Fan (Wi-Fi)" or "Lighting" > "Light (Wi-Fi)" or use the "Auto Scan" feature.
- Follow the in-app prompts to connect the device. You may need to confirm that the indicator on the receiver is blinking rapidly (this usually happens after power cycling the receiver).
- Enter your 2.4 GHz Wi-Fi network password when prompted.
- Once connected, you can rename the device to an easily identifiable name (e.g., "Bedroom Fan").
Video 1: A tutorial demonstrating the Wi-Fi fan light kit setup process using the mobile app.
5.4. Opsætning af stemmestyring (Alexa/Google Home)
After successfully setting up the device in the Smart Life app, you can link it to your voice assistant.
- Åbn din Alexa- eller Google Home-app.
- Naviger til afsnittet "Færdigheder" eller "Fungerer med Google".
- Søg efter "Smart Life" og aktiver færdigheden/tjenesten.
- Link your Smart Life account by entering your Smart Life app credentials.
- Discover devices. Your ceiling fan and light should now appear in your voice assistant app.
6. Betjeningsvejledning
6.1. Betjening af fjernbetjening
Use the provided 2.4G RF remote control to manage your fan and light:
- Lys ON/OFF: Press the "Light ON/OFF" button to toggle the light.
- Blæserhastighed: Use "LOW", "MED", "HI" buttons to adjust fan speed.
- Blæser slukket: Press the "STOP" button to turn off the fan.
- Timing off: Use the "1H", "2H", "4H", "8H" buttons to set a countdown timer for the fan to turn off automatically.
Figur 6: Fjernbetjeningens layout og knapfunktioner.
6.2. Brug af mobilappen
The Smart Life app provides comprehensive control and advanced features:
- Fjernbetjening TIL/FRA: Control the fan and lights from anywhere with internet access.
- Justering af blæserhastighed: Adjust fan speed levels directly from the app.
- Planlægning: Set detailed schedules for the fan and light to turn on/off at specific times.
- Nedtællingstimer: Set a countdown for the device to turn off.
- Smarte scener: Create automated routines based on various conditions (e.g., turn on fan when room temperature reaches a certain level).

Figure 7: The Smart Life app interface for managing ceiling fan and light functions.

Figur 8: Eksample of scheduling options available in the Smart Life app for automated fan operation.
6.3. Stemmestyringskommandoer
Once linked to Alexa or Google Home, use simple voice commands:
- "Alexa, turn on [Device Name] light."
- "Alexa, turn off [Device Name] light."
- "Alexa, turn on [Device Name] fan."
- "Alexa, turn off [Device Name] fan."
- "Alexa, set [Device Name] fan to high/medium/low."
- "Hey Google, turn on [Device Name] light."
- "Hey Google, turn off [Device Name] light."
- "Hey Google, turn on [Device Name] fan."
- "Hey Google, turn off [Device Name] fan."
- "Hey Google, set [Device Name] fan to speed 1/2/3."
Note: Some voice assistants may not support all fan speed levels or light dimming functions depending on the specific integration.
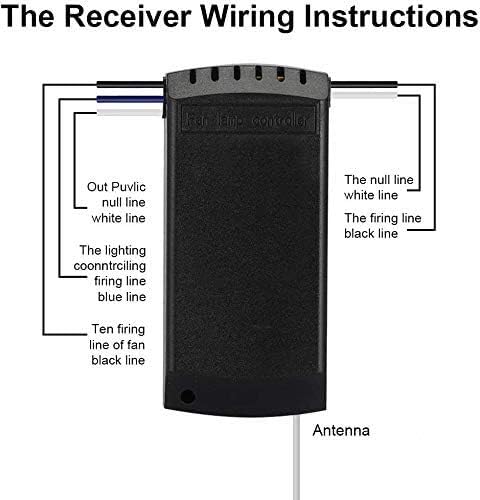
Figure 9: Illustration of Alexa voice control in a smart home environment.
7. Vedligeholdelse
- Rensning: Wipe the remote control and visible parts of the receiver with a soft, dry cloth. Do not use abrasive cleaners or solvents.
- Udskiftning af batteri: Replace the AAA batteries in the remote control when its indicator light dims or it becomes unresponsive. Ensure correct polarity when inserting new batteries.
- Firmwareopdateringer: Periodically check the Smart Life app for any available firmware updates for the receiver to ensure optimal performance and access to new features.
8. Fejlfinding
| Problem | Mulig løsning |
|---|---|
| Enheden parres ikke med appen. |
|
| Fjernbetjeningen reagerer ikke. |
|
| Device beeps loudly with every command. |
|
| Alexa/Google Home cannot control light or fan speed. |
|
| Receiver does not fit in fan housing. |
|
9. Garanti og support
QIACHIP products are designed for reliability and performance. For warranty information, technical support, or further assistance, please refer to the official QIACHIP webwebstedet eller kontakt deres kundeservice direkte. Gem din købskvittering som købsbevis i tilfælde af garantikrav.
Du kan også besøge QIACHIP-butik på Amazon for yderligere produktinformation og supportressourcer.
Relaterede dokumenter - KLCW-110v
 |
ZBBridge-01 Zigbee Bridge brugermanual og specifikationer Dette dokument indeholder brugermanualen og specifikationerne for ZBBridge-01 Zigbee Bridge, med detaljerede oplysninger om dens funktioner, opsætningsvejledning, LED-statusindikatorer og fejlfindingstips. Den understøtter WiFi og Zigbee dual-protocol og integreres med populære AI-platforme som Google Assistant og Amazon Alexa. |
 |
QIACHIP WiFi + RF Smart Switch Brugermanual Omfattende brugermanual til QIACHIP WiFi + RF Smart Switch, der dækker sikkerhedsadvarsler, ledningsføring, RF-fjernbetjeningsparringstilstande (selvlåsende, interlock, jog), WiFi-opsætning via Smart Life-appen, integration med stemmeassistent (Tmall Genie, Alexa, Google Assistant) og detaljerede produktspecifikationer. |
 |
QIACHIP RX480E-868 Trådløs Firekanals Dekodningsmodtagermodul - Teknisk Specifikation Detaljerede tekniske specifikationer, funktioner, anvendelser, pinbeskrivelser og driftstilstande for QIACHIP RX480E-868 FSK RF fjernbetjeningsmodtagermodulet. |
 |
QIACHIP KR1204B 12V 4-kanals trådløs fjernbetjeningsafbryder brugermanual Brugermanual til QIACHIP KR1204B 12V 4-kanals trådløs fjernbetjeningsmodtagermodul. Indeholder ledningsdiagrammer, driftstilstande (Momentær, Toggle, Latching) og tekniske specifikationer. |
 |
QA-R-011 Lysstyringsmodul Specifikation Specifikationer og betjeningsvejledning til QA-R-011 lysstyringsmodulet, en trådløs RF-fjernbetjeningsafbryder til LED-belysning med momentan, vippe-, låse- og tidsforsinkelsestilstande. |
 |
Qiachip KR2402A 2-kanals modtager brugsanvisning Instruktionsmanual til Qiachip KR2402A DC6-30V 2-kanals modtager, med detaljerede ledningsdiagrammer, funktionsbeskrivelser, indstillingsmetoder og tekniske specifikationer. |