Indledning
Thank you for choosing the SONGMICS Interlocking Modular Shoe Rack. This manual provides essential information for the safe assembly, operation, and maintenance of your new storage unit. Please read these instructions carefully before assembly and retain them for future reference.
Sikkerhedsoplysninger
- Keep the shelf away from sharp objects and fire sources.
- Avoid prolonged exposure to intense sunlight.
- Do not sit on the shelf.
- Do not place objects exceeding the maximum static load capacity of 10 kg per compartment.
- If the assembled unit is higher than 60 cm, attach it to the wall using the included anti-tip protection device to prevent accidental tipping.
Pakkens indhold
Kontroller venligst, at alle nedenstående komponenter er til stede, før monteringen påbegyndes:
- 12 x Semi-transparent plastic plates (40 x 30 cm)
- 20 x Semi-transparent plastic plates (30 x 17 cm)
- 20 x Semi-transparent plastic plates (40 x 17 cm)
- 48 x ABS plastic connectors
- 1 x hammer
- 2 x Anti-tip protection devices
- 1 x Brugsanvisning (dette dokument)
Opsætning og montering
Follow these steps to assemble your modular shoe rack. The interlocking design allows for various configurations to suit your space.
Step 1: Connect Panels to Connectors
Insert the edges of the plastic panels firmly into the slots of the ABS plastic connectors. Ensure that all panels are fully seated and locked into place. Use the included hammer to gently tap the panels into the connectors for a secure and stable connection. After assembling each row, press on the connectors until they are fully locked.
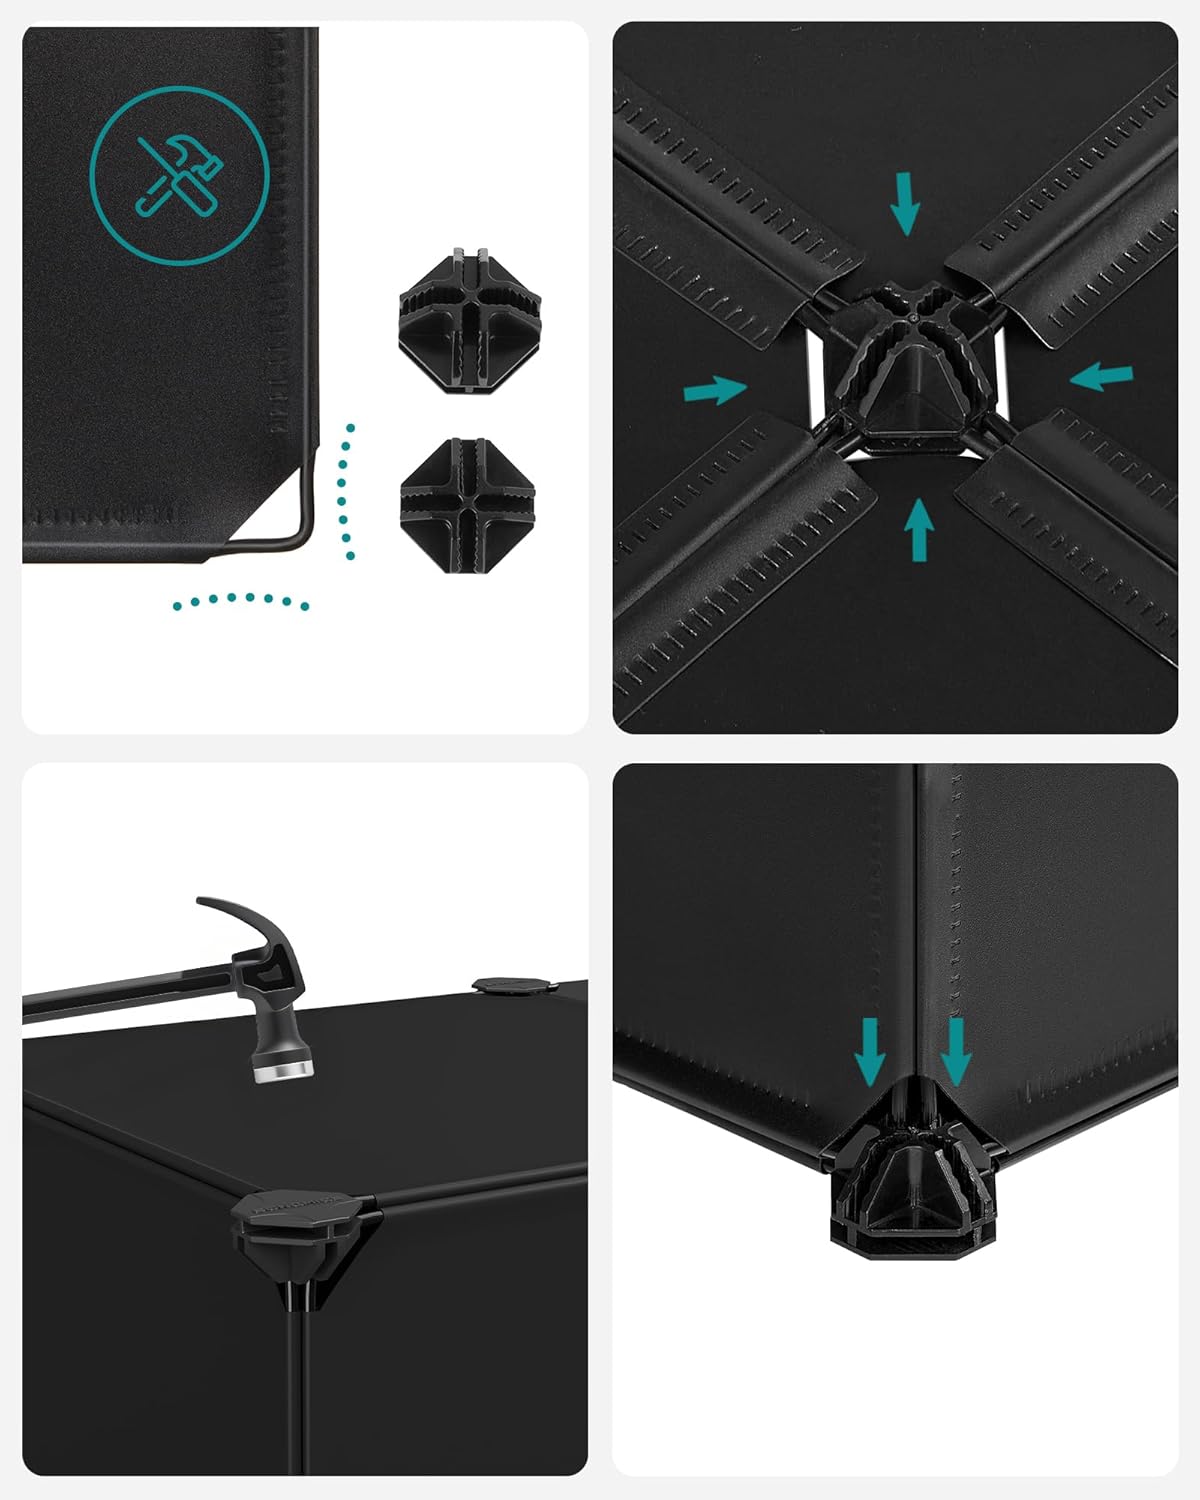
Billede: Detaljeret view of the assembly process, showing how panels connect to the ABS plastic connectors and the use of the included hammer to secure them. This ensures a stable structure.
Step 2: Build Your Desired Configuration
The modular design allows you to stack and arrange the 40 x 30 x 17 cm slots in various ways. You can create a tall, narrow tower, a wide, low unit, or a stepped configuration to fit your available space. Refer to the examples below for inspiration.

Billede: Illustrations demonstrating different ways to assemble the modular shoe rack, including a tall vertical unit, a wider horizontal unit, and a stepped configuration, highlighting its adaptability to various spaces.
Step 3: Install Anti-Tip Protection (If Applicable)
If your assembled shoe rack exceeds 60 cm in height, it is crucial to install the anti-tip protection device. Secure the device to the top of the unit and firmly attach it to a wall stud or appropriate anchor point. This prevents the unit from accidentally tipping over, enhancing safety.
Betjeningsvejledning
Storing Shoes and Other Items
Each compartment is designed to hold shoes and other small items, with a maximum static load capacity of 10 kg. The rack can typically accommodate 24-35 pairs of shoes, depending on their size and the configuration.

Billede: The shoe rack configured to store different types of footwear, such as sneakers, high heels, and boots, demonstrating its versatility for various shoe sizes and styles.
Customizing Compartment Size
For taller items like boots or plush toys, you can remove a horizontal divider panel between two compartments to create a larger, double-height space. This flexibility allows you to adapt the storage to your specific needs.

Billede: A lifestyle shot of the shoe rack integrated into a room setting, showcasing its practical use for storing shoes and other household items, enhancing organization.
Opretholdelse
The plastic sheets are waterproof and easy to clean. To maintain the appearance and longevity of your shoe rack:
- Wipe surfaces with a dry cloth to remove dust and light dirt.
- For spills or stubborn marks, use a damp en klud med en mild sæbe, og tør derefter straks af.
- Avoid using abrasive cleaners or harsh chemicals, as these can damage the plastic.
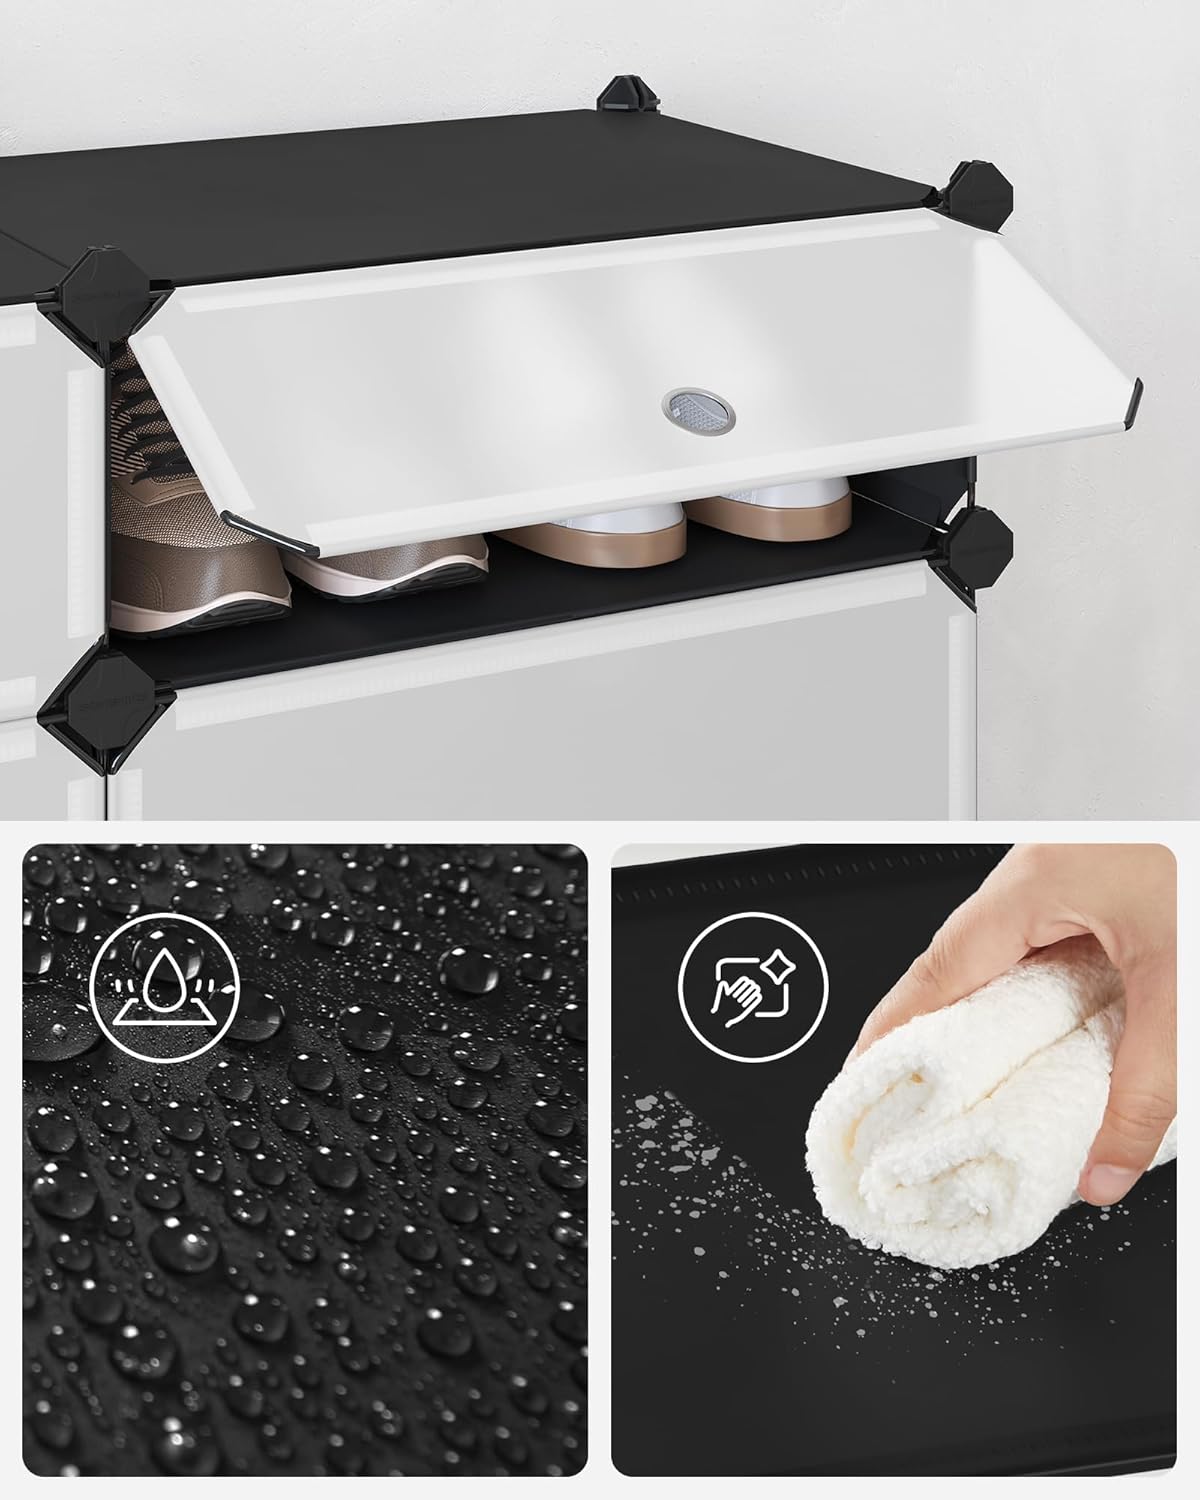
Billede: Et nærbillede view illustrating the waterproof nature of the plastic panels and the ease of cleaning them with a cloth, emphasizing the low-maintenance design.
Fejlfinding
- Enheden føles ustabil: Ensure all plastic plates are firmly pressed into the connectors. Use the hammer to tap them securely into place. Check that all connectors are fully locked after assembling each row.
- Panels are bent or damaged: Avoid excessive force during assembly. If a panel is damaged, contact customer support for replacement options.
- Items are too heavy: Do not exceed the maximum static load capacity of 10 kg per compartment. Distribute weight evenly.
Specifikationer
| Mærke | SONGMICS |
| Modelnummer | LPC10HV1 |
| Farve | Sort |
| Materiale | PP Plastic Sheets, Wire Frame, ABS Plastic Connectors |
| Overall Dimensions (1x10 configuration) | 31 x 43 x 173 cm (D x B x H) |
| Individual Slot Dimensions | 40 x 30 x 17 cm (L x B x H) |
| Varens vægt | 7.2 kg |
| Max. Static Load Capacity per Compartment | 10 kg |
| Montering påkrævet | Ja |
| Plejevejledning | Tør af med en tør klud |
Garanti og support
Specific warranty information for this product is not provided in this manual. For details regarding warranty coverage, returns, or technical support, please refer to your purchase documentation or contact the retailer where the product was purchased. You may also visit the official SONGMICS website or their Amazon store for further assistance.
SONGMICS Store: Besøg SONGMICS-butikken på Amazon


