1. Introduktion
Tak for købetasing the Homtime C1 Digital Alarm Clock. This device combines a digital alarm clock with dual USB charging ports, offering convenience and functionality for your bedside or office. Its user-friendly design, featuring a rotary button and dimmable LCD screen, ensures ease of use for all ages. Please read this manual thoroughly before operation to ensure proper use and maintenance.

Image: The Homtime C1 Digital Alarm Clock, turquoise in color, displayed on a wooden surface with a succulent plant in the background. The clock shows the time 20:08 and an alarm set for 15:00.
2. Sikkerhedsoplysninger
For at sikre sikker drift og forhindre skader, bedes du overholde følgende forholdsregler:
- Udsæt ikke enheden for vand eller for høj luftfugtighed.
- Undgå at placere enheden i nærheden af varmekilder såsom radiatorer, varmeapparater, komfurer eller andre apparater (herunder ampløftere), der producerer varme.
- Use only the power adapter and charging cable provided or recommended by Homtime.
- Forsøg ikke selv at adskille, reparere eller ændre enheden. Overlad al service til kvalificeret servicepersonale.
- Hold enheden væk fra stærke magnetiske felter.
- Rengør kun med en tør klud.
3. Pakkens indhold
Tjek venligst pakken for følgende varer:
- Homtime C1 Digital Alarm Clock
- Strømadapter
- Charging Cable (Multi-connector for various mobile phones)
- Brugermanual

Image: A gold-colored multi-connector charging cable with USB-A, Micro USB, Lightning, and USB-C connectors, indicating its versatility for various mobile devices.
4. Produktet er slutview
Familiarize yourself with the different parts of your Homtime C1 alarm clock:
- Front: Large LCD display for time and alarm.
- Top: Rotary button for setting time/alarm, snooze/dimmer button, alarm ON/OFF button.
- Tilbage: Strømindgangsport.
- Side (højre): To USB-opladningsporte.

Image: A composite image showing various angles of the Homtime C1 Digital Alarm Clock, including front, top, side, and bottom views, highlighting its compact design and port locations.
5. Opsætning
- Tilslut strøm: Plug the provided power adapter into the DC input port on the back of the alarm clock, then plug the adapter into a standard wall outlet. The display will light up.
- Indstilling af starttidspunkt: The clock will typically display a default time. To set the correct time, proceed to the 'Setting Time' section under Operating Instructions.
6. Betjeningsvejledning
6.1 Indstilling af tid
- Press and hold the rotary button on top of the clock until the hour digits start blinking.
- Rotate the button clockwise or counter-clockwise to adjust the hour.
- Press the rotary button once to switch to minute adjustment.
- Rotate the button to adjust the minutes.
- Press the rotary button again to confirm the time and exit time setting mode.
6.2 Indstilling af alarm
- Press and hold the alarm setting button (bell icon) on top of the clock until the alarm hour digits start blinking.
- Rotate the rotary button to adjust the alarm hour.
- Press the alarm setting button once to switch to alarm minute adjustment.
- Rotate the rotary button to adjust the alarm minutes.
- Press the alarm setting button again to confirm the alarm time.
- To activate or deactivate the alarm, press the alarm ON/OFF button (next to the rotary button). An alarm icon will appear on the display when activated.

Image: A person's hand with green nail polish is shown pressing the large circular button on top of a white Homtime C1 alarm clock, demonstrating the interaction for setting time or alarm.
6.3 Snooze -funktion
When the alarm sounds, press the large rotary button on top of the clock to activate the snooze function. The alarm will pause for a few minutes (default snooze time is typically 9 minutes) and then sound again. To turn off the alarm completely, press the alarm ON/OFF button.
6.4 Display Brightness (Dimmable)
The Homtime C1 features an auto-dimmable display. The brightness adjusts automatically based on ambient light conditions. You can also manually adjust the brightness by briefly pressing the snooze/dimmer button (usually the large rotary button or a dedicated button next to it) to cycle through different brightness levels.
6.5 USB-opladningsporte
The Homtime C1 is equipped with dual USB charging ports (5V/2.1A) on its side, allowing you to charge your mobile devices directly from the clock. Simply connect your device's USB charging cable to one of the ports. These ports are compatible with most smartphones and tablets, including iPhone and Android devices.
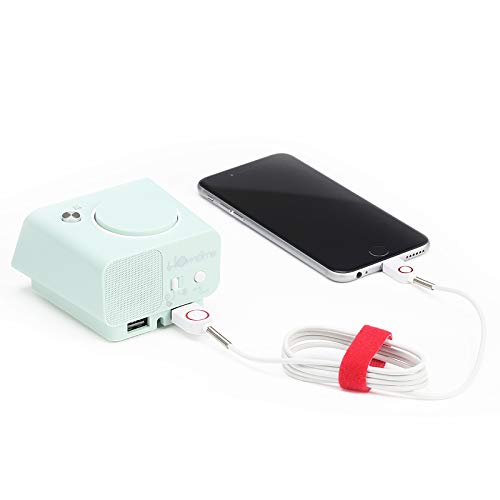
Image: The Homtime C1 alarm clock, turquoise in color, with a white charging cable connected to its side USB port, actively charging a black smartphone. This illustrates the dual USB charging capability.
7. Vedligeholdelse
- Rensning: Use a soft, dry cloth to clean the surface of the clock. Do not use liquid cleaners or aerosol sprays.
- Opbevaring: Hvis enheden opbevares i længere tid, skal du tage stikket ud af stikkontakten og opbevare den et køligt og tørt sted.
- Undgå påvirkning: Do not drop or subject the clock to strong impacts, as this may damage internal components.
8. Fejlfinding
| Problem | Mulig årsag | Løsning |
|---|---|---|
| Urvisningen er slukket. | Ingen strømtilslutning. | Sørg for, at strømadapteren er korrekt tilsluttet uret og stikkontakten. |
| Alarmen lyder ikke. | Alarmen er ikke aktiveret eller indstillet forkert. | Check if the alarm icon is displayed. Re-set the alarm time. |
| USB-opladning virker ikke. | Kabelproblem eller enhedsinkompatibilitet. | Try a different USB cable. Ensure your device is compatible with 5V/2.1A charging. |
| Display too dim/bright. | Auto-dimming or manual setting. | Briefly press the snooze/dimmer button to cycle through brightness levels. |
9. Specifikationer
- Mærke: Hjemmetid
- Model: C1
- Farve: Turquoise (Green)
- Skærmtype: Digital LCD
- Særlige funktioner: Alarm, Auto Dimmable, Snooze, Dual USB Charging Ports
- Strømkilde: Elektrisk med ledning
- Materiale: Acrylonitril Butadien Styren, Plast
- Monteringstype: Bordplade
- USB-udgang: 5V/2.1A (Total for both ports)
- Dimensioner: (Refer to product packaging for exact dimensions)
- Oprindelsesland: Kina
10. Garanti og support
Homtime products are designed and manufactured to the highest quality standards. For information regarding warranty coverage, please refer to the warranty card included with your product or visit the official Homtime website. For technical support or service inquiries, please contact Homtime customer service through the contact information provided on the product packaging or webwebsted.
Gem venligst din købskvittering som købsbevis af garantiårsager.


