1. Introduktion
This manual provides comprehensive instructions for the operation and maintenance of your Fetcus Universal Remote Control, designed for various Hitachi Air Conditioner models. Please read this manual thoroughly before using the remote control to ensure proper function and longevity.
This remote control is a direct replacement or compatible alternative for original Hitachi air conditioner remote models including RAS-D10EX, RAR-5E1, RAS-10XH1, RAR-5E2, RAR-5E3, RAR-5E4, RAR-5E5, RAR-5E6, and RAS-D14EX2.
2. Produktfunktioner
- Universal kompatibilitet: Designed to work with a wide range of Hitachi air conditioner models.
- Infrarød forbindelse: Utilizes standard infrared signals for reliable communication with your AC unit.
- Dedicated AC Functions: Includes specific buttons for common air conditioner operations such as power, mode selection, temperature adjustment, fan speed, and more.
- Kompakt design: Ergonomic and easy to handle.
- Ingen app-understøttelse: Operates independently without the need for a smartphone application.
- Frekvens: Operates at 433 MHz for signal transmission.
3. Opsætning
3.1 Batteriinstallation
The remote control requires appropriate batteries for operation. Follow these steps to install or replace batteries:
- Find batterirummet på bagsiden af fjernbetjeningen.
- Skub batteridækslet nedad, eller tryk på låsen for at åbne det.
- Insert new batteries, ensuring the positive (+) and negative (-) terminals align correctly with the markings inside the compartment. Typically, two AAA batteries are required, though specific battery type should be confirmed by checking the compartment markings.
- Luk batteridækslet ordentligt, indtil det klikker på plads.

Figur 3.1: Bag view of the Fetcus remote control with the battery compartment open, revealing the two battery slots and a label with battery safety warnings. This image illustrates the correct orientation for battery insertion.
Vigtig: Fjern batterierne, hvis fjernbetjeningen ikke skal bruges i længere tid, for at forhindre lækage og skader.
4. Betjeningsvejledning
Familiarize yourself with the buttons on your remote control. The remote features a main display and various control buttons for your air conditioner.
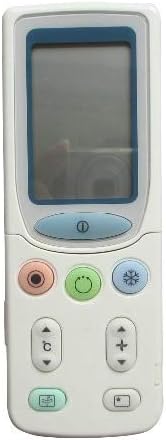
Figur 4.1: Front view of the Fetcus remote control, highlighting the LCD screen and the primary control buttons for power, mode, and temperature adjustment.
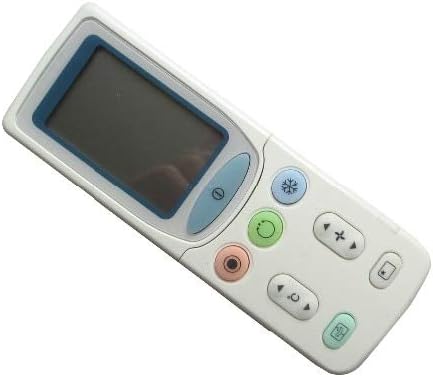
Figur 4.2: Vinklet view of the Fetcus remote control, showing the main display and primary function buttons including power, mode, and fan speed controls.
4.1 Grundlæggende funktioner
- Tænd/sluk-knap (①): Tryk for at tænde eller slukke for klimaanlægget.
- Tilstandsknap (↻): Press repeatedly to cycle through operating modes: Auto, Cool, Dry, Fan, Heat (if applicable to your AC unit).
- Temperaturjusteringsknapper (+ / -): Tryk for at øge eller mindske den ønskede temperaturindstilling.
- Knap til ventilatorhastighed (❄): Press to adjust the fan speed (e.g., Auto, Low, Medium, High).
4.2 Avancerede funktioner (under skydedøren)
Some advanced functions are accessible by sliding down the cover on the remote control. This reveals additional buttons for more specific controls.

Figur 4.3: Vinklet view of the Fetcus remote control with the sliding cover open, exposing additional advanced function buttons beneath the main display.
- Sving-/lamelstyring: Adjusts the direction of the airflow (vertical or horizontal swing).
- Timer/Sleep Mode: Sets a timer for the AC unit to turn on or off, or activates a sleep-friendly operating mode.
- C/F Switch (℃): Skifter temperaturvisningen mellem Celsius og Fahrenheit.
- Nulstil knap: Used to reset the remote control settings or clear certain functions. Consult your AC unit's manual for specific reset procedures if needed.
- Other Specific Buttons: Depending on your specific Hitachi AC model, other buttons may control functions like Quiet mode, Turbo mode, or Health functions. Refer to your AC unit's original manual for detailed explanations of these specific icons.
5. Vedligeholdelse
- Rensning: Tør fjernbetjeningen af med en blød, tør klud. Brug ikke flydende rengøringsmidler eller slibende materialer, da de kan beskadige overfladen eller de indvendige komponenter.
- Udskiftning af batteri: Replace batteries when the remote's range decreases or the display becomes dim. Always replace all batteries at the same time with new ones of the same type.
- Opbevaring: Opbevar fjernbetjeningen på et køligt, tørt sted væk fra direkte sollys og ekstreme temperaturer.
6. Fejlfinding
| Problem | Mulig årsag | Løsning |
|---|---|---|
| Fjernbetjeningen svarer ikke. | Døde eller forkert installerede batterier. | Udskift batterierne, og sørg for at polariteten (+/-) vender korrekt. |
| Fjernbetjeningens rækkevidde er dårlig. | Weak batteries; Obstruction between remote and AC unit. | Replace batteries. Ensure a clear line of sight to the AC unit's infrared receiver. |
| AC unit not responding to specific functions. | Remote not fully compatible with all AC unit features; AC unit does not support the function. | Verify the function exists on your specific AC model. This remote is a universal replacement and may not support all obscure functions of every original remote. |
| Skærmen er svag eller tom. | Lav batteristrøm. | Udskift batterierne. |
7. Specifikationer
| Feature | Detalje |
|---|---|
| Mærke | Calvas |
| Modelnummer (internt) | CLS-D41D8CD98F00B204E9800998ECF8427E |
| Kompatible enheder | Air Conditioner (Hitachi RAS-D10EX, RAR-5E1, RAS-10XH1, RAR-5E2, RAR-5E3, RAR-5E4, RAR-5E5, RAR-5E6, RAS-D14EX2) |
| Forbindelsesteknologi | Infrarød |
| Frekvens | 433 MHz |
| Maks. antal understøttede enheder | 1 |
| Materiale | Other (Durable Plastic) |
| Batteribeskrivelse | Lithium (Typically uses AAA batteries, please check compartment) |
| Særlige funktioner | Universal, Wireless |
| Vare Pakke Antal | 1 |
| Dato først tilgængelig | 8. maj 2019 |
8. Garanti og support
This Fetcus Remote Control comes with a 90 dages garanti fra købsdatoen. Denne garanti dækker fabrikationsfejl og sikrer, at produktet fungerer som tilsigtet under normal brug.
For warranty claims or technical support, please contact your retailer or the manufacturer with your purchase details. Please retain your proof of purchase for warranty validation.


