1. Introduktion
This manual provides essential information for the safe and efficient operation of your LEXMAN LED Inspection Flashlight. Please read it thoroughly before use and retain it for future reference. This versatile flashlight is designed for various inspection and work tasks, featuring two distinct light sources and multiple attachment options.
2. Sikkerhedsinstruktioner
- Batterisikkerhed: Use only 3 x AAA LR03 batteries. Ensure correct polarity (+/-) when inserting. Do not mix old and new batteries, or different types of batteries. Remove batteries if the device will not be used for an extended period to prevent leakage.
- Non-Replaceable LEDs: Den integrerede LED lamps in this product are not replaceable. Do not attempt to disassemble or modify the light sources.
- IP20-klassificering: This product has an IP20 protection rating, meaning it is protected against solid objects larger than 12.5mm. It offers ingen beskyttelse mod vand. Avoid exposure to water, rain, or high humidity to prevent damage and electric shock.
- Øjenbeskyttelse: Do not stare directly into the LED light. The intense light can cause temporary vision impairment.
- Opbevaring: Opbevar lommelygten på et køligt, tørt sted væk fra direkte sollys og ekstreme temperaturer.
3. Produktfunktioner og komponenter
The LEXMAN LED Inspection Flashlight is equipped with two independent light sources and practical features for versatile use.

Vinklet view of the LEXMAN LED Inspection Flashlight, showcasing its black and red design with the main side light panel and the top spotlight.

Front view of the LEXMAN LED Inspection Flashlight, highlighting the 24 SMD LEDs on the main panel and the red power button.

Bag view of the LEXMAN LED Inspection Flashlight, showing the integrated hanging hook and the magnetic base for versatile attachment.

Nærbillede view of the sturdy hanging hook, designed for convenient suspension of the flashlight.

Illustration of the flashlight in use, demonstrating the powerful 160-lumen side light with a 60-degree beam angle, providing illumination up to 50 meters for 6 hours.
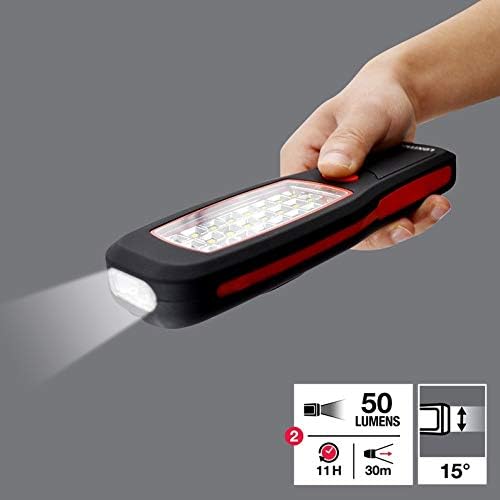
Illustration of the flashlight in use, demonstrating the focused 50-lumen top spotlight with a 15-degree beam angle, providing illumination up to 30 meters for 11 hours.
Nøglefunktioner:
- Dobbelt lyskilder: Features a main side light (24 SMD LEDs) for broad illumination and a top spotlight (1 LED) for focused lighting.
- Integreret ophængningskrog: A foldable hook allows for convenient suspension of the flashlight.
- Magnetisk base: A strong magnet on the back enables quick and secure attachment to metallic surfaces.
- Betjening med en enkelt knap: Easy control of light modes with a single power button.
- Holdbar konstruktion: Lavet af robust plastik til langvarig brug.
4. Opsætning
Batteri installation:
- The LEXMAN LED Inspection Flashlight requires 3 x AAA LR03 batteries (ikke inkluderet).
- Locate the battery compartment cover on the back of the flashlight.
- Skub eller afklips dækslet for at åbne rummet.
- Insert the 3 AAA batteries, ensuring that the positive (+) and negative (-) ends align with the polarity markings inside the compartment.
- Securely close the battery compartment cover until it clicks into place.
Note: Always use new batteries for optimal performance. If the flashlight will not be used for an extended period, remove the batteries to prevent potential leakage and damage.
5. Betjeningsvejledning
Turning On/Off and Switching Modes:
The flashlight is operated using a single red power button located on the front.
- To turn on the Side Light: Press the power button once. The main side panel with 24 SMD LEDs will illuminate (160 lumens).
- To switch to the Top Spotlight: While the side light is on, press the power button a second time. The side light will turn off, and the top spotlight (1 LED, 50 lumens) will illuminate.
- Sådan slukker du lommelygten: While the top spotlight is on, press the power button a third time. The flashlight will turn off.
The cycle is: Side Light (160 lm) → Top Spotlight (50 lm) → Slukket.
Using the Hook and Magnet:
- Ophængskrog: Unfold the integrated hook from the back of the flashlight to hang it from a nail, wire, or other suitable fixture.
- Magnetisk base: Utilize the strong magnet on the back to attach the flashlight securely to any ferrous metal surface, such as car hoods, metal shelves, or toolboxes.
6. Vedligeholdelse
- Rensning: Clean the exterior of the flashlight with a soft, dry cloth. Do not use abrasive cleaners, solvents, or harsh chemicals, as these may damage the plastic housing.
- Udskiftning af batteri: Replace batteries when the light output becomes dim or inconsistent. Always replace all three batteries at the same time.
- Opbevaring: When not in use, store the flashlight in a dry environment. If storing for extended periods, remove the batteries.
7. Fejlfinding
| Problem | Mulig årsag | Løsning |
|---|---|---|
| Lyset tændes ikke. |
|
|
| Lyset er svagt eller flimrer. |
|
|
| Lommelygten bliver varm under brug. | Normal drift. | This is normal for LED devices. If it becomes excessively hot, discontinue use and allow it to cool. |
8. Specifikationer
| Mærke: | Lexman |
| Modelnummer: | 80118994 FL-035-1 Handleuchte |
| Lyskilder: | 2 (24 Side SMD LEDs, 1 Top LED) |
| Luminous Flux (Side Light): | 160 lumen |
| Luminous Flux (Top Spotlight): | 50 lumen |
| Battery Life (Side Light): | 6 timer |
| Battery Life (Top Spotlight): | 11 timer |
| Lighting Range (Side Light): | 50 meter |
| Lighting Range (Top Spotlight): | 30 meter |
| Beam Angle (Side Light): | 60° |
| Beam Angle (Top Spotlight): | 15° |
| Ingress Protection (IP) Rating: | IP20 (Ingen vandbeskyttelse) |
| Strømkilde: | 3 x AAA LR03 batteries (not included) |
| Materiale: | Plast |
| Farve: | Sort/rød |
| Dimensions (with hook extended): | 25 cm (længde) |
| Dimensions (without hook): | 20.3 cm (længde) x 5.8 cm (bredde) x 3 cm (højde) |
| Vægt: | 30 g (0.066 lbs) |
| Certificeringer: | CE mærket |
9. Garanti og support
For warranty information, technical support, or inquiries regarding your LEXMAN LED Inspection Flashlight, please refer to the documentation provided at the time of purchase or contact your retailer. Keep your proof of purchase for any warranty claims.


