1. Introduktion
This manual provides detailed instructions for the operation and maintenance of your Trexonic TRX-68B-AMZ 3-Speed Turntable System. Please read this manual thoroughly before using the product to ensure proper function and to prevent damage.
2. Sikkerhedsinstruktioner
- Udsæt ikke enheden for regn eller fugt.
- Bloker ikke nogen ventilationsåbninger.
- Sørg for, at netledningen ikke kommer i klemme eller går på.
- Tag stikket ud af enheden under tordenvejr, eller når den ikke skal bruges i længere perioder.
- Overlad al service til kvalificeret servicepersonale.
3. Pakkens indhold
Kontroller, at alle varer er til stede i emballagen:
- Trexonic TRX-68B-AMZ Main Unit
- Wired Shelf Speakers (2)
- Fjernbetjening
- Brugervejledning (dette dokument)
- Strømadapter

Figure 3.1: Trexonic TRX-68B-AMZ Turntable System with included wired shelf speakers.
4. Produktet er slutview: Controls and Features
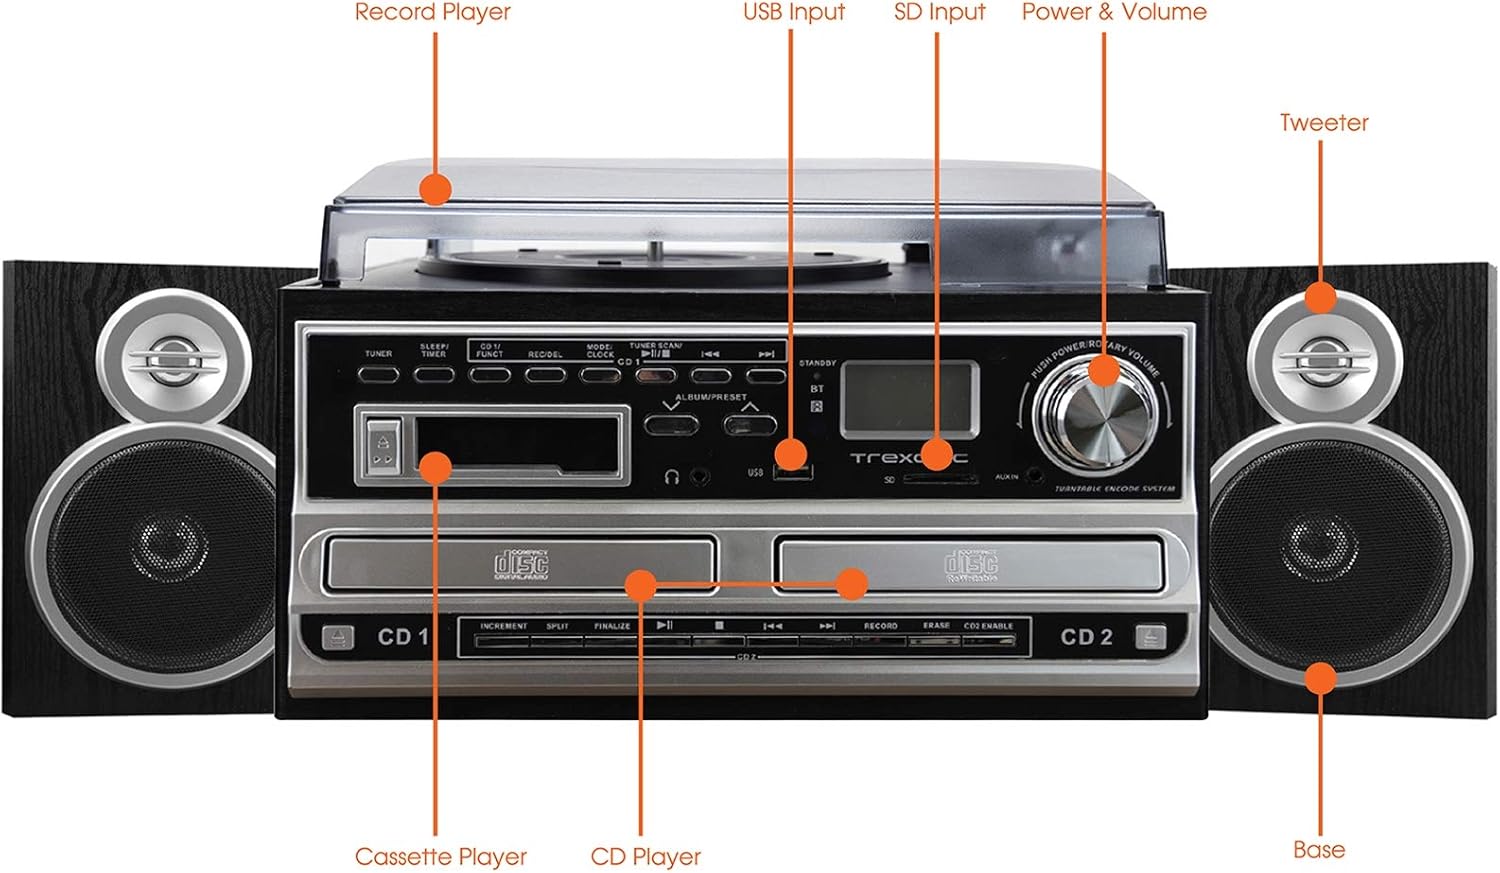
Figure 4.1: Front panel and top view of the Trexonic TRX-68B-AMZ with key components labeled.
- Record Player: For playing vinyl records.
- USB-indgang: Connect USB drives for playback or recording.
- SD-indgang: Insert SD cards for playback or recording.
- Power & Volume Knob: Styrer tænd/sluk og lydstyrke.
- Diskanthøjttaler: High-frequency speaker component.
- Base (Woofer): Low-frequency speaker component.
- CD-afspiller: For playing audio CDs and CD recording.
- Kassetteafspiller: Til afspilning og optagelse af kassettebånd.
5. Opsætning
5.1 Udpakning
Fjern forsigtigt alle komponenter fra emballagen. Gem emballagematerialerne til senere transport eller opbevaring.
5.2 Højttalertilslutning
Connect the wired shelf speakers to the speaker output terminals on the rear of the main unit. Ensure correct polarity (positive to positive, negative to negative) for optimal sound quality.
5.3 Strømtilslutning
Plug the power adapter into the DC IN jack on the back of the unit, then plug the other end into a standard wall outlet (AC 100-240V, 50/60Hz).
6. Betjeningsvejledning
6.1 Generelle kontroller
- Strøm-/lydstyrkeknap: Rotate to turn the unit on/off and adjust volume.
- Tilstands-/funktionsknap: Press to cycle through different modes (Turntable, CD, Cassette, FM, USB, SD, AUX, Bluetooth).
6.2 Betjening af pladespiller

Figur 6.1: Nærbillede view of the turntable platter and tonearm.
- Løft støvdækslet.
- Læg en plade på fadet.
- Vælg den passende hastighed (33, 45 eller 78 o/min) ved hjælp af hastighedsvælgeren.
- Move the tonearm to the desired position on the record. The platter will begin to spin automatically.
- Lower the tonearm gently onto the record.
- To stop playback, lift the tonearm and return it to its rest.
6.3 Betjening af cd-afspilleren
- Press the Mode/Function button to select CD mode.
- Tryk på OPEN/CLOSE-knappen for at åbne CD-skuffen.
- Placer en CD med etiketten opad.
- Press the OPEN/CLOSE button to close the tray. The CD will begin playing automatically.
- Use the PLAY/PAUSE, STOP, SKIP FORWARD, and SKIP BACKWARD buttons for control.
6.4 Betjening af kassettebåndoptageren

Figur 6.2: Nærbillede view of the cassette player slot.
- Press the Mode/Function button to select Cassette mode.
- Insert a cassette tape into the cassette slot.
- Use the PLAY, PAUSE, FAST FORWARD, REWIND, and STOP buttons for control.
6.5 FM-radiofunktion
- Press the Mode/Function button to select FM Radio mode.
- Use the TUNER knob or SEEK buttons to find radio stations.
- Press the PRESET button to save or recall favorite stations.
6.6 USB/SD-afspilning
- Indsæt et USB-drev i USB-porten eller et SD-kort i SD-slotten.
- Press the Mode/Function button to select USB or SD mode.
- Enheden vil automatisk registrere og afspille kompatibel lyd files.
- Use the PLAY/PAUSE, STOP, SKIP FORWARD, and SKIP BACKWARD buttons for control.
6.7 Optagelsesfunktioner
The Trexonic TRX-68B-AMZ allows recording from various sources to USB or SD card.
- Recording from Vinyl, CD, Cassette, or AUX to USB/SD:
- Insert a USB drive or SD card into the respective slot.
- Select the desired source mode (Turntable, CD, Cassette, or AUX).
- Start afspilning af kildematerialet.
- Press the RECORD button. The recording indicator will illuminate.
- Press the STOP button to end the recording.
7. Vedligeholdelse
7.1 Rengøring af enheden
Wipe the unit with a soft, dry cloth. Do not use abrasive cleaners or solvents. For the dust cover, use a soft cloth and a mild detergent solution if necessary, then wipe dry.
7.2 Stylus Care and Replacement
The turntable stylus (needle) is a delicate component. Clean it periodically with a soft brush, brushing from back to front. A worn stylus can damage records and degrade sound quality. Replace the stylus approximately every 300-500 hours of playback, or if you notice a decrease in sound quality or increased record wear.
8. Fejlfinding
| Problem | Mulig årsag | Løsning |
|---|---|---|
| Ingen strøm | Netledning ikke tilsluttet; stikkontakt defekt | Sørg for, at netledningen er korrekt tilsluttet; prøv en anden stikkontakt. |
| Ingen lyd | Volume too low; Speakers not connected; Incorrect mode selected | Increase volume; Check speaker connections; Select correct input mode. |
| Pladespiller drejer ikke | Unit not powered on; Tonearm not moved over platter | Turn on unit; Move tonearm over the record to activate platter. |
| CD'en afspiller ikke | CD inserted incorrectly; CD scratched/dirty; Incorrect mode | Reinsert CD correctly; Clean or replace CD; Select CD mode. |
| Problemer med optagelse | USB/SD full or incompatible; Source not playing | Check USB/SD capacity and format; Ensure source is playing during recording. |
9. Specifikationer
| Feature | Specifikation |
|---|---|
| Mærke | Trexonic |
| Modelnummer | TRX-68B-AMZ |
| Pladespiller hastigheder | 33/45/78 RPM |
| Optagelsesformater | MP3 (til USB/SD) |
| Afspilningsmedier | Vinyl, CD, Cassette, FM Radio, USB, SD, AUX, Bluetooth |
| Inkluderede komponenter | Remote Control, Wired Shelf Speakers |
| Strømkilde | Elektrisk med ledning |
| Dimensioner (pakke) | 56.64 x 35.56 x 26.67 cm |
| Vægt (pakke) | 6.89 kg |
10. Garantioplysninger
Trexonic products are designed and manufactured to the highest quality standards. For specific warranty details, please refer to the warranty card included with your product or contact Trexonic customer support. Keep your purchase receipt as proof of purchase.
11. Kundesupport
If you encounter any issues not covered in this manual or require further assistance, please contact Trexonic customer support. Contact information can typically be found on the manufacturer's official webwebstedet eller på produktemballagen.


