Indledning
The Argo Relax Style portable air conditioner is designed for efficient and compact cooling. Featuring a vertical design concept (VDC), this unit offers powerful performance in a sleek, modern form factor. It combines a high-gloss front finish with matte side panels for an ergonomic grip and contemporary aesthetic.
This appliance provides three primary functions: cooling, ventilation, and dehumidification. It also offers three fan speeds, including an automatic speed setting, to suit various comfort needs. The unit incorporates automatic condensation vaporization during cooling operation and allows for continuous condensate drainage in dehumidification mode. It utilizes a refrigerant gas with a Global Warming Potential (GWP) close to zero, reflecting an environmentally conscious design.

Figur 1: Forside view of the Argo Relax Style Portable Air Conditioner.
Sikkerhedsoplysninger
Læs alle sikkerhedsinstruktioner omhyggeligt, inden du bruger apparatet. Manglende overholdelse af disse instruktioner kan resultere i elektrisk stød, brand eller alvorlig personskade.
- Sørg for, at strømforsyningen voltage stemmer overens med klassificeringsmærkatet på enheden.
- Betjen ikke enheden med en beskadiget strømledning eller stik.
- Bloker ikke luftindtag eller -udtag. Sørg for tilstrækkelig afstand omkring enheden for korrekt luftgennemstrømning.
- Stik ikke genstande ind i luftudløbene.
- Hold enheden væk fra brandfarlige materialer og varmekilder.
- Tag altid stikket ud af enheden, før du rengør eller udfører vedligeholdelse.
- Dette apparat er ikke beregnet til brug af personer (inklusive børn) med nedsatte fysiske, sensoriske eller mentale evner, eller mangel på erfaring og viden, medmindre de har fået opsyn eller instruktion i brugen af apparatet af en person, der er ansvarlig for deres sikkerhed.
- Børn skal være under opsyn for at sikre, at de ikke leger med apparatet.
Produktkomponenter
The Argo Relax Style portable air conditioner comes with several components necessary for its operation and installation. Familiarize yourself with these parts before setup.
- Hovedklimaanlæg
- Fleksibel udstødningsslange
- Window Adapter Kit (for exhaust hose)
- Multi-function Remote Control with LED screen
- Drainage Hose (for continuous dehumidification)
- Air Filter (removable for cleaning)
- Multi-directional Wheels and Handle for portability

Figure 2: Included components: flexible hose, window adapter, remote control, and drainage hose.
Opsætning
1. Udpakning
Tag forsigtigt klimaanlægget og alt tilbehør ud af emballagen. Gem den originale emballage til senere opbevaring eller transport.
2. Placering
Place the unit on a flat, stable surface. Ensure there is at least 30 cm (12 inches) of space around the unit for proper air circulation. Position the unit near a window or opening where the exhaust hose can be vented to the outside.

Figur 3: Eksample placement of the air conditioner in a room.
3. Montering af udstødningsslange
- Attach one end of the flexible exhaust hose to the air outlet on the back of the unit.
- Connect the window adapter to the other end of the exhaust hose.
- Open a window or sliding door and place the window adapter securely in the opening to vent hot air outside. For fixed glass installations, use the provided kit. Ensure the hose is as straight and short as possible to maximize efficiency.
4. Drainage (Dehumidification Mode)
For continuous dehumidification, connect the drainage hose to the continuous drainage port on the unit and direct the other end to a suitable drain or container. In cooling mode, condensation is automatically vaporized.
5. Strømtilslutning
Sæt netledningen i en jordet stikkontakt. Sørg for, at stikkontakten opfylder de elektriske krav, der er angivet i afsnittet 'Specifikationer'.
Betjeningsvejledning
Kontrolpanel overview
Kontrolpanelet er placeret øverst på enheden og har et LED-display og forskellige knapper til betjening.

Figure 4: Top control panel of the unit.
- On/Off knap: Tænder eller slukker for enheden.
- Mode knap: Cycles through Cooling, Fan, and Dehumidification modes.
- Temperature/Timer Adjustment Buttons (+/-): Adjusts desired temperature or sets timer duration.
- Ventilatorhastighedsknap: Vælger ventilatorhastighed (Lav, Mellem, Høj, Auto).
- Sving knap: Activates or deactivates the automatic oscillation of the motorized louvers.
- Sleep knap: Aktiverer dvaletilstand for mere støjsvag drift og gradvis temperaturjustering.
- Timer knap: Sets the 24-hour programmable timer for automatic on/off.
Fjernbetjening
The unit can be operated using the included multi-function remote control, which mirrors the functions of the control panel.
Driftstilstande
- Køletilstand: Reduces room temperature. Set desired temperature using the +/- buttons. The unit will cool until the set temperature is reached.
- Ventilatortilstand: Cirkulerer luften uden køling. Vælg den ønskede ventilatorhastighed.
- Affugtningstilstand: Removes excess moisture from the air. Connect the continuous drainage hose for optimal performance in this mode.
Særlige funktioner
- 24-timers programmerbar timer: Allows you to set a specific time for the unit to turn on or off automatically.
- Søvnfunktion: Optimizes operation for nighttime comfort, typically by gradually increasing the set temperature and reducing fan speed.
- Hukommelsesfunktion: The unit retains your last settings when powered off and on.
- Autodiagnose: The unit can perform self-diagnosis to identify potential issues.
- Motorized Louvers: The discharge fins are motorized and can be oriented horizontally and vertically with automatic oscillation for better air distribution.
Opretholdelse
Regular maintenance ensures optimal performance and extends the lifespan of your air conditioner. Always unplug the unit before cleaning or maintenance.
1. Rengøring af luftfilter
The air filter should be cleaned regularly, typically every two weeks, or more frequently depending on usage and air quality. A dirty filter can reduce cooling efficiency and airflow.
- Locate the air filter, usually on the back or side of the unit. It is easily removable.
- Træk forsigtigt filteret ud.
- Rengør filteret med en støvsuger for at fjerne støv, eller vask det med lunkent vand og et mildt rengøringsmiddel.
- Skyl grundigt, og lad filteret lufttørre helt, før det sættes tilbage i enheden.

Figur 5: Side view indicating air intake vents where the filter is located.
2. Kondensdræning
While the unit features automatic condensation vaporization in cooling mode, it's important to be aware of drainage for dehumidification or if the internal tank fills up.
- Automatic Vaporization: In cooling mode, most condensation is evaporated and expelled with the hot air.
- Kontinuerlig dræning: For prolonged dehumidification or in very humid conditions, connect the provided drainage hose to the continuous drainage port to allow water to drain directly.
- Manuel dræning: If the internal tank becomes full (indicated by an error code or indicator light), turn off the unit, unplug it, and carefully move it to a location where water can be drained from the bottom drainage plug into a shallow pan.
3. Unit Cleaning
Tør ydersiden af enheden af med en blød, damp klud. Brug ikke skrappe kemikalier, slibemidler eller opløsningsmidler, da disse kan beskadige overfladen.
4. Opbevaring
Before storing the unit for an extended period (e.g., off-season):
- Ensure all water has been drained from the unit.
- Rengør luftfilteret.
- Tag netledningen ud, og rul den pænt op.
- Store the unit in a cool, dry place, preferably in its original packaging, to protect it from dust and damage.
- If the unit has been stored horizontally, allow it to stand upright for at least 4 hours before restarting operation.
Fejlfinding
Før du kontakter kundesupport, bedes du læse følgende almindelige problemer og løsninger på disse:
| Problem | Mulig årsag | Løsning |
|---|---|---|
| Enheden tænder ikke. | Ingen strøm, netledning frakoblet, afbryder udløst. | Kontroller strømforbindelsen, sørg for at stikkontakten fungerer, nulstil afbryderen. |
| Enheden kører, men køler ikke. | Exhaust hose not properly vented, room too large, windows/doors open, dirty air filter, temperature setting too high. | Ensure exhaust hose is vented outside, close windows/doors, clean air filter, lower temperature setting. |
| Enheden er støjende. | Normal operating noise (fan/compressor), unit not on a level surface, internal components vibrating. | Ensure unit is on a flat, stable surface. Some operating noise is normal for portable units. |
| Vandlækage. | Drainage plug not secured, continuous drainage hose blocked or disconnected, internal water tank full. | Check drainage plug, ensure hose is properly connected and clear, drain internal tank if full. |
| Fjernbetjening virker ikke. | Batteries dead or incorrectly inserted, obstruction between remote and unit. | Replace batteries, ensure clear line of sight to the unit's receiver. |
Hvis problemet fortsætter efter at have forsøgt disse løsninger, bedes du kontakte kundesupport.
Specifikationer
The following table provides detailed technical specifications for the Argo Relax Style portable air conditioner:
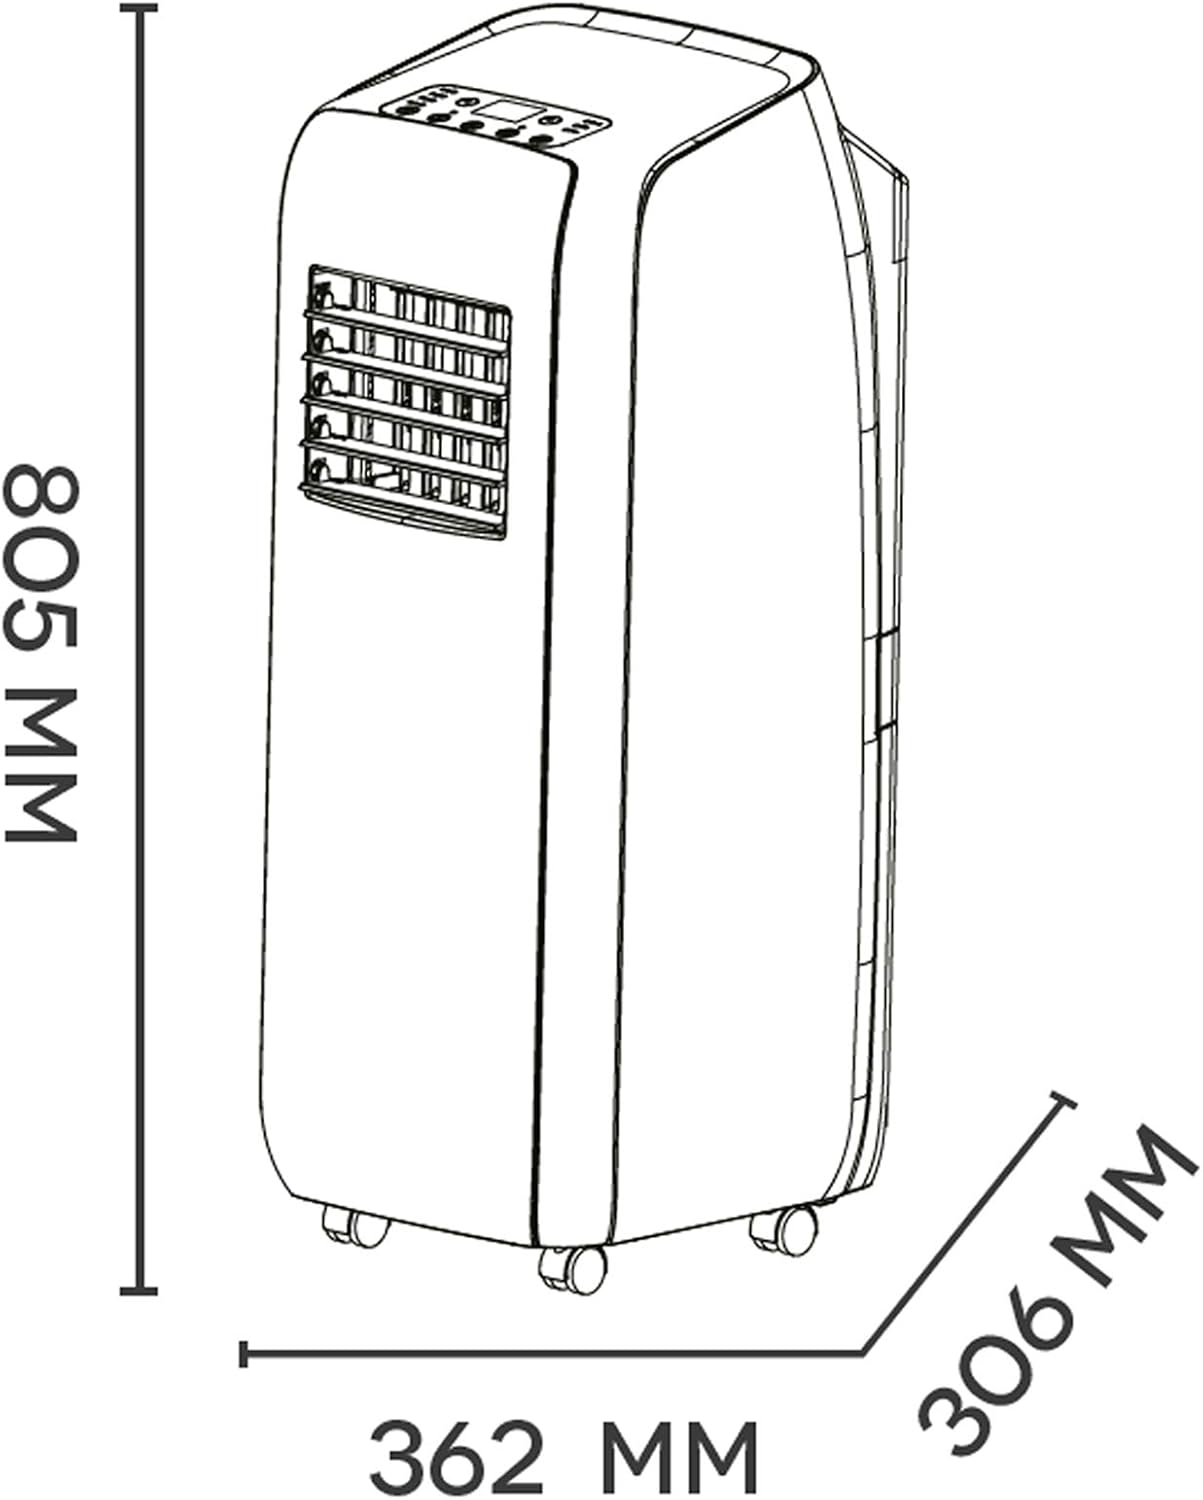
Figure 6: Dimensions of the unit.
| Feature | Specifikation |
|---|---|
| Mærke | Argo |
| Modelnummer | RELAX STYLE |
| Produktmål (L x B x H) | 36.2 x 30.6 x 80.5 cm (14.25 x 12.05 x 31.69 tommer) |
| Vægt | 28 kg (61.7 lbs) |
| Energieffektivitetsklasse | A |
| Kølekapacitet | 10000 BTU/t (2.6 kW) |
| Støjniveau | 64 dB |
| Voltage | 230 volt |
| Strømforbrug | 2600 watt |
| Installationstype | Transportabel |
| Inkluderede komponenter | Product, manual, remote control, warranty, flexible hose, window adapter, fixed glass installation kit |
Garanti og support
For warranty information, please refer to the warranty card included with your product or visit the official Argo webwebstedet. Behold din købskvittering som købsbevis.
For technical support, spare parts, or service inquiries, please contact Argo customer service. Contact details can typically be found in the product packaging or on the manufacturer's official webwebsted.
Vigtig: Do not attempt to repair the unit yourself. Unauthorized repairs will void the warranty and may pose safety risks.


