Indledning
This manual provides detailed instructions for the installation, operation, and maintenance of your QIACHIP DC 12V 4-Channel Wireless RF Remote Control Relay Switch Kit. This kit is designed for various remote control applications, offering flexibility and convenience for controlling lights, fans, garage doors, gates, and other DC 12V powered devices.

Image: The QIACHIP 4-channel relay receiver module and two 4-button remote control transmitters.
Produktegenskaber
- Trådløs kontrol: Operates on a 433Mhz RF frequency for reliable signal transmission.
- 4-kanals output: Independently control up to four different devices.
- Flere arbejdstilstande: Supports Momentary, Toggle, and Latched modes for versatile application.
- Udvidet rækkevidde: Up to 164ft (50m) transmission distance in open areas.
- Høj kompatibilitet: Suitable for various DC 12V applications including lights, fans, garage doors, and gate openers.
- Kan udvides: The receiver can store up to 20 remote controllers.
Specifikationer
| Fabrikant | qiachip Electronic Technology |
| Varens vægt | 5.6 ounce |
| Pakkedimensioner | 5.28 x 4.72 x 1.3 tommer |
| Receiver Input Voltage | DC 12V |
| RF-frekvens | 433Mhz |
| Batterier til fjernbetjening | 2 CR2032 batteries (required, not included) |
| Materiale | ABS |

Image: Dimensions of the QIACHIP 4-button remote control transmitter (6.8cm x 3.6cm x 1.6cm).

Image: Dimensions of the QIACHIP 4-channel relay receiver module (75mm x 54mm x 25mm).
Pakkens indhold
- 1 x QIACHIP 4-Channel Relay Receiver Module
- 2 x QIACHIP 4-Button Remote Control Transmitters
Opsætning og installation
Ledningsdiagrammer
Before connecting any wires, ensure the power supply is disconnected to prevent electrical shock. The receiver module operates on DC 12V. The relay outputs can control both DC and AC loads, depending on your application.

Image: General wiring diagrams for DC and AC loads, including DC motor control.

Image: Wiring diagrams for controlling lights with the relay module (DC 12V and AC 85V-250V).
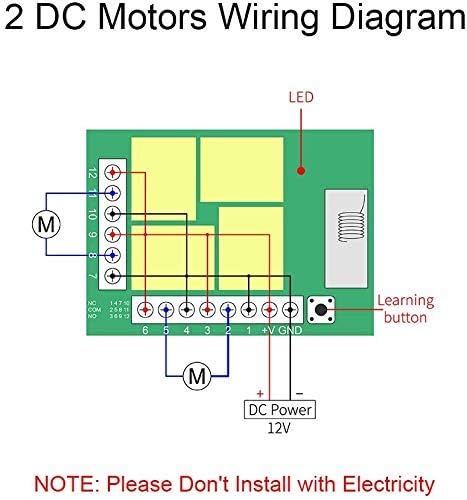
Image: Wiring diagram for controlling two DC motors using the relay module.
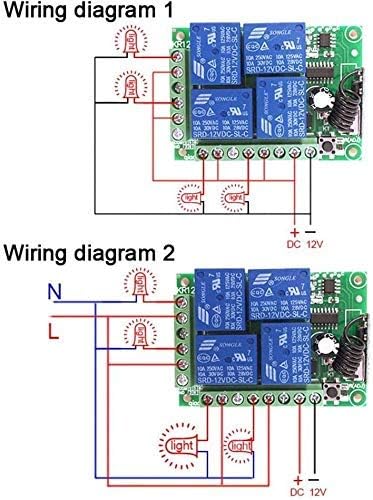
Image: Wiring diagram for connecting DC bulbs to the relay module.
NOTE: Always ensure power is OFF before performing any wiring. Incorrect wiring can damage the device or cause electrical hazards.
Learning Mode / Pairing Transmitters
The receiver module supports three working modes: Momentary, Toggle, and Latched. All four channels on the receiver will operate in the same selected mode.
- Clear Existing Codes: Press the learning button on the receiver module 8 times. The LED indicator will flash 8 times and then clear all stored remote codes. This is recommended before pairing new remotes or changing modes.
- Pairing in Momentary Mode (Default):
- Press the learning button on the receiver module once. The LED indicator will turn on.
- Press any button on the remote control (e.g., button A). The LED indicator on the receiver will flash once and then turn off, indicating successful pairing in Momentary mode.
- In Momentary mode, the relay activates only while the remote button is pressed.
- Pairing in Toggle Mode:
- Press the learning button on the receiver module twice. The LED indicator will turn on.
- Press any button on the remote control (e.g., button A). The LED indicator on the receiver will flash once and then turn off, indicating successful pairing in Toggle mode.
- In Toggle mode, one press of the remote button activates the relay, and a second press deactivates it.
- Pairing in Latched Mode:
- Press the learning button on the receiver module three times. The LED indicator will turn on.
- Press button A on the remote control. The LED indicator will flash once.
- Then, press button B on the remote control. The LED indicator will flash once and then turn off, indicating successful pairing in Latched mode.
- In Latched mode, pressing button A activates the corresponding relay and deactivates any previously active relay. Pressing button B deactivates all relays.
Betjeningsvejledning
Once the remote control transmitters are paired with the receiver module in your desired mode, operation is straightforward:
- Momentan Mode: Press and hold the corresponding button (A, B, C, or D) on the remote to activate the relay. Release the button to deactivate.
- Skift tilstand: Press the corresponding button (A, B, C, or D) once to activate the relay. Press the same button again to deactivate the relay.
- Fastlåst tilstand: Press button A, B, C, or D to activate its respective relay. Only one relay can be active at a time in this mode. Pressing another button will deactivate the currently active relay and activate the new one.

Billede: Eksamples of applications for the remote control system, such as garage doors, car sunroofs, and gate doors.

Image: A remote control being used to operate a truck liftgate, demonstrating practical application.
Opretholdelse
- Udskiftning af batteri: The remote control transmitters use CR2032 batteries. If the remote's range decreases or it becomes unresponsive, replace the batteries. To replace, carefully open the remote casing and insert new batteries with the correct polarity.
- Rensning: Use a soft, dry cloth to clean the receiver module and remote controls. Avoid using harsh chemicals or abrasive materials.
- Miljø: Keep the receiver module and remotes away from excessive moisture, extreme temperatures, and strong electromagnetic interference.
Fejlfinding
- Fjernbetjeningen reagerer ikke:
- Kontrollér batterierne i fjernbetjeningen, og udskift dem om nødvendigt.
- Ensure the remote is within the effective operating range of the receiver.
- Re-pair the remote control with the receiver module following the 'Learning Mode' instructions.
- Reduceret rækkevidde:
- Udskift fjernbetjeningens batterier.
- Ensure there are no significant obstructions (e.g., thick walls, metal structures) between the remote and the receiver.
- Check for sources of RF interference near the receiver.
- Relæ aktiveres ikke:
- Verify all wiring connections to the receiver and the load are secure and correct.
- Confirm the receiver is receiving proper DC 12V power.
- Ensure the remote is correctly paired and in the desired working mode.
Støtte
For any issues or questions regarding your QIACHIP DC 12V 4-Channel Wireless RF Remote Control Relay Switch Kit, please contact QIACHIP customer support. We are committed to providing assistance and ensuring your satisfaction.
E-mail: Refer to your product packaging or the QIACHIP official webwebsted for kontaktoplysninger.


