Indledning
This manual provides detailed instructions for the setup, operation, and maintenance of your PROMETHEAN PRM-35 Short-Throw DLP Home Theater Projector. Please read this manual thoroughly before using the projector to ensure proper operation and to extend the life of your device. Keep this manual for future reference.
Sikkerhedsoplysninger
Overhold følgende sikkerhedsforanstaltninger for at forhindre brand, elektrisk stød eller personskade:
- Bloker ikke ventilationsåbningerne. Sørg for tilstrækkelig plads omkring projektoren for korrekt luftgennemstrømning.
- Udsæt ikke projektoren for regn eller fugt.
- Åbn ikke projektoren casing. Overlad al service til kvalificeret servicepersonale.
- Undgå at se direkte ind i projektorlinsen, når lamp er tændt, da det skarpe lys kan beskadige dine øjne.
- Use only the power cord supplied with the projector or a suitable replacement.
- Tag projektorens stik ud af stikkontakten før rengøring eller når den ikke er i brug i længere perioder.
Pakkens indhold
Bekræft at alle varer er til stede i din pakke:
- PROMETHEAN PRM-35 Projector
- Strømledning
- Fjernbetjening
- HDMI-kabel (kan variere afhængigt af region/pakke)
- Brugervejledning (dette dokument)

Image: The PROMETHEAN PRM-35 projector shown alongside its remote control, power cord, and an HDMI cable, illustrating the typical package contents.
Produkt overview
Front View

Billede: Forside view of the PROMETHEAN PRM-35 projector, highlighting the lens, brand logo, and various certifications.
The front of the projector features the main projection lens, which includes manual focus and digital zoom capabilities. The PROMETHEAN logo and other product identifiers are also visible.
Bag View (Forbindelsesporte)
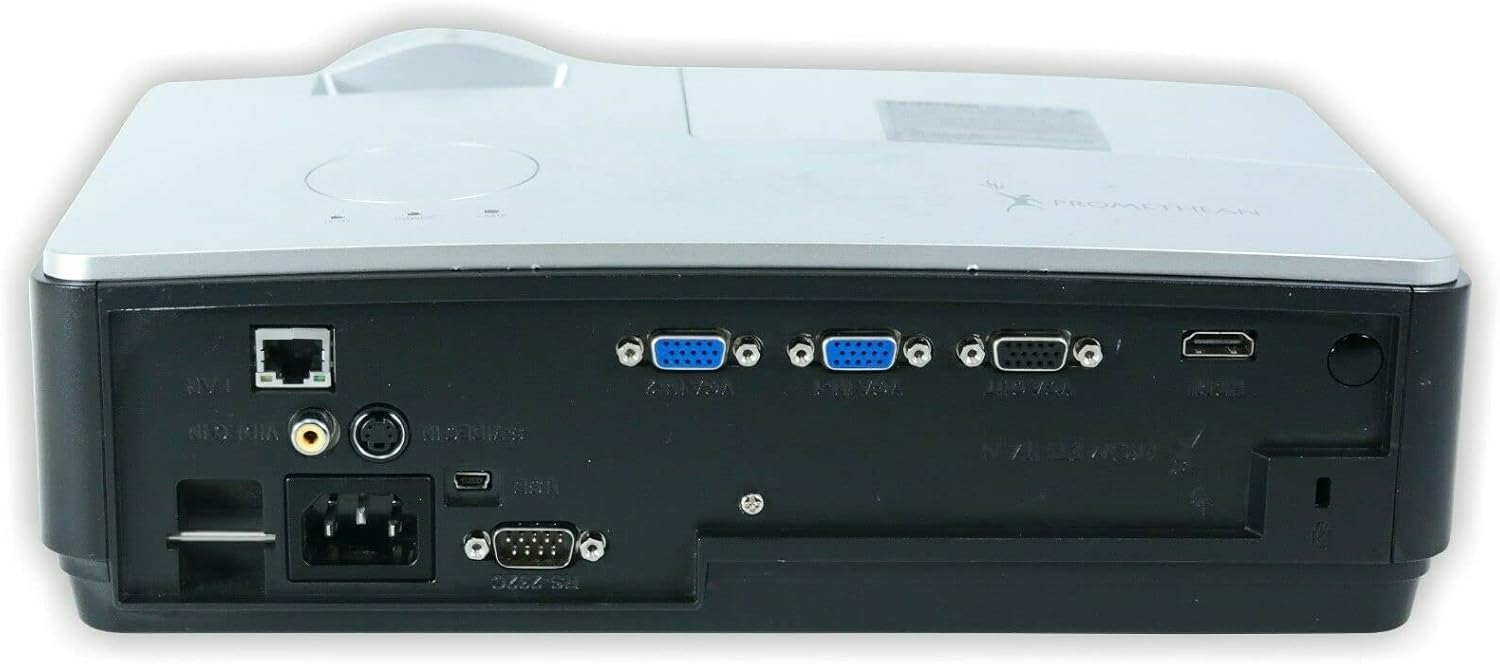
Billede: Bagside view of the PROMETHEAN PRM-35 projector, displaying a variety of input and output ports including HDMI, VGA, USB, S-Video, and network connections.
The rear panel provides all the necessary input and output ports for connecting to various devices. These include HDMI, VGA, S-Video, USB Mini Type-A, RS232, RJ-45 (LAN), and audio jacks.
Side Views (Ventilation)

Billede: Side view of the PROMETHEAN PRM-35 projector, showing the ventilation grilles for heat dissipation.

Billede: En anden side view of the PROMETHEAN PRM-35 projector, also featuring ventilation grilles.
Both sides of the projector feature ventilation grilles to ensure proper airflow and prevent overheating. It is crucial to keep these vents unobstructed during operation.
Top View
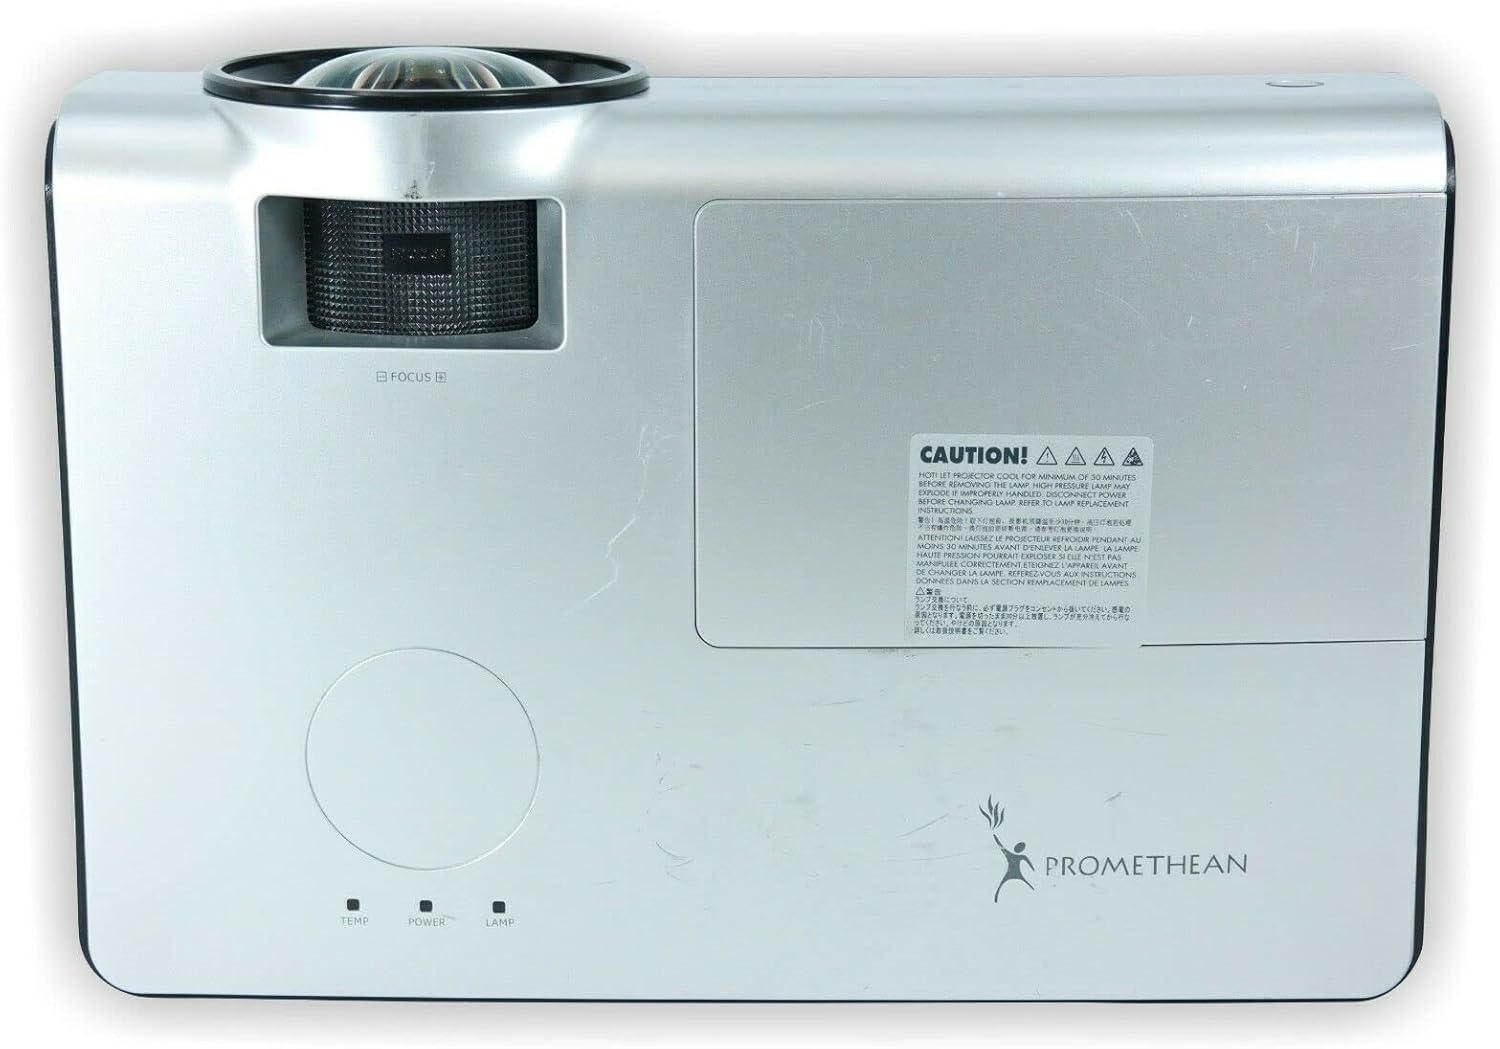
Billede: Top view of the PROMETHEAN PRM-35 projector, showing the control panel area and lamp adgangsdæksel.
The top panel includes indicator lights for temperature, power, and lamp status, along with a caution label regarding lamp varme.
Bund View

Billede: Bund view of the PROMETHEAN PRM-35 projector, showing mounting points and regulatory labels.
The bottom of the projector features mounting points for ceiling or table top projection, along with product information and regulatory compliance labels.
Opsætning
1. Placering
Position the projector on a stable, flat surface or mount it securely. For short-throw projection, place the projector close to the screen. Ensure there is adequate space around the projector for ventilation.
- Table Top Projection: Placer projektoren på et bord foran skærmen.
- Loftprojektion: Use a compatible ceiling mount (sold separately) and ensure the projector is securely fastened.
- Bagprojektion: If your screen supports it, the projector can be placed behind the screen. Adjust settings in the projector menu for rear projection.
2. Tilslutning til strøm
- Connect the power cord to the projector's power input port on the rear panel.
- Sæt den anden ende af netledningen i en jordet stikkontakt.
- Strømindikatorlampen på projektoren skal lyse.
3. Tilslutning af indgangskilder
The PRM-35 offers multiple connectivity options:
- HDMI: For high-definition digital video and audio. Connect an HDMI cable from your source device (e.g., Blu-ray player, game console, PC) to the HDMI port on the projector.
- VGA: For analog video connection from computers. Connect a VGA cable from your PC to one of the VGA/SVGA D-Sub ports.
- S-video: Til video i standardopløsning.
- USB Mini Type-A: For certain data or control functions.
- RS232 (DB-9pin): Til seriel styring af projektoren.
- RJ-45 (LAN): For network connectivity and control (e.g., Crestron RoomView).
- Lyd: Use the headphone jack for audio output or connect external speakers if desired.
4. Focus and Digital Zoom Adjustment
Once the projector is powered on and displaying an image:
- Fokus: Rotate the focus ring around the projector lens until the image appears sharp and clear on the screen.
- Digital zoom: Use the remote control or projector's on-screen display (OSD) menu to adjust the digital zoom. This feature allows you to enlarge or reduce the image size without moving the projector.
Betjening af projektoren
Tænd/sluk
- Tænd: Tryk på Magt button on the projector's control panel or the remote control. The power indicator light will change to solid green.
- Sluk: Tryk på Magt button again. A confirmation message may appear. Press Magt a second time to confirm shutdown. The projector will enter a cooling cycle before fully powering off. Do not unplug the projector during the cooling cycle.
Menu Navigation (OSD)
Use the buttons on the projector's control panel or the remote control to navigate the On-Screen Display (OSD) menu:
- Brug Menu button to open or close the OSD.
- Brug Pil knapper (Op, Ned, Venstre, Højre) to navigate through menu options.
- Tryk på Indtast or OK knappen for at vælge en mulighed eller bekræfte en indstilling.
- Brug Udgang or Tilbage knappen for at vende tilbage til den forrige menu eller afslutte OSD-menuen.
Valg af inputkilde
Sådan skifter du mellem tilsluttede enheder:
- Tryk på Kilde or Input knappen på fjernbetjeningen eller projektoren.
- A list of available input sources will appear on the screen.
- Brug Pil buttons to highlight the desired source and press Indtast or OK.
Billedjusteringer
Access the Picture menu in the OSD to fine-tune image quality:
- Lysstyrke: Adjusts the overall lightness or darkness of the image.
- Kontrast: Styrer forskellen mellem de lyseste og mørkeste områder.
- Farve: Justerer farvernes intensitet.
- Farvetone: Fine-tunes the color balance (primarily for NTSC video sources).
- Skarphed: Enhances or softens the edges of objects in the image.
- Aspektforhold: Selects the display format (e.g., 16:10, 16:9, 4:3). The native aspect ratio is 16:10.
Lydindstillinger
The PRM-35 has built-in speakers. Adjust audio settings via the OSD:
- Bind: Controls the output level of the built-in speakers.
- Stum: Temporarily silences the audio.
3D Modes (PC 3D Ready)
The projector supports PC 3D Ready functionality. To experience 3D content:
- Ensure your PC's graphics card and software support 3D output.
- Use compatible 3D glasses (sold separately).
- Refer to your PC's 3D software instructions for specific setup.
Opretholdelse
Regelmæssig vedligeholdelse sikrer optimal ydeevne og levetid for din projektor.
Rengøring af projektoren
- Ydre: Brug en blød, fnugfri klud dampened with a mild, non-abrasive cleaner. Do not spray cleaner directly onto the projector.
- Linse: Use a professional lens cleaning kit or a soft, dry microfiber cloth specifically designed for optical lenses. Avoid touching the lens with your fingers.
- Ventilationsåbninger: Periodically check and gently clean the ventilation grilles to prevent dust buildup, which can impede airflow. Use a soft brush or compressed air (held upright to prevent propellant discharge).
Lamp Liv og erstatning
The PRM-35 projector lamp has a long lifespan, up to 6000 hours. When the lamp når slutningen af sit liv, den lamp indicator light on the projector will illuminate or flash, and a message may appear on the screen.
Note: This projector features a filter-free design, eliminating the need for filter replacement or cleaning, which reduces maintenance time and cost.
For lamp replacement, it is recommended to contact qualified service personnel or refer to the detailed lamp replacement guide available from Promethean support.
Opbevaring
If storing the projector for an extended period:
- Power off the projector correctly and allow it to cool down completely.
- Afbryd alle kabler.
- Store the projector in a cool, dry place, away from direct sunlight and extreme temperatures.
- Use the original packaging or a protective case to prevent dust and damage.
Fejlfinding
This section addresses common issues you might encounter with your PRM-35 projector.
| Problem | Mulig årsag | Løsning |
|---|---|---|
| Intet billede på skærmen |
|
|
| Billedet er sløret |
|
|
| Projektoren overopheder eller slukker |
|
|
| Fjernbetjening virker ikke |
|
|
Specifikationer
| Feature | Detalje |
|---|---|
| Mærke | PROMETHEAN |
| Model | PRM-35 |
| Display Type | DLP |
| Indfødt opløsning | 1280x800 |
| Billedlysstyrke | 2500 ANSI Lumens |
| Kontrastforhold | 2000:1 |
| Aspektforhold | 16:10 (Native) |
| Video Modes Supported | 720p, 1080i, 1080p |
| 3D-tilstande | PC 3D Ready |
| Kasteafstand | Kort kast |
| Forbindelse | HDMI, VGA, USB Mini Type-A, RS232, S-Video, RJ-45 (LAN), Headphone Jack |
| Særlige funktioner | Portable, Short Throw, 3D-Ready, Closed Captioning, Crestron RoomView, Built-in Speakers, Filter-free design |
| Varens vægt | 6 lbs (ca.) |
| Produktdimensioner | 11 x 12 x 4 tommer (ca.) |
| Lamp Liv | Op til 6000 timer |
| Kompatibilitet | PC and MAC computers |
Garanti og support
For information regarding the warranty coverage for your PROMETHEAN PRM-35 projector, please refer to the warranty card included with your purchase or visit the official PROMETHEAN webGarantibetingelserne kan variere afhængigt af region og forhandler.
For technical support, service, or to purchase replacement parts, please contact PROMETHEAN customer support through their official channels. You may need your product model number (PRM-35) and serial number when contacting support.
Official PROMETHEAN Webwebsted: www.prometheanworld.com (This is a placeholder link, please refer to actual manufacturer webhjemmeside for support.)


