Indledning
This manual provides essential information for the safe and efficient operation, maintenance, and troubleshooting of your Pretul 20 L, 2-1/2 HP (maximum power), 120 V Compressor. Please read this manual thoroughly before using the compressor to ensure proper handling and to prevent injury or damage.

Image: Pretul 20 L Air Compressor, a yellow and black portable unit with wheels and a handle.
Sikkerhedsoplysninger
ADVARSEL: Manglende overholdelse af disse sikkerhedsinstruktioner kan resultere i alvorlig personskade eller materielle skader.
- Brug altid passende personlige værnemidler (PPE), såsom sikkerhedsbriller, når du betjener kompressoren.
- Sørg for, at kompressoren er placeret på en stabil, plan overflade for at forhindre, at den vælter.
- Betjen ikke kompressoren i vådt eller damp forhold, eller i nærheden af brandfarlige væsker eller gasser.
- Before performing any maintenance or adjustments, always disconnect the compressor from the power source and release all air pressure from the tank.
- Hold børn og omkringstående væk fra betjeningsområdet.
- Undersøg regelmæssigt netledningen for skader. Brug den ikke, hvis ledningen er flosset eller beskadiget.
- Do not modify the compressor or its components. Use only original replacement parts.
Produkt overview og komponenter
Familiarize yourself with the various parts of your Pretul air compressor before operation.
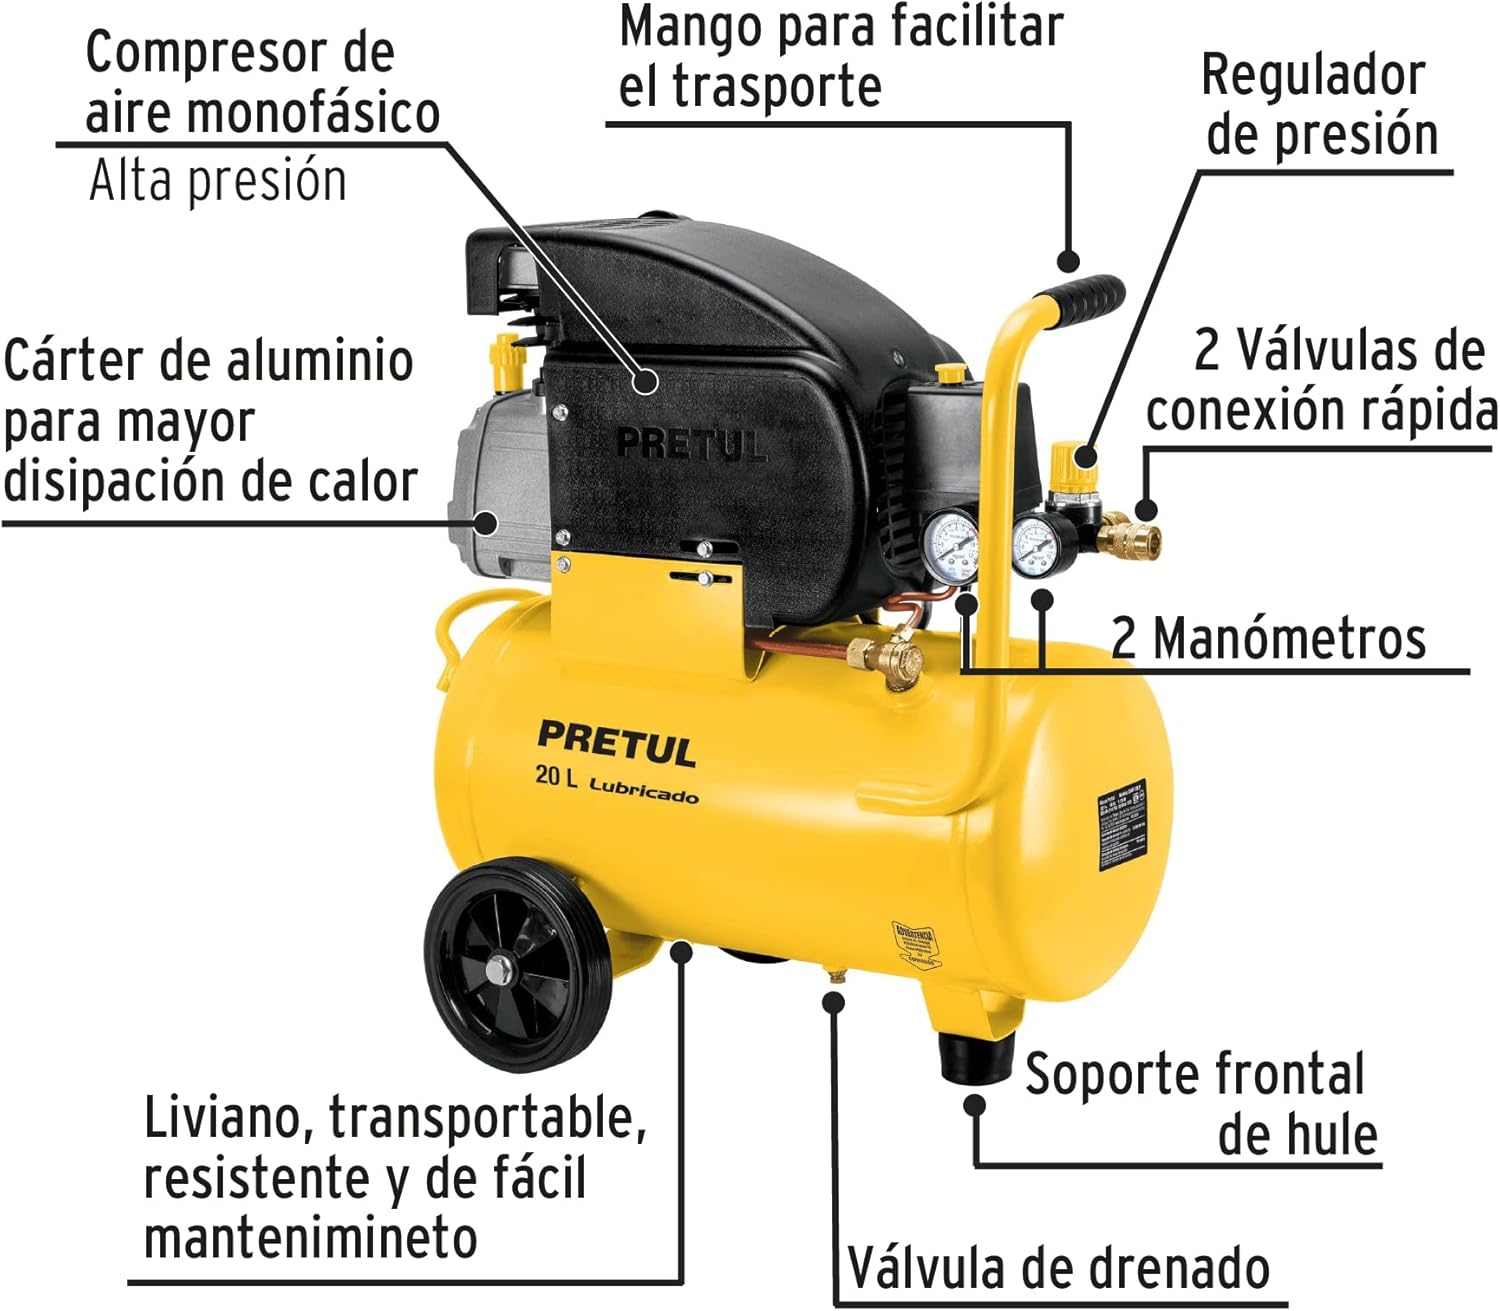
Image: Diagram showing the labeled components of the Pretul air compressor, including the single-phase air compressor, aluminum crankcase, transport handle, pressure regulator, quick-connect valves, pressure gauges, rubber front support, drain valve, and lightweight, transportable, resistant, and easy-to-maintain design.
- Single-phase air compressor: The main unit that compresses air.
- Aluminum Crankcase: Designed for better heat dissipation.
- Transporthåndtag: For nem transport.
- Trykregulator: Justerer udgangslufttrykket.
- Quick-Connect Valves: For attaching air tools and hoses.
- Trykmålere: Viser tanktryk og reguleret udgangstryk.
- Rubber Front Support: Giver stabilitet.
- Afløbsventil: Placeret i bunden af tanken for at fjerne fugt.
- Hjul: For easy movement of the compressor.
Specifikationer
Key technical specifications for the Pretul 20 L Air Compressor.
| Feature | Specifikation |
|---|---|
| Mærke | pris |
| Modelnavn | 23065 |
| Varenummer | COMP-20LP |
| Voltage | 120 volt |
| Maksimal effekt | 2.5 hestekræfter |
| Kapacitet | 20 liter (5.2 gallons) |
| Støjniveau | 69 dB |
| Strømkilde | Elektrisk med ledning |
| Varens vægt | 21 kilo (46.2 pund) |
| Produktmål (L x B x H) | 20.87 x 13.39 x 22.83 tommer (53 x 34 x 58 cm) |
| Anbefalede anvendelser | Blow Cleaning, Spraying, Tire Inflation |
| Speciel funktion | Built-In Gauge |

Image: Diagram illustrating the dimensions of the Pretul air compressor: Height 58 cm, Depth 53 cm, Base 34 cm.
Opsætning
1. Udpakning og inspektion
Carefully remove the compressor from its packaging. Inspect the unit for any signs of damage that may have occurred during shipping. Report any damage to your retailer immediately.

Image: The Pretul air compressor inside its retail packaging, showing the product details on the box.
2. Placering
Place the compressor on a firm, level surface in a clean, well-ventilated area. Ensure there is adequate space around the unit for air circulation and maintenance access. Avoid placing it near heat sources or in direct sunlight.
3. Strømtilslutning
Connect the compressor to a grounded 120 V electrical outlet. Ensure the circuit can handle the compressor's power requirements (2.5 HP maximum power).
4. Oil Check (for oil-lubricated models)
This is an oil-lubricated compressor. Before first use, and periodically thereafter, check the oil level. Ensure the oil level is between the minimum and maximum marks on the dipstick or sight glass. Add appropriate compressor oil if necessary.
5. Handle and Wheel Assembly (if not pre-assembled)
If the handle and wheels are not pre-assembled, attach them according to the included hardware. The handle is designed for easy transport.

Image: A person demonstrating how to transport the Pretul air compressor using its integrated handle and wheels.
Betjeningsvejledning
1. Første opstart
- Sørg for, at afløbsventilen i bunden af tanken er lukket.
- Plug the compressor into a suitable electrical outlet.
- Turn the power switch to the "ON" position. The compressor will begin to build pressure.
- Allow the compressor to reach its maximum pressure and shut off automatically. This indicates the pressure switch is functioning correctly.
2. Justering af udgangstryk
The compressor features a pressure regulator to control the air pressure delivered to your tools.
- Attach your air hose and tool to one of the quick-connect valves.
- Turn the pressure regulator knob (usually located near the output gauges) clockwise to increase pressure and counter-clockwise to decrease pressure.
- Monitor the output pressure gauge to set the desired pressure for your application.

Image: A person demonstrating the adjustment of the air regulating valve on the compressor, with an air hose connected.
3. Overcurrent Protector
Your compressor is equipped with an overcurrent protector to prevent motor damage in case of overload. If the compressor stops unexpectedly, check the overcurrent protector button. If it has popped out, allow the motor to cool down for a few minutes, then press the button to reset it.

Billede: Nærbillede view of the overcurrent protector button on the Pretul air compressor, with a person using a spray gun in the background.
4. Ansøgninger
This compressor is suitable for various applications including:
- Blow Cleaning: Use an air blow gun to clean dust and debris from surfaces.
- Sprøjtning: Connect a spray gun for painting or other liquid applications.
- Dækpumpe: Use an inflation gun with a gauge to inflate tires and other inflatables.
Opretholdelse
Regular maintenance is crucial for the longevity and optimal performance of your compressor.
1. Draining the Air Tank
WARNING: Always drain the tank after each use or at least daily. Moisture buildup can lead to rust and tank failure.
- Turn off the compressor and disconnect it from the power source.
- Open the drain valve located at the bottom of the air tank.
- Allow all condensed moisture to drain completely.
- Close the drain valve tightly after draining.
2. Oil Maintenance
As an oil-lubricated compressor, regular oil checks and changes are necessary.
- Tjek oliestand: Before each use, ensure the oil level is within the safe operating range.
- Skift olie: Refer to the specific oil change interval recommended by Pretul (typically after the first 20 hours, then every 200 hours or 3 months, whichever comes first). Use only compressor-specific oil.
3. Rensning
- Hold kompressoren ren og fri for støv og snavs.
- Clean the air filter regularly (if accessible) to ensure proper airflow and prevent motor strain.
Fejlfinding
Dette afsnit indeholder løsninger på almindelige problemer, du kan støde på.
| Problem | Mulig årsag | Løsning |
|---|---|---|
| Kompressoren starter ikke. | No power, tripped circuit breaker, faulty switch. | Check power connection, reset circuit breaker, contact service if switch is faulty. |
| Kompressoren kører kontinuerligt eller cykler for ofte. | Air leak in system, faulty pressure switch. | Check all connections for leaks, tighten fittings. If problem persists, pressure switch may need replacement. |
| Low air pressure at output. | Pressure regulator set too low, air leak, clogged air filter. | Adjust pressure regulator, check for leaks, clean or replace air filter. |
| Overdreven støj eller vibrationer. | Loose components, worn parts, low oil level. | Check and tighten all fasteners, inspect for worn parts, check and add oil if needed. |
| Overcurrent protector trips. | Overload, motor overheating, low voltage. | Reduce load, allow motor to cool, ensure proper voltage supply. Reset button. |
Hvis du støder på problemer, der ikke er nævnt her, eller hvis de foreslåede løsninger ikke løser problemet, bedes du kontakte kundesupport.
Garanti og support
Pretul products are manufactured to high-quality standards. For information regarding warranty coverage and terms, please refer to the warranty card included with your purchase or visit the official Pretul webwebsted.
For technical assistance, spare parts, or service inquiries, please contact Pretul Customer Support. Details can typically be found on the product packaging or the manufacturer's webwebsted.
Du kan også besøge Pretul brand page on Amazon for mere information.


