1. Introduktion
This manual provides essential information for the safe and effective use of the KEYENCE LV-N11P Digital Laser Sensor Amplifier. Please read this manual thoroughly before operating the product to ensure correct installation, operation, and maintenance. Retain this manual for future reference.
2. Sikkerhedsoplysninger
Overhold altid følgende sikkerhedsforanstaltninger for at forhindre personskade og beskadigelse af udstyret.
- Strømforsyning: Sørg for, at strømforsyningen voltage is within the specified range of 10-30 VDC. Incorrect voltage kan forårsage skade.
- Ledningsføring: Perform all wiring with the power supply turned off to prevent electric shock or damage to the unit.
- Miljø: Do not install the unit in locations subject to excessive dust, moisture, corrosive gases, or extreme temperatures.
- Lasersikkerhed: This product is a laser device. Avoid direct exposure to the laser beam. Refer to relevant laser safety standards.
- Ændringer: Do not attempt to disassemble, repair, or modify the unit. Unauthorized modifications can lead to malfunction and void the warranty.
3. Produktet er slutview
The KEYENCE LV-N11P is a compact digital laser sensor amplifier designed for precise detection applications. It operates on a 10-30 VDC power supply and functions as a main unit for laser sensing systems.

Image: The KEYENCE LV-N11P Digital Laser Sensor Amplifier main unit, showcasing dens kompakte design.
Nøglefunktioner:
- Digital display for easy configuration and monitoring.
- Bred drift bindtage-område: 10-30 VDC.
- Designed as a main unit for laser sensor systems.
- Compact and robust construction for industrial environments.

Image: The LV-N11P sensor amplifier shown with its integrated cable, ready for connection.
4. Installation og opsætning
4.1 Montering
The LV-N11P is designed for freestanding mounting. Ensure a stable and vibration-free surface for optimal performance. Use appropriate fasteners (not included) to secure the unit.
4.2 Ledningsføring
Before wiring, ensure the power supply is disconnected. Refer to the wiring diagram on the unit label and below for correct connections.
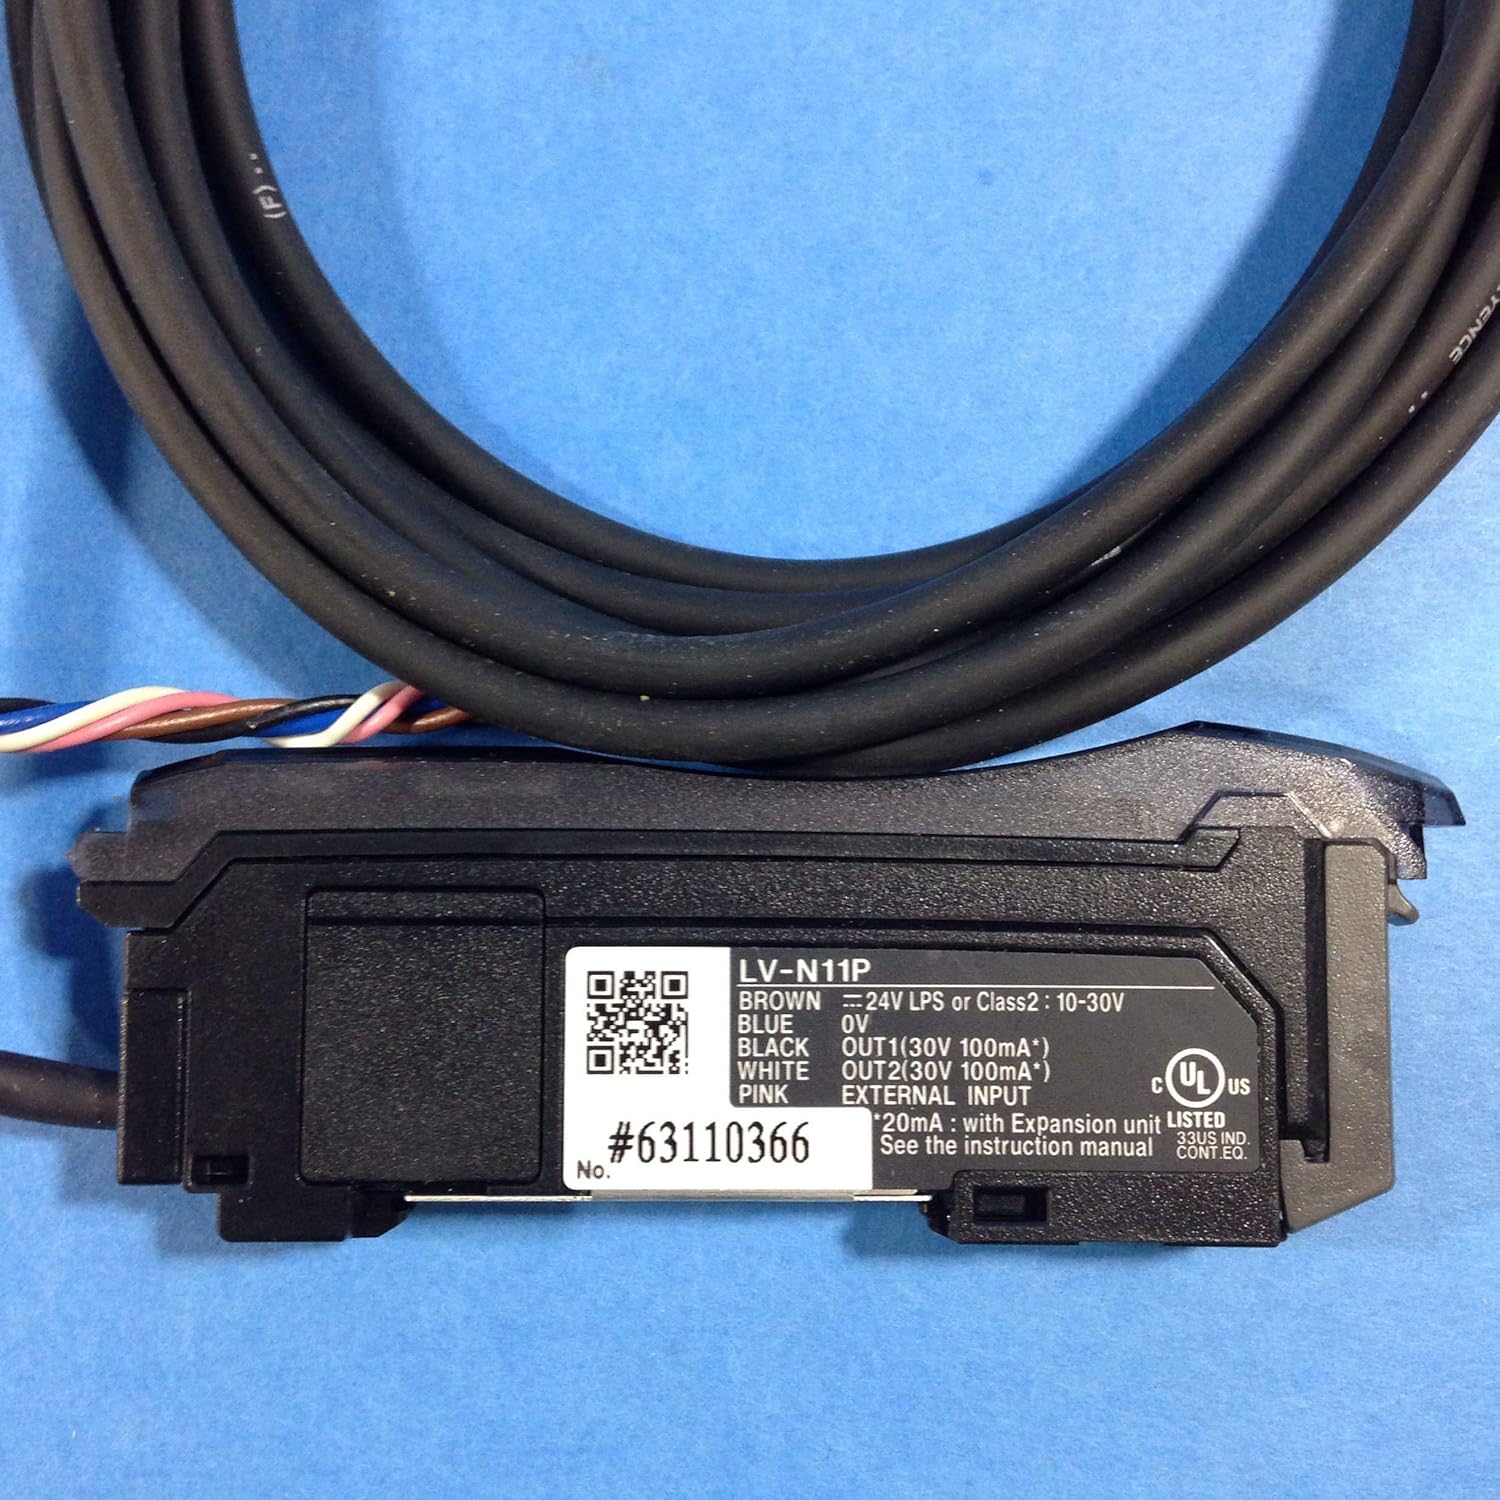
Image: Close-up of the LV-N11P label, detailing wiring connections and basic specifications.
- Brun tråd: Connect to +24V LPS or Class2: 10-30V DC power supply.
- Blå ledning: Connect to 0V (Ground).
- Sort ledning: Connect to OUT1 (30V 100mA*).
- Hvid ledning: Connect to OUT2 (30V 100mA*).
- Pink tråd: Connect to External Input.
- *Note: Max 20mA with expansion unit LV-N10.
5. Betjeningsvejledning
Once properly installed and wired, the LV-N11P is ready for operation. Specific operating procedures will depend on the connected laser sensor head and the application. Generally, follow these steps:
- Tænd: Apply power to the unit. The digital display should illuminate.
- Indledende konfiguration: Use the control buttons (if present) to navigate through the menu and set parameters such as detection mode, threshold, and output logic. Refer to the detailed programming guide for specific menu structures.
- Target Alignment: Position the laser sensor head to align with the target object. Monitor the stability indicator on the amplivligere.
- Finjustering: Adjust sensitivity or threshold settings to achieve reliable detection for your specific application.
- Test drift: Verify the output response by presenting and removing the target object.
6. Vedligeholdelse
The KEYENCE LV-N11P is designed for long-term, reliable operation with minimal maintenance. However, periodic checks can help ensure optimal performance.
- Rensning: Hold enheden ren og fri for støv og snavs. Brug en blød, tør klud til rengøring. Brug ikke slibende rengøringsmidler eller opløsningsmidler.
- Kabelinspektion: Periodically inspect the cables for any signs of damage, fraying, or loose connections.
- Miljøtjek: Ensure the operating environment remains within specified conditions (temperature, humidity, vibration).
- Funktionstest: Regularly test the sensor's detection capabilities to confirm it is operating within expected parameters.
7. Fejlfinding
If you encounter issues with your LV-N11P, refer to the table below for common problems and their solutions.
| Problem | Mulig årsag | Løsning |
|---|---|---|
| Enheden tænder ikke. | Ingen strømforsyning; forkert ledningsføring; defekt strømforsyning. | Check power connections (Brown to +V, Blue to 0V). Verify power supply voltage (10-30 VDC). |
| Sensor does not detect target. | Incorrect sensitivity/threshold setting; misaligned sensor head; dirty lens; target too far/close. | Adjust sensitivity. Realign sensor head. Clean sensor lens. Ensure target is within detection range. |
| Udgangen er altid ON/OFF. | Incorrect output logic setting; sensor saturated/blocked. | Check output logic (NO/NC). Adjust threshold. Ensure sensor is not continuously blocked or clear. |
| Intermitterende detektion. | Unstable mounting; electrical noise; fluctuating target position. | Securely mount the unit. Shield cables from noise sources. Stabilize target presentation. |
8. Specifikationer
Detailed technical specifications for the KEYENCE LV-N11P Digital Laser Sensor Amplivligere:
| Parameter | Værdi |
|---|---|
| Modelnummer | LV-N11P |
| Strømforsyning | 10-30 VDC |
| Type | Digital Laser Sensor Ampvæske (hovedenhed) |
| Udgange | OUT1 (30V 100mA*), OUT2 (30V 100mA*) |
| Ekstern input | Yes (Pink wire) |
| Dimensioner (L x B x H) | 3.15 x 0.39 x 1.18 tommer |
| Vægt | 2.08 ounce |
| Monteringstype | Frit stående |
| Fabrikant | KEYENCE CORP |
*Note: Max 20mA with expansion unit LV-N10. Specifications are subject to change without notice.
9. Garanti og support
For information regarding product warranty, technical support, or service, please contact your local KEYENCE representative or visit the official KEYENCE website. Ensure you have the model number (LV-N11P) and any relevant purchase details available when seeking support.
KEYENCE Official Webwebsted: www.keyence.com


