1. Introduktion
This manual provides detailed instructions for the installation, setup, and operation of your MOES WiFi Smart Wall Touch Light Switch. Please read this manual thoroughly before installation and use to ensure proper function and safety.

Figure 1: MOES WiFi Smart Wall Touch Light Switch (1 Gang, Black)
2. Sikkerhedsoplysninger
- Elektrisk installation: Installationen bør kun udføres af en kvalificeret elektriker eller en person med et indgående kendskab til elektriske ledninger.
- Strømafbrydelse: Always disconnect power at the circuit breaker before installing, removing, or servicing the switch. Failure to do so may result in serious injury or death.
- Neutral ledning påkrævet: This smart switch requires a neutral wire in your switch box to operate correctly. If you do not have a neutral wire, this switch is not compatible.
- Wi-Fi-netværk: Requires a 2.4GHz Wi-Fi network connection. It is not compatible with 5GHz Wi-Fi networks.
- Kompatibilitet: Only compatible with 1 gang switch boxes. Not compatible with standard US 2/3/4 gang switch plates. This switch is not designed for 3-way switch configurations or as a dimmer switch.
- Kun indendørs brug: Denne enhed er beregnet til indendørs brug i tørre omgivelser.
- Operation Voltage: Ensure your electrical system operates within the specified voltage-området (240 volt).

Figure 2: Key compatibility and wiring considerations.
3. Pakkens indhold
- MOES WiFi Smart Wall Touch Light Switch (1 Gang)
- Brugermanual
- Monteringsskruer
4. Produktfunktioner
- Touch Control: Features a toughened glass surface for touch operation.
- Stemmestyring: Compatible with Amazon Alexa (Amazon Echo/Dot/Tap) and Google Assistant for hands-free operation.
- Wi-Fi fjernbetjening: Control the wall switch wirelessly from anywhere using the 'Smart Life' app on your smartphone via Wi-Fi or 4G network. No separate hub is required.
- Timing funktion: Schedule lights and appliances to turn on/off automatically at specific times.

Figure 3: Smart Switch in a home environment.
5. Specifikationer
| Specifikation | Værdi |
|---|---|
| Driftstilstand | Automatisk, slukket, smart switch |
| Nuværende vurdering | 10 Amps |
| Operation Voltage | 240 volt |
| Kontakttype | Normalt åben |
| Connector Type | Trådløs |
| Terminal | Skrue |
| Varedimensioner (L x B x H) | 4.7 x 2.9 x 1.5 tommer |
| Kredsløbstype | 1-vejs |
| Aktuator type | Røre |
| Kontaktmateriale | Messing |
| International Protection Rating | IPX4 |
| Antal stillinger | 3 |
| Controller type | Amazon Alexa, Google Assistant |
| Kontrolmetode | Fjern |
| Forbindelsesprotokol | Wi-Fi (kun 2.4 GHz) |
| Wattage | 1000 watt |
| Varens vægt | 7.4 ounce |

Figure 4: Product dimensions and wiring terminals.
6. Installationsvejledning
Før du begynder:
- Sørg for, at strømmen er afbrudt ved afbryderen.
- Confirm your switch box has a neutral wire. This is essential for the smart switch to function.
- Bekræft, at dit Wi-Fi-netværk er 2.4 GHz.
- This switch is for 1-gang setups only and is not a dimmer or 3-way switch.
Ledningstrin:
- Turn off power at the circuit breaker for the light switch you are replacing.
- Fjern den eksisterende vægplade og skift.
- Identify the wires: Live (usually black), Neutral (usually white), and Load (to the light fixture). A Ground wire (usually green or bare copper) may also be present.
- Connect the wires from your wall box to the corresponding terminals on the MOES Smart Switch:
- N: Connect the Neutral wire (usually white).
- L: Connect the Live wire (incoming power, usually black).
- L1: Connect the Load wire (to the light fixture). For 1-gang switches, only L1 is typically used.
- Jord: If present, connect the ground wire to the switch's ground terminal (if available) or safely cap it.
- Fastgør afbryderen i vægdåsen med de medfølgende skruer.
- Attach the glass panel.
- Gendan strømmen ved afbryderen.
After installation, the indicator lights on the switch should blink quickly, indicating it is ready for Wi-Fi connection in Default Normal Mode.

Figure 5: Replacing a traditional switch with the smart touch switch.
7. App-opsætning og parring
To control your smart switch via smartphone, download the 'Smart Life' app from the App Store (iOS) or Google Play (Android).
- Download and Register: Install the 'Smart Life' app and register an account.
- Tilføj enhed: Open the app, tap '+' or 'Add Device', and select 'Light Switch' or 'Electrical Switch'.
- Confirm Indicator Status: Ensure the indicator light on your switch is blinking quickly. If not, you may need to reset the device.
- Opret forbindelse til Wi-Fi: Follow the in-app instructions to connect the switch to your 2.4GHz Wi-Fi network. Enter your Wi-Fi password when prompted.
- Omdøbning af enhed: Once connected, you can rename the switch for easier identification (e.g., "Living Room Light").
Nulstilling af enheden:
If the indicator lights are not blinking quickly, or if you need to reset the switch for any reason:
- Press and hold any button on the switch for approximately 20 seconds until the indicator light blinks quickly. This puts the device into Default Normal Mode for Wi-Fi connection.
- If the indicator light blinks very slowly after holding for 20 seconds, it is in AP (Access Point) mode. This is an alternative pairing mode if Default Normal Mode fails.
Video 1: Demonstrates how to reset or unlock the device by pressing and holding a button for 20 seconds, showing the indicator light changes for different pairing modes.
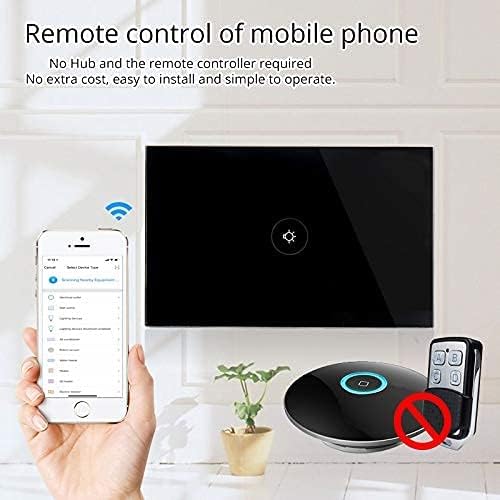
Figur 6: Fjernbetjening via mobilapplikation.
8. Betjening
Once installed and paired with the 'Smart Life' app, you can operate your switch in several ways:
- Manual Touch: Simply touch the glass panel to turn the connected light or appliance on or off.
- App kontrol: Use the 'Smart Life' app on your smartphone to remotely turn the switch on or off from anywhere with an internet connection.
9. Integration af stemmestyring
The MOES Smart Switch is compatible with Amazon Alexa and Google Assistant for convenient voice control.
- Link 'Smart Life' Account: In your Amazon Alexa or Google Home app, search for the 'Smart Life' skill/action and enable it.
- Log ind: Log in with your 'Smart Life' account credentials.
- Opdag enheder: Once linked, ask Alexa or Google Assistant to "Discover devices" or manually initiate device discovery in their respective apps.
- Stemmekommandoer: You can now use voice commands such as "Alexa, turn on [device name]" or "Hey Google, turn off [device name]". Use the names you assigned in the 'Smart Life' app.

Figure 7: Voice control with Alexa and Google Home.
10. Timing-funktion
The 'Smart Life' app allows you to set schedules and timers for your smart switch, automating your lighting or appliances.
- Opret tidsplaner: In the 'Smart Life' app, navigate to the device settings and select 'Schedule' or 'Timer'.
- Set On/Off Times: Configure specific times for the switch to turn on or off. You can set daily, weekly, or custom schedules.
- Solopgang/solnedgang automatisering: Some app versions allow for automation based on local sunrise and sunset times.

Figure 8: Setting schedules via the Smart Life app.
11. Fejlfinding
| Problem | Mulig årsag | Løsning |
|---|---|---|
| Kontakten reagerer ikke på berøring. | No power, incorrect wiring, or device locked. | Check circuit breaker. Verify wiring (Live, Neutral, Load). Perform a device reset (hold button for 20 seconds). |
| Kan ikke oprette forbindelse til Wi-Fi. | Forkert Wi-Fi-bånd (5 GHz), svagt signal, forkert adgangskode eller enhed ikke i parringstilstand. | Ensure your router is broadcasting a 2.4GHz signal. Move closer to the router. Double-check Wi-Fi password. Reset the switch to enter pairing mode (blinking indicator). Try AP mode if normal mode fails. |
| Stemmestyring virker ikke. | 'Smart Life' skill not enabled, incorrect device name, or no internet connection. | Ensure the 'Smart Life' skill is enabled and linked in your Alexa/Google Home app. Verify device names match. Check internet connectivity. |
| Switch goes offline frequently. | Weak Wi-Fi signal, network congestion, or router issues. | Improve Wi-Fi signal strength (e.g., Wi-Fi extender). Reduce network congestion. Restart your router. |
12. Vedligeholdelse
- Rensning: Gently wipe the glass panel with a soft, dry cloth. Avoid abrasive cleaners or solvents.
- Firmwareopdateringer: Periodically check the 'Smart Life' app for available firmware updates to ensure optimal performance and security.
13. Garanti og support
For warranty information or technical support, please refer to the documentation provided with your purchase or contact MOES customer service directly. Contact details can typically be found on the MOES official website or within the 'Smart Life' app's support section.
Video 2: Overståetview of MOES smart home products and their integration, demonstrating various smart life features like color temperature control, music sync lighting, and smart automation based on environmental sensors.


