Indledning
This manual provides essential instructions for the safe assembly, operation, maintenance, and troubleshooting of your Sun Joe MJ401C-PRO 14-inch Cordless Electric Lawn Mower. Please read this manual thoroughly before using the product and retain it for future reference.
Vigtige sikkerhedsoplysninger: Always wear appropriate personal protective equipment, including eye protection and sturdy footwear, when operating the lawn mower. Ensure the safety key is removed when the mower is not in use or during maintenance.
Opsætning
1. Udpakning og montering
Carefully remove all components from the packaging. Inspect for any damage. Assembly typically involves attaching the handle, wheels (if not pre-assembled), and the grass catcher.

Image: The Sun Joe MJ401C-PRO cordless electric lawn mower, fully assembled and ready for use. This image shows the overall design, including the handle, motor housing, and grass collection bag.
2. Opladning af batteriet
The mower is powered by a 28V 4Ah rechargeable lithium-ion battery. Before first use, ensure the battery is fully charged. Connect the charger to the mower's charging port and then to a standard electrical outlet. The charger indicator light will change to indicate charging status (e.g., red for charging, green for fully charged).
Note: Do not overcharge the battery. Refer to the charger's specific instructions for charging times. The battery is built-in and not removable for charging.

Image: The Sun Joe MJ401C-PRO lawn mower shown with its included charger and the rear discharge chute accessory. The charger connects directly to the mower.
3. Attaching the Grass Catcher or Rear Discharge Chute
The mower includes a detachable 10.6-gallon grass catcher for collecting clippings. To attach, lift the rear discharge flap and hook the grass catcher onto the mower's frame. For rear discharge without collection, ensure the rear discharge chute (MJ401E-DCA) is properly installed.

Image: A hand demonstrating the attachment of the grass collection bag to the rear of the Sun Joe lawn mower. The bag hooks securely into place under the discharge flap.
4. Inserting the Safety Key
Locate the safety key slot on the mower. Insert the safety key fully to enable power to the motor. The mower will not operate without the safety key correctly inserted.

Billede: Et nærbillede view of the Sun Joe lawn mower's removable safety key being inserted into its slot. This key prevents accidental starts.
Betjeningsvejledning
1. Start og stop af plæneklipperen
To start the mower, ensure the safety key is inserted. Press and hold the safety button, then pull the bail lever towards the handle. Release the safety button once the motor starts. To stop, simply release the bail lever.
2. Justering af klippehøjde
The mower features a 3-position manual height adjustment. To change the cutting height, turn off the mower, remove the safety key, and adjust the levers on each wheel to the desired position. Available cutting heights range from 1.18 inches to 2.52 inches.

Image: A close-up of the mower's wheel and axle assembly, illustrating the manual height adjustment mechanism. Users can select one of three cutting height positions.
3. Klippeteknikker
For optimal results, mow in straight, overlapping lines. Avoid cutting wet grass, as it can clog the mower and reduce cutting efficiency. For tall grass, it is recommended to make two passes, raising the cutting height for the first pass and lowering it for the second.

Image: The Sun Joe MJ401C-PRO cordless lawn mower being operated on a green lawn, demonstrating its walk-behind functionality and compact size.
Opretholdelse
Regular maintenance ensures the longevity and optimal performance of your lawn mower. Always remove the safety key and disconnect the power source before performing any maintenance.
1. Rengøring af plæneklipperen
After each use, clean grass clippings and debris from the mower deck, blade, and grass catcher. Use a brush or cloth; avoid using water directly on electrical components.
2. Blade Inspection and Care
Periodically inspect the steel blade for sharpness and damage. A dull or damaged blade can lead to poor cutting performance and strain the motor. If necessary, have the blade sharpened or replaced by a qualified service technician. Always wear heavy-duty gloves when handling the blade.
Billede: Et nærbillede view of the durable steel blade located under the mower deck of the Sun Joe MJ401C-PRO. The blade is designed for a 14-inch cutting path.
3. Opbevaring
Store the mower in a dry, secure location, away from children and pets. Ensure the battery is fully charged before long-term storage to maintain battery health. Remove the safety key.
Fejlfinding
| Problem | Mulig årsag | Løsning |
|---|---|---|
| Plæneklipper starter ikke |
|
|
| Plæneklipperen stopper under drift |
|
|
| Ujævn snit |
|
|
Specifikationer
- Model: MJ401C-PRO
- Mærke: Sun Joe
- Strømkilde: Batteridrevet (28V 4Ah litium-ion)
- Klippebredde: 14 tommer
- Klippehøjdejustering: 3-position manual (1.18" - 2.52")
- Græsopsamlerens kapacitet: 10.6 gallons (40 liter)
- Varens vægt: 23.1 pund
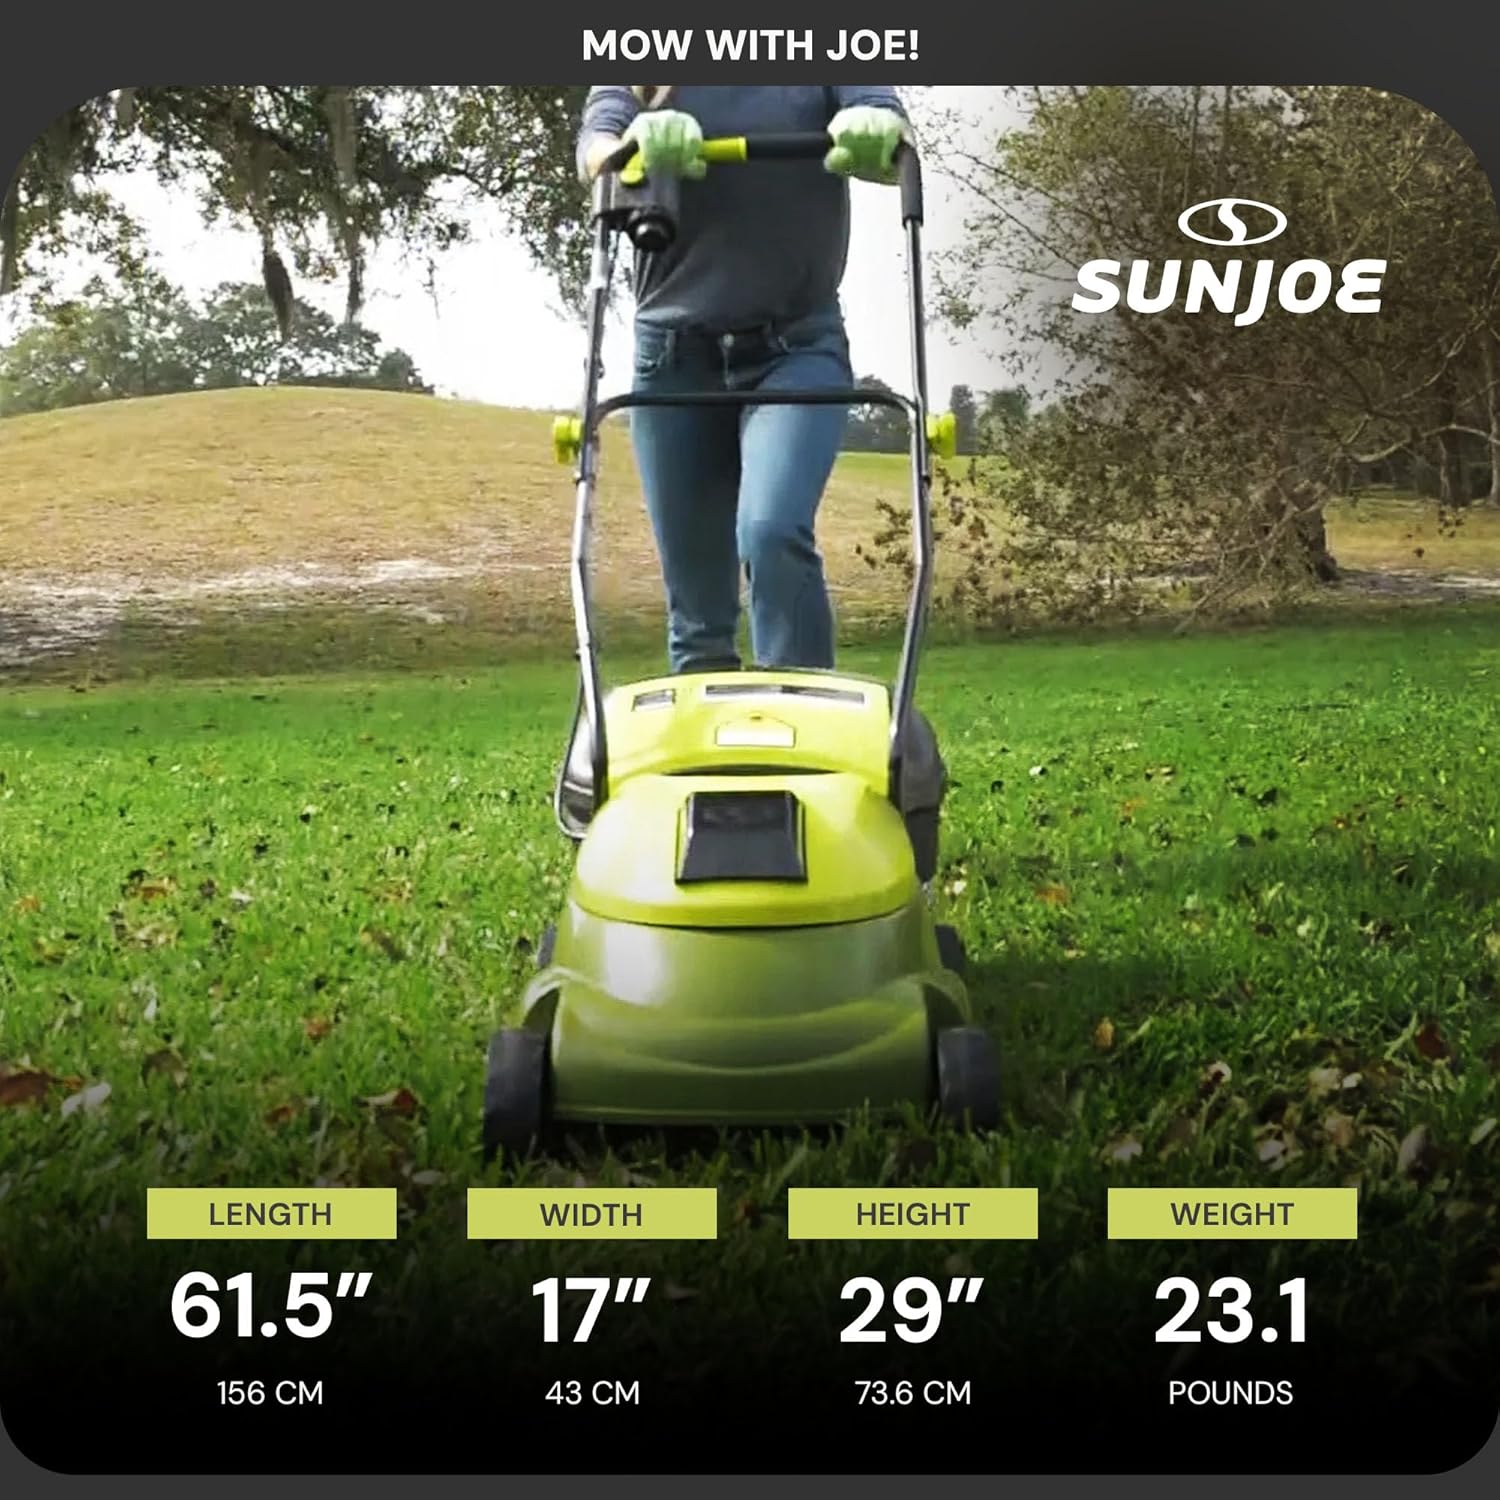
- Produktdimensioner: 61.5" D x 17" B x 29" H
- Materiale: Legeret stål
- UPC: 842470111097

Image: An infographic displaying the key dimensions of the Sun Joe MJ401C-PRO lawn mower: Length 61.5", Width 17", Height 29", and Weight 23.1 pounds.
Garanti og support
Your Sun Joe MJ401C-PRO lawn mower is covered by the Snow Joe Sun Joe Customer Promise, which warrants new, powered products for to år fra købsdatoen. Denne garanti dækker materiale- og fabrikationsfejl ved normal brug. Gem venligst din købsbevis i tilfælde af garantikrav.
For warranty service or technical support, please contact Sun Joe customer service. Contact information can typically be found on the manufacturer's official webwebsted eller produktemballage.


