1. Vigtige sikkerhedsinstruktioner
Læs og forstå alle sikkerhedsadvarsler og instruktioner, før du bruger denne luftkompressor. Manglende overholdelse af disse instruktioner kan resultere i elektrisk stød, brand og/eller alvorlig personskade.
- Elektrisk sikkerhed: Sørg for, at strømforsyningen passer til kompressorens krav. Må ikke anvendes i våde forhold.
- Tryksikkerhed: Never exceed the maximum operating pressure of the compressor or any attached tools. Do not tamper med overtryksventilen.
- Personligt beskyttelsesudstyr: Always wear safety glasses or goggles. Hearing protection is recommended during operation.
- Ventilation: Brug kompressoren i et godt ventileret område for at forhindre varmeophobning og sikre korrekt luftindtag.
- Bevægelige dele: Hold hænder, hår og løstsiddende tøj væk fra bevægelige dele.
- Opretholdelse: Afbryd strømmen, før der udføres vedligeholdelse eller reparationer.
2. Produktet er slutview
The Geko G80301 is a 50-liter oil-lubricated air compressor designed for various pneumatic applications. It features a robust motor and pump assembly, a large air tank, and essential controls for efficient operation.
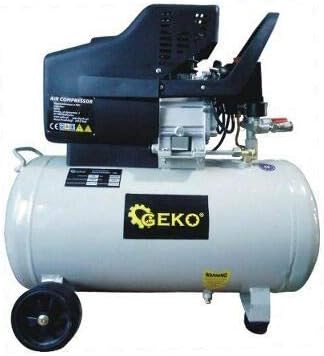
Figur 2.1: Forside view of the Geko G80301 50L Oil-Lubricated Air Compressor, showing the motor, tank, wheels, and pressure gauges.
Nøglekomponenter:
- Luftbeholder: Opbevarer trykluft.
- Motor/Pumpe-enhed: Komprimerer luft ind i tanken.
- Trykmålere: Viser tanktryk og reguleret udløbstryk.
- Trykregulator: Justerer udgangslufttrykket.
- Hurtigkobling: For connecting air hoses and tools.
- Afløbsventil: Placeret i bunden af tanken til dræning af kondens.
- Hjul og håndtag: For bærbarhed.
3. Opsætning og første brug
3.1 Udpakning og montering
- Tag forsigtigt kompressoren ud af emballagen.
- Attach the wheels and handle (if not pre-assembled) using the provided hardware.
- Install the air filter into its designated port.
3.2 Kontrol af oliestand
This is an oil-lubricated compressor. Before first use, and periodically thereafter, check the oil level using the dipstick or sight glass. Add compressor oil if necessary, ensuring it does not exceed the maximum fill line.
3.3 Elektrisk tilslutning
Connect the compressor to a grounded electrical outlet that meets the voltage og amperage requirements specified on the product label. Avoid using extension cords unless absolutely necessary, and ensure any used cord is rated for the compressor's power draw.
3.4 First Use (Break-in Procedure)
- Sørg for, at afløbsventilen i bunden af tanken er lukket.
- Turn the pressure regulator to its lowest setting.
- Turn on the compressor and allow it to run for approximately 15-20 minutes with the outlet valve open (no tools attached) to allow the internal components to break in.
- After the break-in period, turn off the compressor and drain any condensation from the tank.
4. Betjeningsvejledning
4.1 Start af kompressoren
- Ensure the compressor is on a stable, level surface.
- Kontroller, at netledningen er tilsluttet korrekt.
- Turn the ON/OFF switch to the 'ON' position. The compressor will start to build pressure.
4.2 Justering af udgangstryk
- Once the tank reaches maximum pressure and the motor stops, connect your air hose to the quick coupler.
- Turn the pressure regulator knob clockwise to increase the output pressure, and counter-clockwise to decrease it. Monitor the regulated pressure gauge.
- Always set the pressure according to the requirements of your air tool.
4.3 Nedlukning
- Drej tænd/sluk-knappen til 'OFF'-positionen.
- Disconnect the air hose and tools.
- Slowly open the drain valve at the bottom of the tank to release any remaining air pressure and condensation. Close the valve once the tank is empty.
5. Vedligeholdelse
Regular maintenance ensures the longevity and safe operation of your air compressor. Always disconnect power before performing maintenance.
5.1 Daglig vedligeholdelse
- Kondens i afløb: Open the drain valve daily after use to remove moisture from the tank. This prevents rust and extends tank life.
5.2 Ugentlig/månedlig vedligeholdelse
- Tjek oliestand: Ensure the oil level is between the minimum and maximum marks on the dipstick/sight glass. Add or change oil as needed.
- Ren luftfilter: Inspect and clean the air filter. Replace if it is heavily soiled or damaged.
- Inspicer slanger og fittings: Check for any signs of wear, cracks, or leaks in air hoses and connections.
5.3 Opbevaring
When storing the compressor, ensure the tank is completely drained of air and condensation. Store in a dry, clean environment.
6. Fejlfinding
Dette afsnit omhandler almindelige problemer, du kan støde på med din luftkompressor.
| Problem | Mulig årsag | Løsning |
|---|---|---|
| Kompressoren starter ikke | Ingen strøm; Termisk overbelastning udløst; Defekt kontakt | Check power connection; Allow motor to cool and reset; Contact service. |
| Low air pressure / Slow pressure build-up | Luftlækager; Tilstoppet luftfilter; Slidte pumpekomponenter | Check connections for leaks; Clean/replace air filter; Contact service. |
| Overdreven støj eller vibrationer | Loose components; Low oil level; Worn bearings | Tighten fasteners; Check/add oil; Contact service. |
| Air leaks from drain valve | Drain valve not fully closed or damaged | Ensure valve is tightly closed; Replace valve if damaged. |
7. Specifikationer
| Feature | Detalje |
|---|---|
| Mærke | Geko |
| Modelnummer | G80301 |
| Fabrikant | Firma Handlowa GEKO |
| Kapacitet | 50 liter |
| Vægt | 25 kilo |
| Pakkedimensioner | 35 x 35 x 15 cm |
| Farve | Flerfarvet |
| Batterier påkrævet | Ingen |
| International artikelkode | 05901477113024 |
8. Garanti og support
Specific warranty details for the Geko G80301 air compressor may vary by region and retailer. Please refer to your purchase documentation or contact your point of sale for information regarding warranty coverage.
For technical support, spare parts, or service inquiries, please contact the manufacturer, Firma Handlowa GEKO, or your authorized dealer. Always provide the model number (G80301) and purchase date when seeking support.


