Indledning
Tak for købetasing the iTOMA White Noise Machine and Alarm Clock Model 301. This device combines a sound machine with 20 soothing sounds and a digital alarm clock with vibration and buzzer options, designed to enhance your sleep and waking experience. Please read this manual thoroughly before use to ensure proper operation and to maximize the product's features.

Figur 1: iTOMA White Noise Machine and Alarm Clock Model 301. This image shows the front view of the device with its digital display showing "12:38" and control buttons on top.
Pakkens indhold
Bekræft at alle varer er til stede i pakken:
- 1 x iTOMA White Noise Machine and Alarm Clock
- 1 x brugermanual
- 1 x Type-C ladekabel
- 1 x USB til USB C-adapter

Figur 2: Package Contents. This image displays the white noise machine, user manual, Type-C charging cable, and a USB to USB-C adapter, laid out on a surface.
Opsætning
Tænd for enheden
The iTOMA White Noise Machine and Alarm Clock is powered via a USB Type-C connection. An AC adapter is not included, but you can use any standard USB power adapter (e.g., from a smartphone) or a USB port on a computer or power bank.
- Connect the provided Type-C charging cable to the Type-C port on the back of the device.
- Tilslut den anden ende af kablet til en USB-strømkilde (f.eks. en vægadapter eller en computers USB-port).
- The device will power on, and the display will illuminate.
Battery Installation (for backup)
The device requires 1 CR2032 battery (not included) for time and alarm settings backup during power outages. This battery does not power the main functions of the device.
- Locate the battery compartment on the bottom of the device.
- Åbn dækslet til rummet.
- Isæt et CR2032-batteri, og sørg for den korrekte polaritet (+/-).
- Luk batterirummets dæksel forsvarligt.
Betjeningsvejledning
Indstilling af tid
- Tryk og hold på TIDSINDSTILLING button located on the top of the device. The hour display will begin to flash.
- Brug UP (▲) eller NED (▼)-knapperne til at justere timetallet.
- Tryk på TIDSINDSTILLING button again. The minute display will flash.
- Brug UP (▲) eller NED (▼)-knapperne til at justere minutterne.
- Trykke TIDSINDSTILLING endnu en gang for at bekræfte og afslutte tidsindstillingstilstanden.
Sound Machine Operation
The device offers 20 natural soothing sounds to aid relaxation and sleep.

Figur 3: Soothing Sounds Selection. This image highlights the "WHITE NOISE", "FANS SOUNDS", and "NATURE SOUNDS" buttons on the device, indicating the variety of available sounds.
- White Noise Sounds (5 types): Tryk på HVID STØJ button to cycle through 5 different white noise options.
- Fan Sounds (5 types): Tryk på FANS SOUNDS button to cycle through 5 different fan sound options.
- Nature Sounds (10 types): Tryk på NATURLYDE button to cycle through 10 different nature sounds (e.g., bird, clock, forest, ocean, rain, thunder).
- Lydstyrkekontrol: Brug UP (▲) eller NED (▼) buttons to adjust the sound volume (16 levels).
- Sound Timer: Tryk på TIMER button to set an automatic shut-off timer for the sounds. Options include 30, 60, 90, or 120 minutes, or continuous play. The device will remember your last sound and volume settings.

Figur 4: Timer Options. This image illustrates the available timer settings: Continuous, 30 minutes, 60 minutes, 90 minutes, and 120 minutes, shown above the device on a bedside table.
Vækkeur funktion
The device features a digital alarm clock with multiple wake-up options.

Figur 5: Digital Alarm Clock Features. This image highlights the wake-up options (buzzer or vibration), 16-level volume control, and snooze function, with the device shown on a wooden surface.
- Indstilling af alarm:
- Tryk og hold på ALARM SÆT button. The alarm hour will flash.
- Brug UP (▲) eller NED (▼) buttons to set the desired alarm hour.
- Trykke ALARM SÆT again. The alarm minute will flash.
- Brug UP (▲) eller NED (▼) buttons to set the desired alarm minutes.
- Trykke ALARM SÆT a third time to select the alarm mode:
- Daglig: Alarmen lyder hver dag.
- Hverdage: Alarmen lyder mandag til fredag.
- Weekender: Alarm sounds Saturday and Sunday.
- Trykke ALARM SÆT a fourth time to select the wake-up method:
- Summer: Standard audible alarm.
- Vibration: Silent vibration alarm (requires device to be placed on a surface where vibration can be felt, e.g., under a pillow).
- Trykke ALARM SÆT en sidste gang for at bekræfte og afslutte alarmindstillingstilstand.
- Aktivering/deaktivering af alarm: Tryk kort på ALARM SÆT button to toggle the alarm on or off. An alarm icon will appear on the display when active.
- Snooze-funktion: Når alarmen lyder, skal du trykke på SNOOZE / DIMMER button to activate snooze. The alarm will pause for 9 minutes and then sound again. This can be repeated up to 6 times.
- Stop af alarmen: For at stoppe alarmen helt, tryk på en hvilken som helst knap, bortset fra SNOOZE / DIMMER. The alarm will reset for the next scheduled time.
Display dæmpningskontrol
The display brightness can be adjusted to suit your preference, especially for nighttime use.
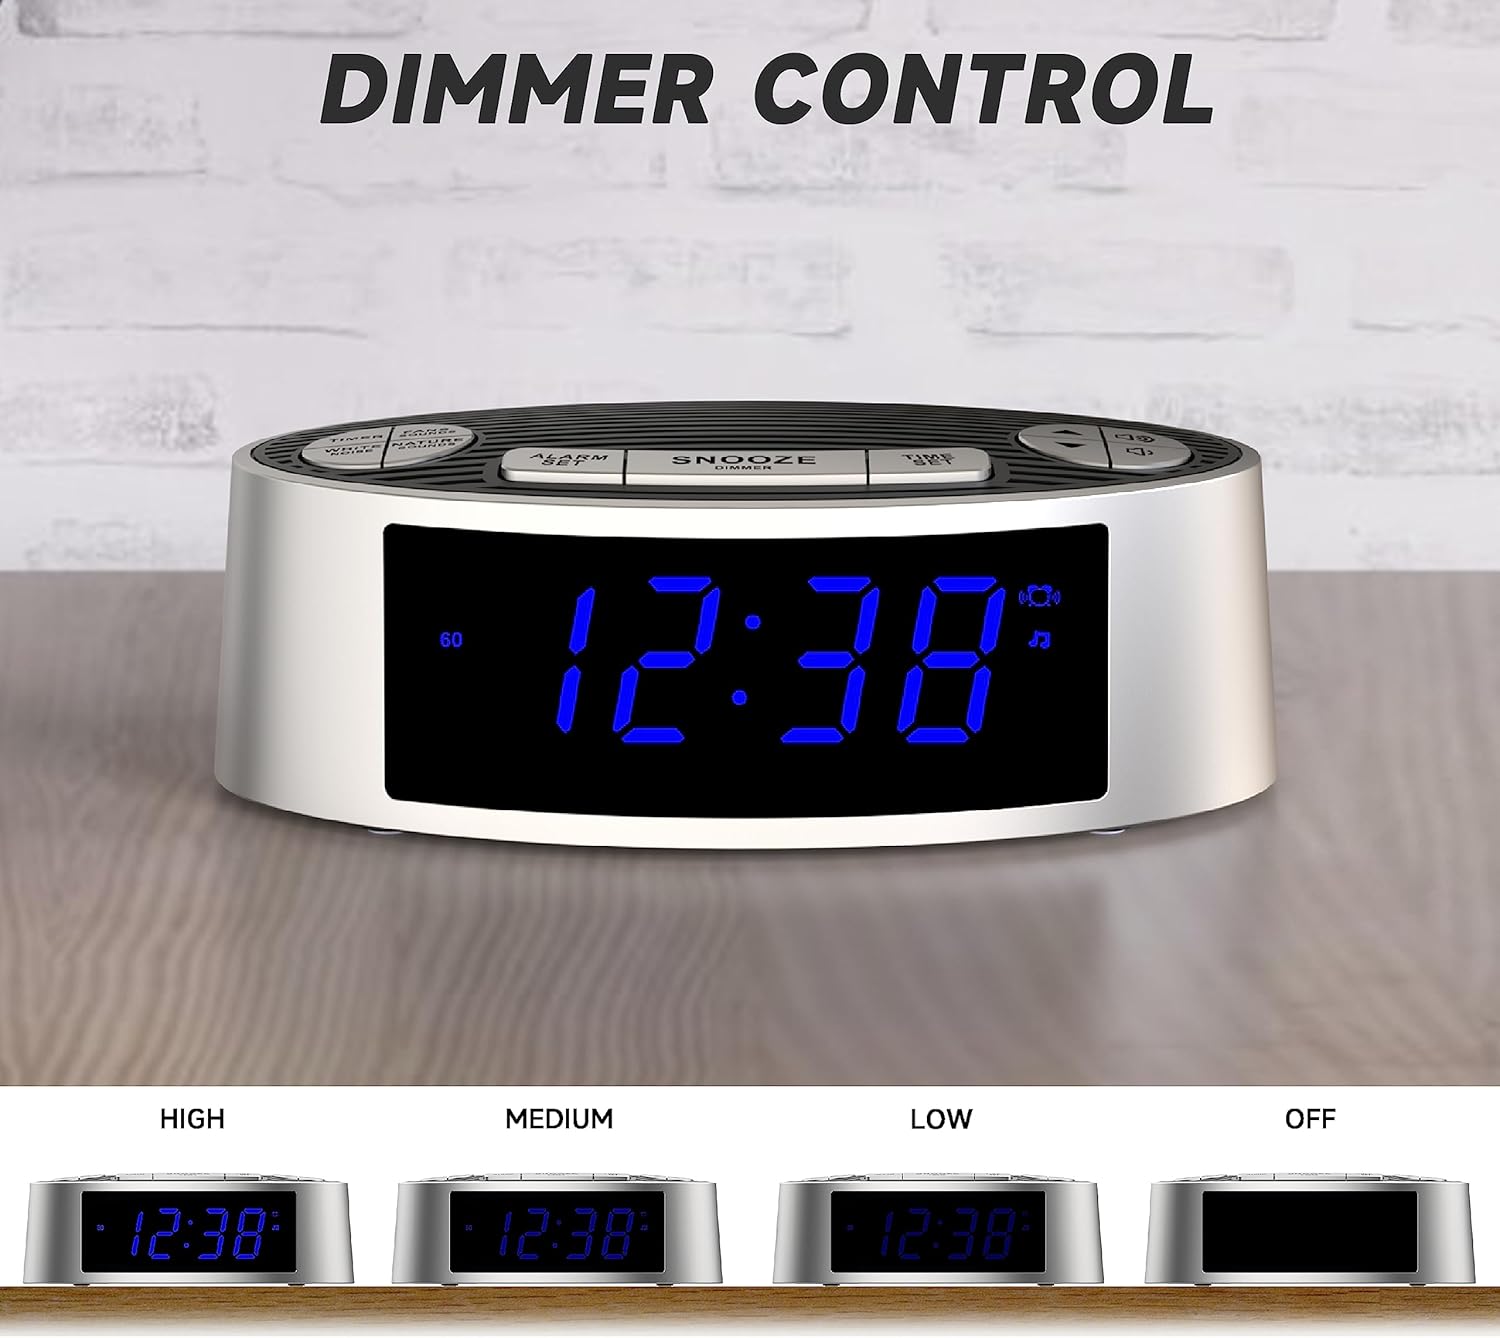
Figur 6: Dimmer Control. This image shows the device's display at four different brightness levels: High, Medium, Low, and Off, demonstrating the adjustable dimmer function.
- Tryk kort på SNOOZE / DIMMER button (when the alarm is not sounding) to cycle through the 4 brightness levels: High, Medium, Low, and Off.
Opretholdelse
Rensning
- Tag enheden ud af strømkilden før rengøring.
- Brug en blød, tør klud til at aftørre enhedens ydre.
- Brug ikke flydende rengøringsmidler, slibende rengøringsmidler eller spray, da disse kan beskadige finishen eller de indvendige komponenter.
Udskiftning af batteri
If the time and alarm settings are lost after a power outage, the CR2032 backup battery may need to be replaced. Follow the battery installation steps in the "Setup" section.
Fejlfinding
| Problem | Mulig årsag | Løsning |
|---|---|---|
| Enheden tænder ikke. | Ingen strømforbindelse eller defekt kabel/adapter. | Ensure the USB-C cable is securely connected to both the device and a working USB power source. Try a different USB cable or power adapter. |
| Alarmen lyder/vibrerer ikke. | Alarm not activated, incorrect time, or volume too low. | Verify the alarm is set and activated (alarm icon visible). Check alarm time. Increase alarm volume. Ensure vibration mode is selected if desired. |
| Time/settings reset after power loss. | CR2032 backup battery is dead or missing. | Udskift CR2032-backupbatteriet. |
| Skærmen er for lys/mørket. | Dæmperindstillingen skal justeres. | Tryk på SNOOZE / DIMMER knappen for at skifte mellem lysstyrkeniveauerne. |
Specifikationer
| Feature | Detalje |
|---|---|
| Modelnummer | 301 (CKS703) |
| Mærke | iTOMA |
| Dimensioner (L x B x H) | 15 x 9 x 5.2 cm (5.9 x 3.5 x 2.0 tommer) |
| Vægt | 240 gram (0.53 lbs) |
| Strømkilde | USB Type-C (AC adapter not included) |
| Backup batteri | 1 x CR2032 (medfølger ikke) |
| Sound Types | 20 (5 White Noise, 5 Fan, 10 Nature) |
| Lydstyrkeniveauer | 16 |
| Sound Timers | Continuous, 30, 60, 90, 120 minutes |
| Alarm Wake-up Options | Buzzer, Vibration |
| Snooze-varighed | 9 minutter (op til 6 gange) |
| Display lysdæmper | 4 levels (High, Medium, Low, Off) |
| Materiale | Acrylonitril Butadien Styren (ABS) |
Garanti og support
For warranty information or technical support, please refer to the contact details provided on the product packaging or the official iTOMA webwebstedet. Behold din købskvittering som købsbevis.
For yderligere hjælp kan du besøge: www.itoma.com


