Indledning
The BOYA BY-DMR7 is a broadcast-quality supercardioid condenser microphone designed for use with DSLR cameras and camcorders. It features an integrated flash recorder capable of capturing 24-bit/48 kHz WAV audio files directly to a MicroSDHC card (up to 32 GB, sold separately). This manual provides comprehensive instructions for setting up, operating, and maintaining your BY-DMR7 microphone to ensure optimal performance.

Image: The BOYA BY-DMR7 microphone with its foam windscreen, showcasing dens kompakte design og integrerede betjeningselementer.
Hvad er der i æsken
Kontroller venligst pakkens indhold for at sikre, at alle varer er til stede:
- BOYA BY-DMR7 Shotgun Microphone
- Skum forrude
- 3.5mm Gold-Plated Audio Cable
- Brugervejledning (dette dokument)

Image: All components included with the BY-DMR7: the microphone unit, the foam windscreen, and the coiled 3.5mm audio cable.
Produkt overview
Familiarize yourself with the various parts and controls of the BY-DMR7 microphone:
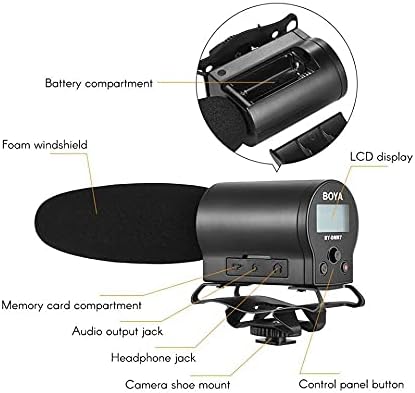
Image: Detailed diagram highlighting key components of the BY-DMR7, including the battery compartment, LCD display, control panel, and various input/output jacks.
- Skum forrude: Reduces wind noise and plosives.
- Microphone Barrel: Houses the supercardioid condenser microphone element.
- LCD-skærm: Shows recording status, battery level, and menu options.
- Kontrolpanelknapper: For menu navigation, recording, and playback.
- Hovedtelefonstik (3.5 mm): Til lydovervågning i realtid.
- Audio Output Jack (3.5mm): Connects to camera's audio input.
- Memory Card Compartment: For MicroSDHC card insertion.
- Batterirum: Holder 2 AA-batterier.
- Integrated Shockmount: Reduces handling noise.
- Camera Shoe Mount: Attaches to standard camera hot/cold shoe.
Opsætning
1. Batteriinstallation
The BY-DMR7 requires two (2) AA batteries for operation.
- Locate the battery compartment on the side of the microphone unit.
- Skub batterirummets dæksel op.
- Isæt to AA-batterier, og sørg for at polerne (+/-) vender korrekt som angivet i batterirummet.
- Luk batterirummets dæksel forsvarligt.
2. MicroSDHC Card Installation
A MicroSDHC card (up to 32 GB) is required for recording audio.
- Locate the memory card compartment.
- Gently insert a MicroSDHC card into the slot until it clicks into place. Ensure the card is oriented correctly.
- For at fjerne det skal du skubbe kortet let ind, indtil det springer ud.
3. Montering af mikrofonen
The BY-DMR7 can be mounted on a camera's hot/cold shoe.
- Slide the camera shoe mount of the microphone onto your camera's hot/cold shoe.
- Spænd låsehjulet på skobeslaget for at fastgøre mikrofonen.

Image: The BY-DMR7 microphone securely attached to a DSLR camera, ready for use.

Image: The BY-DMR7 microphone mounted on a different camera body, demonstrating its versatility.

Image: The BY-DMR7 microphone attached to a camcorder, illustrating its compatibility with various video recording devices.
4. Tilslutning til kamera
Use the supplied 3.5mm audio cable to connect the microphone to your camera's audio input.
- Tilslut den ene ende af 3.5 mm lydkablet til Lydudgangsstik on the BY-DMR7.
- Tilslut den anden ende af kablet til Mikrofonindgang jack on your camera or camcorder.
5. Attaching Foam Windscreen
Slide the foam windscreen over the microphone barrel to reduce unwanted wind noise during outdoor recordings or plosives from close-up speech.
Betjeningsvejledning
1. Tænd/sluk
- To power on the device, press and hold the power button (usually part of the control panel) until the LCD display illuminates.
- For at slukke skal du trykke på tænd/sluk-knappen igen, indtil skærmen slukker.
2. Optagelse af lyd
The BY-DMR7 features one-button recording for ease of use.
- Ensure a MicroSDHC card is inserted and batteries are charged.
- Tryk på den dedikerede Optage button (often marked with a red dot or 'REC'). The recording indicator on the LCD will show that recording is active.
- Tryk på for at stoppe optagelsen Optage knappen igen. De file will be saved automatically to the MicroSDHC card.
3. Overvågning af lyd
Use the 3.5mm headphone output to monitor your audio in real-time.
- Connect a pair of headphones to the Hovedtelefonstik på mikrofonen.
- Adjust the monitoring volume if available through the menu system.
4. Using the Low-Cut Filter
The low-cut filter helps reduce unwanted low-frequency noise such as rumble or air conditioning hum.
- Access the menu system via the control panel buttons.
- Navigate to the audio settings or filter options.
- Enable or disable the low-cut filter as needed for your recording environment.
5. Menunavigation og indstillinger
The LCD display and control panel buttons allow you to adjust various settings.
- Use the navigation buttons (e.g., up/down arrows, 'Menu', 'OK') to browse through options on the LCD.
- Common settings include input gain, headphone volume, low-cut filter, and file ledelse.
6. Afspilning og File Overførsel
- Afspilning: Use the control panel buttons to navigate to recorded files and initiate playback directly on the device through the headphone jack.
- File Overførsel: To transfer recorded WAV files, remove the MicroSDHC card from the BY-DMR7 and insert it into a compatible card reader connected to a computer. The files can then be copied like any other data.
Opretholdelse
- Rensning: Use a soft, dry cloth to clean the exterior of the microphone. Do not use liquid cleaners or solvents.
- Opbevaring: When not in use for extended periods, remove the batteries to prevent leakage. Store the microphone in a cool, dry place, away from direct sunlight and extreme temperatures.
- Skum forrude: Skumforruden kan forsigtigt rengøres med mild sæbe og vand, hvis den bliver snavset. Sørg for, at den er helt tør, før den sættes på igen.
Fejlfinding
| Problem | Mulig årsag | Løsning |
|---|---|---|
| Mikrofonen tændes ikke. | Døde eller forkert isatte batterier. | Udskift batterierne med nye AA-batterier, og sørg for at polariteten vender korrekt. |
| Ingen lydoptagelse. | No MicroSDHC card inserted, card full, or card error. | Insert a MicroSDHC card, check available space, or try formatting the card (this will erase all data). |
| Poor audio quality / excessive noise. | Wind noise, low-cut filter off, incorrect gain settings, or environmental noise. | Ensure foam windscreen is used. Enable low-cut filter. Adjust input gain. Record in a quieter environment. |
| No audio monitoring through headphones. | Headphones not connected properly, headphone volume too low, or faulty headphones. | Check headphone connection. Increase headphone volume. Test with another pair of headphones. |
| Microphone not recognized by camera. | Audio cable not connected properly, or camera audio input settings. | Ensure 3.5mm audio cable is securely connected to both microphone and camera. Check camera's audio input settings (e.g., external mic enabled). |
Specifikationer
| Feature | Detalje |
|---|---|
| Mikrofon formfaktor | Haglgevær |
| Polar mønster | Superkardioid (unidirektionel) |
| Audio Følsomhed | 45 dB |
| Signal-støjforhold | 78 dB |
| Støjniveau | 110 dB |
| Optagelsesformat | 24-bit/48 kHz WAV audio files |
| Lagermedier | MicroSDHC card (up to 32 GB) |
| Hovedtelefonudgang | 3.5 mm stereostik |
| Lydudgang | 3.5 mm jack |
| Strømkilde | 2 AA batterier |
| Varedimensioner (L x B x H) | 9.8 x 3.86 x 1.97 tommer |
| Varens vægt | 5.3 ounce (ca. 150 gram) |
| Materiale | Foam (windscreen) |
| Kompatible enheder | DSLR cameras, camcorders, MiniSDHC cards |
Garanti og support
Information regarding product warranty and customer support is not provided within this manual. Please refer to the manufacturer's official website or contact your retailer for details on warranty coverage, technical support, and service options for your BOYA BY-DMR7 microphone.
For yderligere hjælp kan du besøge BOYA-butik på Amazon.


