1. Introduktion
Thank you for choosing the TechniSat HD-C 232 Digital Cable Receiver. This compact DVB-C receiver is designed for receiving unencrypted digital television and radio programs via cable. It offers high-definition (HDTV) picture quality and features an integrated USB media player and an Electronic Program Guide (EPG). This manual provides essential information for setting up, operating, and maintaining your device.
Nøglefunktioner:
- Compact DVB-C receiver for unencrypted digital TV and radio.
- High-Definition Television (HDTV) support.
- Integrated USB media player for video, music, and image files.
- Electronic Program Guide (EPG) with up to 7 days of program preview.
- Remote control with 4 programmable learning keys.
- HDMI and Scart connectivity for versatile TV connections.
2. Sikkerhedsoplysninger
Læs venligst alle sikkerhedsinstruktioner omhyggeligt, inden du bruger enheden. Gem denne manual til senere brug.
- Strømforsyning: Use only the provided external power supply. Ensure the voltage matches your local power grid.
- Ventilation: Bloker ikke ventilationsåbningerne. Sørg for tilstrækkelig luftgennemstrømning omkring enheden for at forhindre overophedning.
- Fugtighed: Do not expose the device to rain, moisture, or liquids.
- Rensning: Disconnect the power before cleaning. Use a dry, soft cloth. Do not use liquid or aerosol cleaners.
- Service: Forsøg ikke selv at servicere dette produkt. Overlad al service til kvalificeret servicepersonale.
- Placering: Placer enheden på en stabil, plan overflade. Undgå at placere den i nærheden af varmekilder eller i direkte sollys.
3. Pakkens indhold
Bekræft at alle varer er til stede i pakken:
- TechniSat HD-C 232 Digital Cable Receiver
- Remote Control with 4 learning keys
- Ekstern strømforsyning
- Batterier til fjernbetjeningen
- Brugermanual
4. Produktet er slutview
4.1 Frontpanel
The front panel of the HD-C 232 features essential controls and indicators.

Billede 4.1: Front view of the TechniSat HD-C 232 receiver. It shows the HDMI logo, a USB port, a green indicator light, a 4-digit display, and channel/power buttons.
- USB-port (foran): Til tilslutning af USB-lagerenheder til medieafspilning.
- Vise: A 4-digit segment display shows the current channel number or time in standby mode.
- Indikatorlys: Indikerer strømstatus.
- Kontrolknapper: Channel up/down and power on/off buttons.
4.2 Bagpanel
The rear panel provides all necessary connection ports for your television and cable network.

Billede 4.2: Bag view of the TechniSat HD-C 232 receiver, showing various connection ports. From left to right: RF In, RF Out, S/PDIF (digital electrical audio out), HDMI Out, Scart (TV/Scart), and Power Input.
- RF-indgang: Tilsluttes din kabel-i-vægstikkontakt.
- RF Out (LoopThrough): Allows passing the cable signal to another receiver or TV.
- S/PDIF (Digital Electrical Audio Out): For connecting to an audio amplifier eller hjemmebiografsystem.
- HDMI -udgang: Connects to your television for high-definition video and audio.
- Scart (TV/Scart): For connecting to older televisions or VCRs.
- Strømindgang: Tilsluttes til den eksterne strømforsyning.
4.3 Fjernbetjening
The included remote control provides full functionality for your receiver, including 4 programmable learning keys.
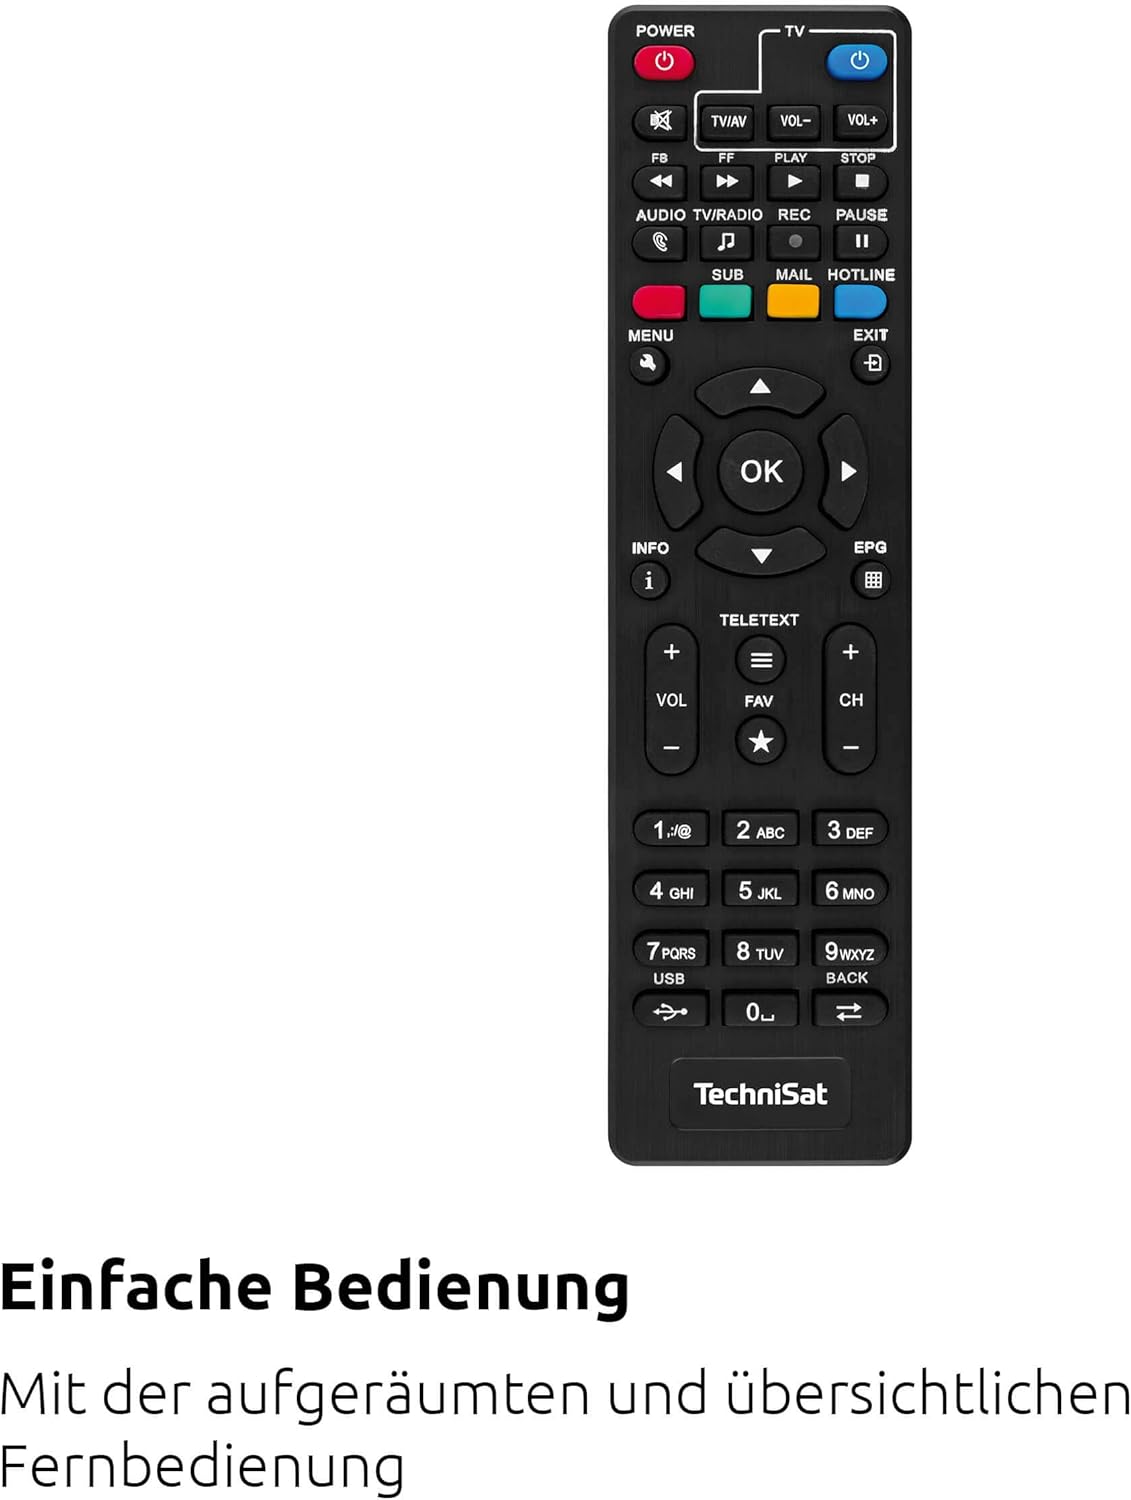
Billede 4.3: The remote control for the TechniSat HD-C 232 receiver, featuring various buttons for power, volume, channel, menu navigation, EPG, and media playback.
Refer to the remote control section in Operating Instructions for details on its functions and how to use the learning keys.
5. Opsætning
Follow these steps to connect your TechniSat HD-C 232 receiver and perform the initial setup.
5.1 Tilslutning af modtageren
- Kabelforbindelse: Connect your cable network's antenna cable to the RF ind porten på bagsiden af modtageren.
Billede 5.1: Illustration showing a cable connected to a receiver, representing the cable network connection.
- TV Connection (HDMI): Connect an HDMI cable (not included) from the HDMI udgang porten på receiveren til en HDMI-indgang på dit fjernsyn.
- TV Connection (Scart - Optional): If your TV does not have an HDMI input, connect a Scart cable from the Scart port on the receiver to the Scart input on your television.
- Tilslutning af lydsystem (valgfrit): For enhanced audio, connect an S/PDIF cable from the S/PDIF port on the receiver to your audio amplifier eller hjemmebiografsystem.
- Strømtilslutning: Connect the external power supply to the Strømindgang on the receiver, then plug the power supply into a wall outlet.
5.2 Indledende opsætning og kanalscanning
- Turn on your television and select the correct HDMI or Scart input source.
- Turn on the TechniSat HD-C 232 receiver using the power button on the front panel or the remote control.
- The receiver will likely guide you through an initial setup wizard. Follow the on-screen instructions.
- During the setup, you will be prompted to perform a channel scan. Select "Automatic Channel Scan" to find all available unencrypted digital cable channels. This process may take several minutes.
- Once the scan is complete, save the channels. Your receiver is now ready for use.
6. Betjeningsvejledning
6.1 Grundlæggende TV Viewing
- Kanalvalg: Brug CH+ og CH- buttons on the remote control or front panel to change channels. You can also enter channel numbers directly using the numeric keypad on the remote.
- Lydstyrkekontrol: Brug VOL+ og VOL- knapperne på fjernbetjeningen for at justere lydstyrken.
- Stum: Tryk på STUM knappen for midlertidigt at slå lyden fra.
6.2 Using the Electronic Program Guide (EPG)
The EPG provides a detailed overview of current and upcoming programs for up to seven days.

Billede 6.1: Icon representing the Electronic Program Guide (EPG) feature.
- Tryk på EPG button on your remote control to access the Electronic Program Guide.
- Naviger gennem kanaler og programtider ved hjælp af piletasterne.
- Select a program to view detailed information (if available).
- Trykke EXIT for at forlade EPG'en.
6.3 USB Media Player
The integrated USB media player allows you to play video, music, and image files fra en tilsluttet USB-lagerenhed.

Billede 6.2: Icons representing the USB media player's capabilities for playing video, music, and image files.
- Insert a USB storage device (e.g., USB stick, external hard drive) into the USB port on the front panel of the receiver.
- Access the media player function via the main menu or a dedicated button on the remote control (if available).
- Naviger gennem din files and folders using the remote control.
- Vælg en file to play. The receiver supports common video (MPEG-2, H.264), audio, and image formats.
6.4 Remote Control Learning Function
The remote control has 4 programmable learning keys that can be assigned functions from another remote control (e.g., your TV remote's power, volume, or input selection).
To program a learning key:
- Place the TechniSat remote control and the remote control to be learned from head-to-head (infrared emitters facing each other) at a distance of about 1-3 cm.
- Enter the learning mode on the TechniSat remote (refer to your remote's specific instructions, usually by holding a specific button for a few seconds).
- Press the learning key on the TechniSat remote that you wish to program.
- Press the corresponding button on the other remote control whose function you want to copy.
- The TechniSat remote will indicate successful learning (e.g., an LED flashes). Repeat for other keys.
- Exit the learning mode.
7. Vedligeholdelse
Proper care ensures the longevity of your TechniSat HD-C 232 receiver.
- Rensning: Disconnect the receiver from the power outlet before cleaning. Use a soft, dry, lint-free cloth to wipe the exterior. Do not use abrasive cleaners, waxes, or solvents.
- Ventilation: Regularly check that the ventilation slots are not obstructed by dust or debris.
- Opbevaring: Hvis enheden opbevares i længere tid, skal den afbrydes fra strømmen og opbevares et køligt og tørt sted.
8. Fejlfinding
Hvis du støder på problemer med din receiver, kan du se følgende almindelige problemer og løsninger.
| Problem | Mulig årsag | Løsning |
|---|---|---|
| Ingen strøm | Power cable not connected; power outlet faulty; power supply unit faulty. | Check power cable connection. Try a different power outlet. Ensure the external power supply is correctly connected. |
| Intet billede eller lyd | Incorrect TV input selected; HDMI/Scart cable loose or faulty; no signal from cable network. | Select the correct HDMI/Scart input on your TV. Check all cable connections. Ensure the cable network is active and connected to the receiver's RF In. Perform a channel scan. |
| Fjernbetjening virker ikke | Batteries depleted or incorrectly inserted; infrared sensor blocked; remote control faulty. | Replace batteries. Ensure batteries are inserted with correct polarity. Remove any obstructions between the remote and receiver. |
| USB-medier afspilles ikke | USB device not recognized; file format not supported; USB device faulty. | Ensure the USB device is properly inserted. Check if the file format is supported (MPEG-2, H.264 for video). Try a different USB device. |
| Dårlig billedkvalitet | Weak cable signal; faulty cable connection; TV settings. | Check cable connections. Contact your cable provider if signal strength is consistently low. Adjust TV picture settings. |
9. Specifikationer
| Feature | Detalje |
|---|---|
| Mærke | TechniSat |
| Model | HD-C 232 |
| Modelnummer | 0000/4830 |
| Farve | Sort |
| Tuner type | DVB-C (Digital Cable) |
| Videokodning | MPEG-2 MP@HL/ML, H.264/MPEG-4 AVC |
| Forbindelser | 1x HDMI Out, 1x Scart, 1x USB 2.0 (front), 1x RF In, 1x RF Out (LoopThrough), 1x S/PDIF (Digital Electrical Audio Out) |
| Samlet USB-porte | 1 |
| Total HDMI-porte | 1 |
| Særlige funktioner | Electronic Program Guide (EPG), USB Media Player, Remote Control with Learning Function |
| Kompatible enheder | Television |
| Lydudgangstilstand | Surround (5.1, 7.1 channel configuration) |
| Dimensioner (B x H x D) | 16.9 cm x 4 cm x 10.3 cm |

Billede 9.1: Diagram showing the dimensions of the TechniSat HD-C 232 receiver: 16.9 cm width, 4 cm height, and 10.3 cm depth.
10. Garanti og support
For warranty information and customer support, please refer to the warranty card included with your product or visit the official TechniSat webwebsted. Gem din købsbevis i tilfælde af garantikrav.
Fabrikant: TechniSat Digital GmbH
Oprindelsesland: Frankrig


