1. Introduktion
The Autophix OM127 is a diagnostic tool designed to read and clear trouble codes from vehicle engine systems. It supports both JOBD (Japanese On-Board Diagnostics) and standard OBDII/EOBD protocols, making it compatible with a wide range of vehicles manufactured from 1996 onwards, including US, European, and Asian models, with particular emphasis on Japanese vehicles. This manual provides detailed instructions for the proper use, maintenance, and troubleshooting of your OM127 device.
2. Produktet er slutview
2.1 Nøglefunktioner
- Reads and clears generic, pending, and manufacturer-specific diagnostic trouble codes (DTCs).
- Turns off the Check Engine Light (MIL).
- Reads live data stream from the vehicle's sensors.
- Views frysebilleddata, som registrerer køretøjets forhold på det tidspunkt, hvor en fejlkode indstilles.
- Displays I/M readiness status to check emission system monitors.
- Retrieves vehicle information (VIN, CIN, CVN).
- Supports all OBD II protocols: CAN, J1850 PWM, J1850 VPW, ISO9141, and KWP2000.
- Specifically designed for compatibility with Japanese vehicles (JOBD).
- Software upgradable via the internet.
2.2 Enhedskomponenter
The Autophix OM127 device consists of the main unit with a display and control buttons, and an integrated OBD-II connector cable.

Figur 1: Autophix OM127 Code Reader main unit. This image shows the front view of the OM127 diagnostic tool, featuring its yellow and black casing, backlit LCD screen displaying "Main Menu", "Select Brand", "OBDII System", and "Tool Setup", along with "ENTER", "EXIT", and arrow buttons. An integrated OBD-II cable extends from the top.

Figur 2: Autophix OM127 Code Reader with dimensions. This image illustrates the front and side profiles of the OM127 device, indicating its approximate dimensions: 130mm length, 78mm width, and 28mm height. The screen shows the main menu, and the device is labeled "JOBD/OBDII/EOBD".

Figur 3: OBD 16-pin connector. This image displays a close-up of the standard 16-pin OBD-II connector, which is used to link the OM127 device to the vehicle's diagnostic port.
2.3 Pakkens indhold
The Autophix OM127 package typically includes the following items:
- 1 x AUTOPHIX OM127 JOBD/OBDII/EOBD Code Reader main unit
- 1 x Brugermanual (dette dokument)
- 1 x bæretaske
3. Opsætning
- Find køretøjets OBD-II-port: The OBD-II port is typically located under the dashboard on the driver's side, though its exact position may vary by vehicle model. Refer to your vehicle's owner's manual if you cannot locate it.
- Connect the OM127: Plug the 16-pin OBD-II connector from the OM127 device firmly into the vehicle's OBD-II port.
- Tænd: Once connected, the OM127 device will automatically power on, drawing power directly from the vehicle's battery. The display will illuminate, and the main menu will appear.
- Køretøjets tænding: For most diagnostic functions, the vehicle's ignition should be in the "ON" position (engine off) or the engine should be running, depending on the specific test being performed.
4. Betjeningsvejledning
Brug UP og NED arrow buttons to navigate through menu options, the ENTER button to confirm selections, and the EXIT knappen for at vende tilbage til den forrige skærm eller afslutte en funktion.
4.1 Hovedmenunavigation
From the main menu, you can select various diagnostic functions:
- Vælg mærke: For JOBD vehicles, select the specific Japanese vehicle manufacturer.
- OBDII-system: Access standard OBDII/EOBD functions for all compliant vehicles.
- Værktøjsopsætning: Configure device settings such as language, contrast, and units of measurement.
4.2 Aflæsning og sletning af fejlkoder
- From the main menu, select "OBDII System" or "Select Brand" (for JOBD).
- Choose "Read Codes" to display current, pending, or permanent diagnostic trouble codes. The device will show the code and a brief description.
- To clear codes, select "Erase Codes" from the menu. Confirm your selection when prompted. Advarsel: Clearing codes will also clear freeze frame data and reset I/M readiness monitors. Ensure you have addressed the underlying issue before clearing codes.
4.3 Live-datastrøm
Denne funktion giver dig mulighed for view real-time operational data from the vehicle's sensors, such as engine RPM, vehicle speed, oxygen sensor readings, and coolant temperature. This data can be crucial for diagnosing intermittent problems.
- From the OBDII System menu, select "Live Data".
- Use the arrow buttons to scroll through the various data parameters.
4.4 Freeze Frame Data
When an emission-related fault occurs, the vehicle's computer stores a snapshot of operating conditions at that moment. This "freeze frame" data can help identify the conditions under which the fault occurred.
- From the OBDII System menu, select "Freeze Frame".
- Review the displayed parameters.
4.5 I/M-parathedsstatus
I/M Readiness indicates whether the various emission-related systems on the vehicle are operating correctly and have completed their diagnostic tests. This is often checked during vehicle inspections.
- From the OBDII System menu, select "I/M Readiness".
- The display will show the status of each monitor (e.g., "OK" or "INC" for incomplete).
4.6 Køretøjsoplysninger
This function allows you to retrieve the Vehicle Identification Number (VIN), Calibration ID (CIN), and Calibration Verification Number (CVN) from the vehicle's computer.
- From the OBDII System menu, select "Vehicle Info".
- De ønskede oplysninger vil blive vist.
5. Vedligeholdelse
5.1 Softwareopdateringer
The Autophix OM127 supports software updates via the internet. Regularly updating the device ensures compatibility with newer vehicle models and access to the latest diagnostic features and bug fixes. Visit the official AUTOPHIX webwebsted for opdateringsinstruktioner og softwaredownloads.
5.2 Rengøring og opbevaring
- Rengør enheden med en blød, damp klæde. Brug ikke slibende rengøringsmidler eller opløsningsmidler.
- Store the OM127 in its provided carry case in a dry, cool environment, away from direct sunlight and extreme temperatures.
- Ensure the OBD-II connector pins are clean and free from debris before connecting to a vehicle.
6. Fejlfinding
- Enheden tændes ikke:
- Sørg for, at OBD-II-stikket er korrekt tilsluttet køretøjets port.
- Verify the vehicle's ignition is in the "ON" position or the engine is running.
- Kontroller bilens sikring til OBD-II-porten (se bilens instruktionsbog).
- "Link Error" or "Communication Error" Message:
- Confirm the vehicle is OBDII compliant (generally 1996 and newer for US vehicles).
- Ensure the ignition is "ON" or the engine is running.
- Check for any bent or broken pins on the OM127's OBD-II connector or the vehicle's port.
- Prøv at oprette forbindelse til et andet OBDII-kompatibelt køretøj for at udelukke et køretøjsspecifikt problem.
- Kan ikke slette koder:
- Diagnostic Trouble Codes (DTCs) cannot be cleared if the underlying fault is still present. Address the issue causing the code first.
- Ensure the ignition is "ON" (engine off) when attempting to clear codes.
- Slow Response or Freezing:
- Frakobl og tilslut enheden igen.
- Sørg for, at enhedens software er opdateret.
7. Specifikationer
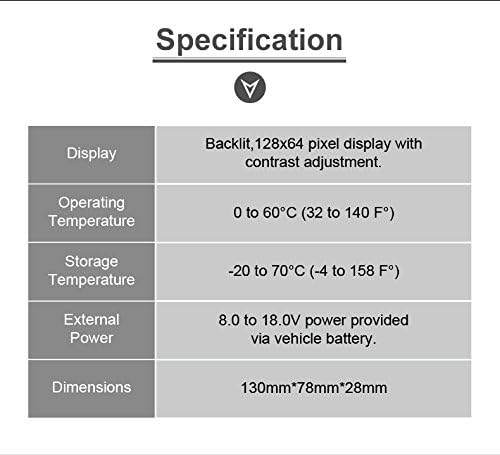
Figur 4: Autophix OM127 Specifications Table. This image displays a table detailing the technical specifications of the OM127 device, including display type, operating temperature, storage temperature, external power requirements, and physical dimensions.
| Specifikation | Værdi |
|---|---|
| Vise | Back-lit, 128 × 64 pixel display with contrast adjustment |
| Driftstemperatur | 0 til 60°C (32 til 140°F) |
| Opbevaringstemperatur | -20 til 70°C (-4 til 158°F) |
| Ydre magt | 8.0 til 18.0 V strøm leveret via køretøjets batteri |
| Dimensioner (L x B x H) | 130 mm x 78 mm x 28 mm |
| Vægt (netto) | 0.26 kg (0.57 lb) |
| Protokoller, der understøttes | CAN, J1850 PWM, J1850 VPW, ISO9141, KWP2000 |
8. Garanti og support
8.1 Garantioplysninger
The Autophix OM127 Code Reader comes with a one-year warranty from the date of purchase, covering manufacturing defects. Please retain your proof of purchase for warranty claims.
8.2 Customer Support and Software Updates
For technical assistance, troubleshooting, or to download the latest software updates for your OM127 device, please visit the official AUTOPHIX webwebsted. Det website provides detailed instructions and resources to ensure your device operates optimally.


