1. Introduktion
Thank you for choosing the JACK F4 Direct Drive Sewing Machine. This manual provides essential information for the safe and efficient operation, setup, and maintenance of your new sewing machine. Please read this manual thoroughly before using the machine to ensure proper function and longevity.

Figure 1: The JACK F4 Direct Drive Sewing Machine, showcasing its sleek design and integrated motor.
2. Sikkerhedsinstruktioner
Følg altid grundlæggende sikkerhedsforanstaltninger, når du bruger elektriske apparater, for at mindske risikoen for brand, elektrisk stød eller personskade.
- Ensure the machine is unplugged from the power outlet before cleaning, servicing, or when not in use.
- Keep fingers away from all moving parts, especially the needle, presser foot, and handwheel.
- Never operate the machine with the air openings blocked. Keep ventilation openings of the sewing machine and foot controller free from the accumulation of lint, dust, and loose cloth.
- Må ikke anvendes, hvor der anvendes aerosolprodukter (spray), eller hvor der indgives ilt.
- Brug kun tilbehør anbefalet af producenten.
- Dette apparat er ikke beregnet til brug af personer (inklusive børn) med nedsatte fysiske, sensoriske eller mentale evner, eller mangel på erfaring og viden, medmindre de har fået opsyn eller instruktion i brugen af apparatet af en person, der er ansvarlig for deres sikkerhed.
3. Opsætning
3.1 Udpakning og placering
Carefully remove the machine from its packaging. Place the machine on a stable, level surface with adequate lighting. Ensure there is enough space around the machine for comfortable operation and material handling.
3.2 Strømtilslutning
Connect the power cord to the machine's power input and then plug it into a suitable electrical outlet. The JACK F4 features a power-saving direct drive motor.

Figur 2: Side view of the machine, showing the power cord connection point.
3.3 Nåleinstallation
Ensure the machine is turned off and unplugged. Loosen the needle clamp screw, insert the new needle with the flat side facing the back of the machine, and push it up as far as it will go. Tighten the needle clamp skrue sikkert.
3.4 Spolning og isætning af spole
Follow the winding path indicated on the machine for the bobbin thread. Once wound, insert the bobbin into the bobbin case under the needle plate. Refer to the markings for correct thread tension and direction.

Figure 3: Close-up of the needle and bobbin area, crucial for threading and maintenance.
3.5 Trådning af maskinen
Raise the presser foot and needle to their highest positions. Follow the numbered threading path from the spool pin through the tension discs, take-up lever, and finally through the needle eye. Pull both upper and bobbin threads to the back under the presser foot.
4. Betjeningsvejledning
4.1 Tænd/sluk
Locate the power switch, typically on the side or front of the machine. Press to turn the machine on or off. The integrated LED light near the needle plate will illuminate when the machine is on.
4.2 Hastighedsjustering
The JACK F4 features adjustable speed control. Use the control panel, usually with '+' and '-' buttons or a dial, to set your desired sewing speed. Start with a slower speed for beginners or intricate work.

Figure 4: The control panel and speed adjustment dial, allowing precise control over sewing speed.
4.3 Needle Position Adjusting/Locking Stitch
This machine allows for needle position adjustment and locking stitch functionality. Consult the control panel for specific buttons or settings to utilize these features, which enhance precision and finish.
4.4 Grundlæggende syning
Place your fabric under the presser foot. Lower the presser foot. Gently press the foot pedal to begin sewing. Guide the fabric smoothly, allowing the machine to feed it. To reverse stitch, use the reverse lever or button.

Figur 5: Detaljeret view of the needle and presser foot, showing the working area.
5. Vedligeholdelse
Regelmæssig vedligeholdelse sikrer din symaskines levetid og optimale ydeevne.
- Rensning: Regularly clean lint and dust from the bobbin area, feed dogs, and tension discs using a small brush or vacuum cleaner. Always unplug the machine before cleaning.
- Smøring: Refer to the machine's specific oiling points (if any) and lubricate with high-quality sewing machine oil as recommended.
- Udskiftning af nåle: Replace needles frequently, especially when working with new projects or if you notice skipped stitches or fabric damage. A dull or bent needle can cause significant issues.
- Opbevaring: When not in use, cover the machine to protect it from dust and store it in a dry place.
6. Fejlfinding
Dette afsnit omhandler almindelige problemer, du kan støde på. Kontakt kundesupport ved mere komplekse problemer.
| Problem | Mulig årsag | Løsning |
|---|---|---|
| Springet sting over | Forkert nål, bøjet nål, forkert trådning. | Replace needle, re-thread machine, ensure correct needle type for fabric. |
| Trådbrud | Incorrect tension, poor quality thread, burrs on needle plate. | Juster spændingen, brug tråd af god kvalitet, og kontroller for grater. |
| Maskine starter ikke | Not plugged in, power switch off, safety mechanism engaged. | Check power connection, turn on switch, ensure presser foot is down. |
| Ujævne sømme | Forkert spænding, slidt nål, ujævn stoffremføring. | Adjust tension, replace needle, guide fabric evenly. |
7. Specifikationer
Key specifications and features of the JACK F4 Direct Drive Sewing Machine:
- Mærke: JACK
- Model: F4
- Farve: Blå
- Motortype: Direct Drive Motor (Power Saving, Power Efficient)
- Hastighedskontrol: Justerbar hastighed
- Belysning: LED Light Near Needle Plate
- Needle Features: Needle Position Adjusting/Locking Stitch
- Produktdimensioner: 9.8D x 25.4B x 21.7H Centimeter
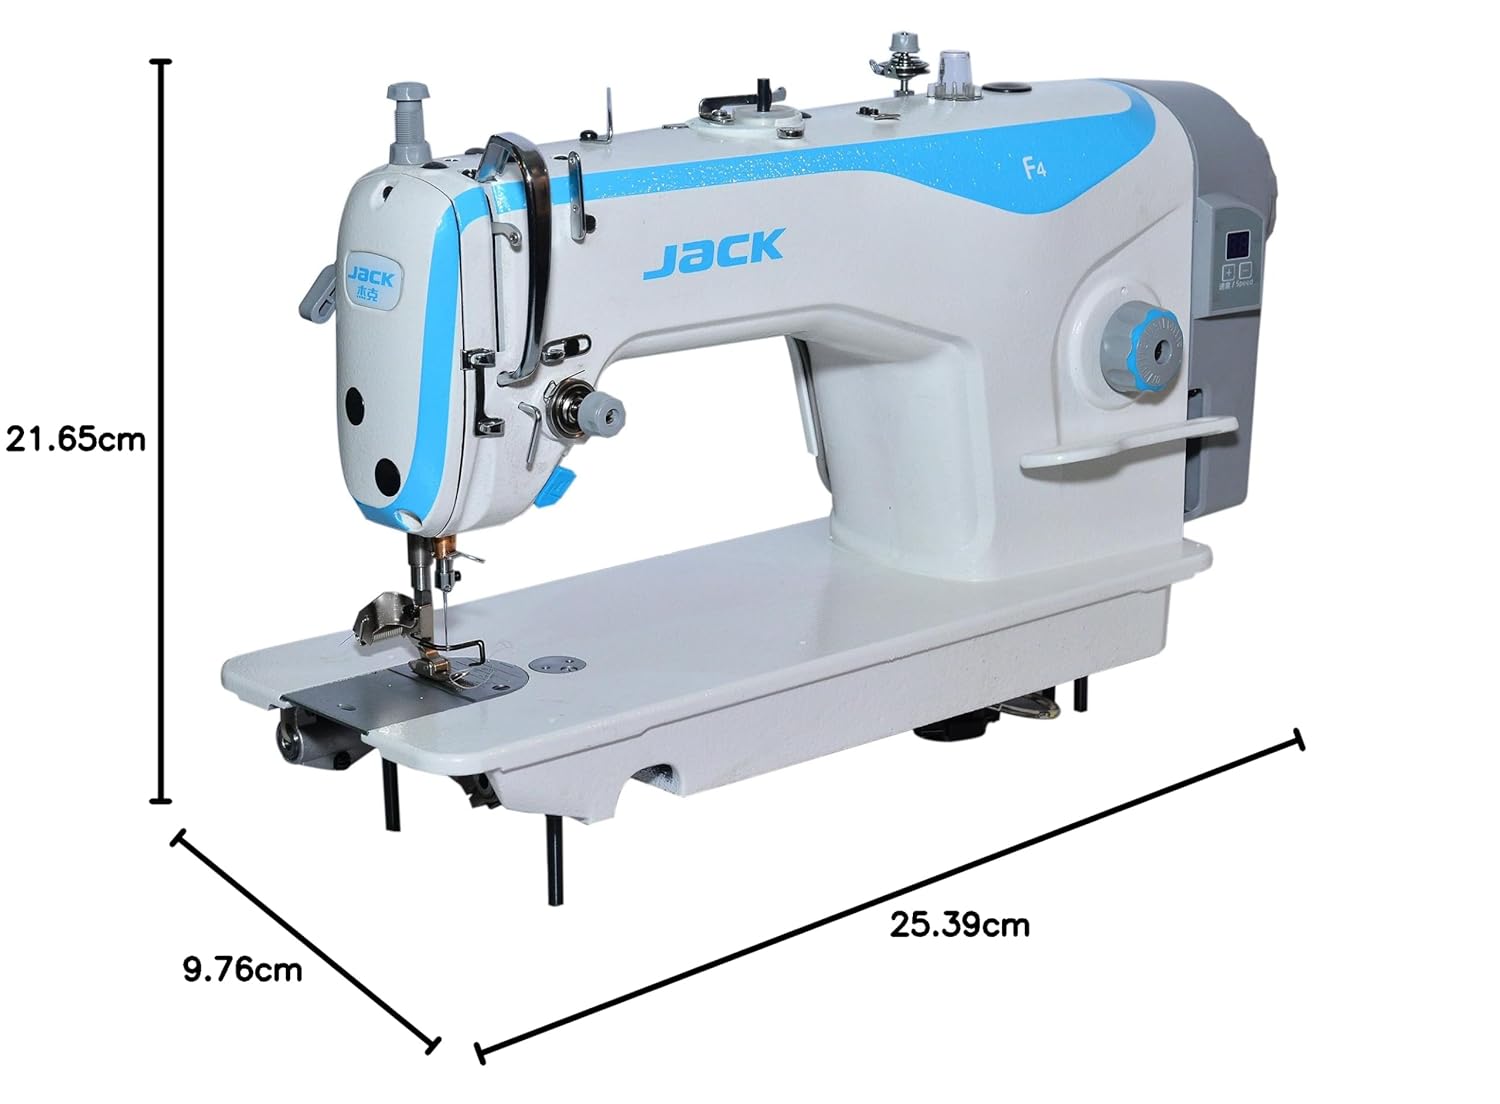
Figure 6: Product dimensions for the JACK F4 sewing machine.
8. Garanti og support
The JACK F4 Direct Drive Sewing Machine comes with a 1 års garanti fra købsdatoen. Denne garanti dækker fabrikationsfejl ved normal brug. Gem venligst din købsbevis i tilfælde af garantikrav.
For technical support, service, or warranty inquiries, please contact your authorized JACK dealer or the customer service department. Provide your machine's model number and a detailed description of the issue to facilitate faster assistance.