1. Introduktion
This manual provides essential instructions for the installation, operation, and maintenance of your Polini RPM 2 Temperature Meter, model 171.1001. This device is designed to monitor engine RPM and two temperature readings, providing critical data for motorcycle performance and health. Please read this manual thoroughly before installation and use to ensure proper function and safety.
2. Sikkerhedsoplysninger
ADVARSEL:
This product is suitable for motorcycles used exclusively for its intended purpose. Improper installation or use can lead to damage to the device, the motorcycle, or personal injury. Always ensure the motorcycle's power is disconnected before performing any installation or maintenance. Consult a qualified technician if you are unsure about any steps.
- Sørg for, at alle elektriske forbindelser er sikre og isolerede for at forhindre kortslutninger.
- Do not modify the device or its components.
- Keep the device away from extreme heat, moisture, and corrosive substances.
- Always wear appropriate safety gear when working on your motorcycle.
3. Pakkens indhold
Bekræft at alle komponenter er til stede i pakken:
- Polini RPM 2 Temperature Meter display unit
- RPM sensor cable
- Two temperature sensor cables
- Wiring harness for power and signal connections
- Mounting accessories (e.g., Velcro strips, connectors)
- Instruktionsmanual (dette dokument)
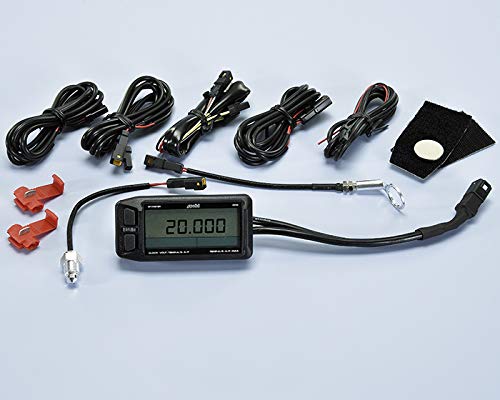
Figur 1: Overview of the Polini RPM 2 Temperature Meter and its included components. The image displays the main display unit, various wiring harnesses, two temperature sensors, an RPM sensor, and mounting accessories.
4. Opsætning og installation
Follow these general steps for installing the Polini RPM 2 Temperature Meter. Specific installation points may vary depending on your motorcycle model.
- Mount the Display Unit: Choose a suitable location on your motorcycle's dashboard or handlebars that provides clear visibility and does not obstruct controls. Use the provided mounting accessories (e.g., Velcro) to secure the display unit.
- Tilslut strøm: Connect the main wiring harness to a switched 12V power source on your motorcycle (e.g., ignition switch). Ensure proper polarity (positive to positive, negative to ground).
- Install RPM Sensor:
- For most motorcycles, the RPM sensor connects to the ignition coil's primary circuit or a dedicated RPM signal wire.
- Wrap the RPM sensor wire around the spark plug cable or connect it to the appropriate signal wire as per your motorcycle's service manual.
- Secure the sensor cable to prevent interference or damage.
- Install Temperature Sensors:
- Identify two locations for temperature monitoring (e.g., cylinder head, radiator hose, exhaust manifold).
- Install the temperature sensors at these chosen points. This may require specific adapters or drilling, depending on the sensor type and location.
- Connect the temperature sensor cables to the corresponding inputs on the display unit's wiring harness.
- Sikker ledningsføring: Route all cables neatly and secure them with cable ties to prevent them from interfering with moving parts or being damaged by heat or abrasion.
- Indledende test: After installation, turn on the motorcycle's ignition (do not start the engine yet) to verify the display unit powers on. Then, start the engine and check if RPM and temperature readings are displayed correctly.
5. Betjeningsvejledning
The Polini RPM 2 Temperature Meter is designed for straightforward operation.
- Tænd/sluk: The unit typically powers on automatically with the motorcycle's ignition and powers off when the ignition is turned off.
- Skærmtilstande: The display unit will show RPM and two temperature readings. There may be buttons on the unit to cycle through different display modes or to adjust settings. Refer to the on-screen prompts or specific button functions.
- Reading RPM: The main display will show the engine's revolutions per minute (RPM).
- Reading Temperatures: Two separate temperature readings will be displayed, corresponding to the installed sensors. Units are typically in Celsius or Fahrenheit, depending on the model's configuration.
- Setting Alarms (if applicable): Some models may allow setting high RPM or temperature alarms. Consult the device's specific interface for instructions on setting these thresholds.
6. Vedligeholdelse
To ensure the longevity and accuracy of your Polini RPM 2 Temperature Meter, follow these maintenance guidelines:
- Rensning: Tør displayenheden af med en blød kludamp klæde. Brug ikke slibende rengøringsmidler eller opløsningsmidler.
- Kabelinspektion: Periodically check all cables and connections for wear, fraying, or corrosion. Replace damaged cables immediately.
- Sensorkontrol: Ensure temperature sensors are securely mounted and free from debris.
- Miljøbeskyttelse: While designed for motorcycle use, avoid prolonged exposure to extreme weather conditions when possible.
7. Fejlfinding
| Problem | Mulig årsag | Løsning |
|---|---|---|
| Skærmen tændes ikke. | Ingen strømforsyning; forkert ledningsføring; sprunget sikring. | Check power connections; verify wiring polarity; inspect motorcycle's fuse box. |
| No RPM reading. | RPM sensor not connected; faulty sensor; incorrect sensor placement. | Ensure RPM sensor is securely connected; verify sensor placement on ignition coil/wire. |
| Forkert temperaturaflæsning. | Temperature sensor not connected; faulty sensor; improper sensor installation. | Check temperature sensor connections; ensure sensors are correctly installed at measurement points. |
| Display flickering or erratic readings. | Loose connections; electrical interference; faulty unit. | Inspect all wiring for loose connections; ensure proper grounding; contact support if problem persists. |
8. Specifikationer
- Mærke: POLINI
- Model Number (Product Identifier): 171.1001
- Item Model Number (Manufacturer's Internal): MVT-002075896
- Materiale: Alloyed Steel (for certain components/sensors)
- Varens vægt: 5 kg (11.02 pund)
- UPC: 689326164124
- Fabrikant: MotoCapuano
- Første tilgængelige dato: 26. marts 2020
9. Garanti og support
For warranty information and technical support, please refer to the documentation provided with your purchase or contact the manufacturer, MotoCapuano, or your authorized Polini dealer. Keep your proof of purchase for warranty claims.


