1. Introduktion
This manual provides detailed instructions for the setup, operation, and maintenance of your ELEPHAS ELE-PRO-S1 Mini Projector. Please read this manual thoroughly before using the projector to ensure proper functionality and to maximize your viewing experience. The ELE-PRO-S1 is a compact and portable DLP projector designed for various entertainment purposes, including home cinema, outdoor movie nights, and gaming.
2. Pakkens indhold
Ved udpakning skal du kontrollere, at alle nedenstående varer er til stede og i god stand:
- ELEPHAS ELE-PRO-S1 Mini Projector
- Stativ
- Power Adapter (DCM)
- USB kabel
- 3.5mm AV Cable
- HDMI kabel
- Brugervejledning (dette dokument)
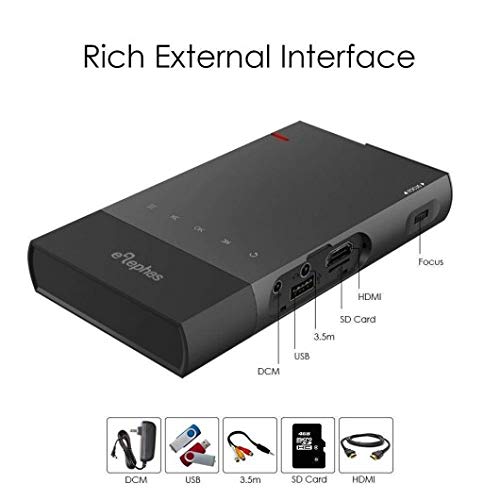
Figur 2.1: The ELEPHAS ELE-PRO-S1 Mini Projector shown with its various ports and included accessories such as the power adapter, USB cable, 3.5mm AV cable, SD card, and HDMI cable.
3. Produktet er slutview
3.1. Projektorkomponenter

Figur 3.1: En top-down view of the ELEPHAS ELE-PRO-S1 Mini Projector, highlighting its sleek, compact design and control buttons.
The ELEPHAS ELE-PRO-S1 is designed for portability and ease of use. Key components include:
- Projektionsobjektiv: Located at the front, responsible for displaying the image.
- Kontrolpanel: Buttons on the top surface for basic navigation and selection.
- Fokushjul: Typically located on the side, used to adjust image clarity.
- Indgangsporte: HDMI, USB, Micro SD Card slot, and AV input for connecting various devices.
- Strømport: Til tilslutning af strømadapteren.
- Højttaler: Built-in for audio output.
3.2. Forbindelsesporte
Figur 3.2: En detaljeret side view of the projector, illustrating the various input ports including HDMI, USB, SD Card slot, 3.5mm audio jack, and the DC power input, along with the focus wheel.
Projektoren tilbyder flere tilslutningsmuligheder:
- HDMI: For connecting laptops, DVD players, gaming consoles (PS3, PS4, Xbox One), and other HDMI-enabled devices.
- USB: Til afspilning af medier direkte fra USB-drev.
- Micro SD-kort: Til afspilning af medier direkte fra Micro SD-kort.
- AV: For connecting older devices using the included 3.5mm AV cable.
4. Opsætning
4.1. Tænd/sluk
- Opladning: Connect the power adapter to the projector's DC input port and then to a power outlet. The projector has a built-in 5200mAh battery, allowing for portable use.
- Tænd: Press and hold the power button on the projector's control panel until the indicator light illuminates and the projector starts.
- Sluk: Press and hold the power button again until the projector shuts down. Disconnect the power adapter if not charging.
4.2. Placement and Focus Adjustment
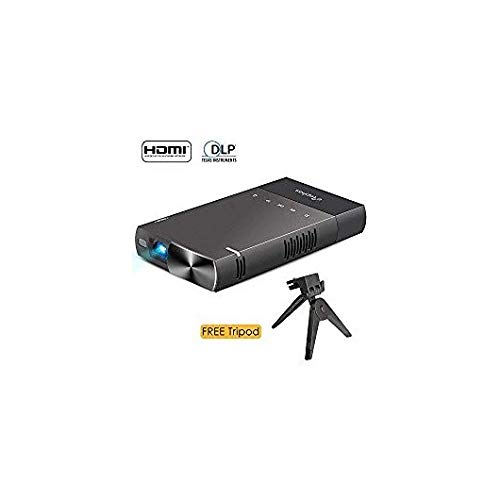
Figur 4.1: The ELEPHAS ELE-PRO-S1 Mini Projector positioned on its included tripod, ready for projection. This image also shows the HDMI and DLP logos, indicating supported technologies.
- Placering: Place the projector on a stable, flat surface or mount it on the included tripod. Ensure the projection path is clear of obstructions. The ideal projection distance ranges from 0.5 to 3 meters (1.6 to 10 feet) for a screen size of 15 to 130 inches. For optimal clarity, a distance of 5 feet is recommended for an 80-inch screen.
- Fokusjustering: Turn the focus wheel located on the side of the projector until the projected image appears sharp and clear.
4.3. Tilslutning af enheder
The ELE-PRO-S1 supports various input sources:
- HDMI-forbindelse: Connect an HDMI cable from your device (laptop, game console, DVD player) to the projector's HDMI port.
- USB/Micro SD Card: Insert a USB drive or Micro SD card into the respective port. The projector will typically detect the media automatically or allow selection via the input source menu.
- AV-forbindelse: Use the provided 3.5mm AV cable to connect to devices with AV output.
4.4. Screen Mirroring (Smartphones)
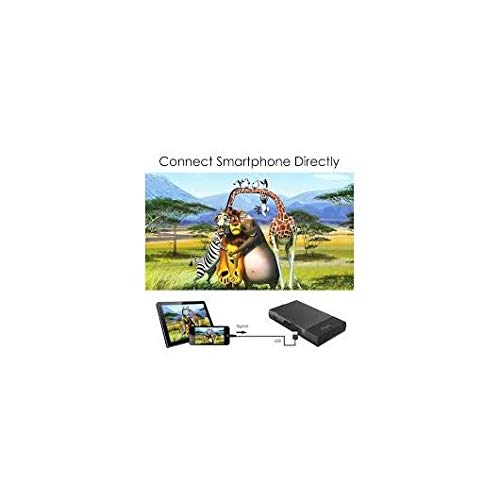
Figur 4.2: An illustration demonstrating how to connect a smartphone directly to the projector using a USB cable for screen mirroring, allowing content from the phone to be displayed on a larger screen.
The projector supports AirPlay, DLNA, and Miracast technologies for screen mirroring.
- iOS Devices (iPhone/iPad): Connect directly via a Lightning cable. No additional adapters are required. Supports iOS 9 or above.
- Android-enheder: An EZcast APP is required. Connect via a USB cable. Supports Android 5.0 or above. Note that not all Android devices are supported.
5. Betjeningsvejledning
5.1. Grundlæggende navigation
Use the control buttons on the projector's top panel to navigate through menus and select options. The buttons typically include directional arrows, an OK/Enter button, and a Back/Menu button.
5.2. Valg af inputkilde
After powering on, access the input source menu to select your desired connection (HDMI, USB, Micro SD, AV, or Screen Mirroring). This is usually done by pressing a dedicated "Source" or "Input" button, or navigating through the main menu.
5.3. Justering af indstillinger
The projector's menu allows for various adjustments:
- Billedindstillinger: Adjust brightness, contrast, color, and aspect ratio (e.g., 16:10).
- Lydindstillinger: Control volume and audio output options.
- Systemindstillinger: Language, time, and other general projector settings.
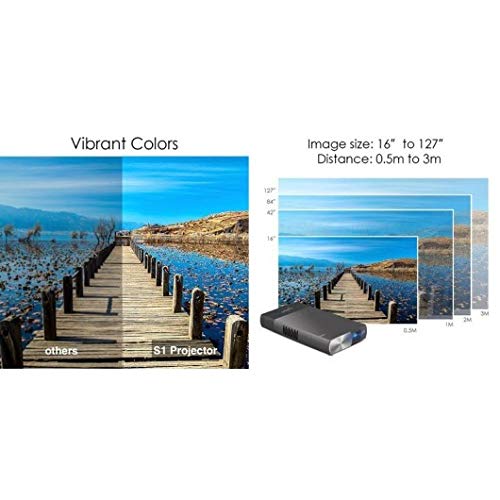
Figur 5.1: An image illustrating the vibrant color reproduction of the S1 Projector compared to other projectors, alongside a diagram showing various projection distances (0.5m to 3m) and corresponding image sizes (16" to 127").
6. Vedligeholdelse
6.1. Rensning
- Linse: Brug en blød, fnugfri klud, der er specielt designet til optiske linser. Brug ikke slibende rengøringsmidler eller overdreven kraft.
- Casing: Tør projektorens yderside af med en blød, tør klud. Ved genstridige mærker kan du bruge en let tør klud.amp cloth can be used, followed by a dry wipe. Ensure no liquid enters the device.
- Ventilation: Hold ventilationsåbningerne fri for støv og snavs for at forhindre overophedning.
6.2. Opbevaring
When not in use, store the projector in a cool, dry place, away from direct sunlight and extreme temperatures. Use the original packaging or a protective case to prevent dust accumulation and physical damage.
7. Fejlfinding
This section addresses common issues you might encounter with your ELEPHAS ELE-PRO-S1 Mini Projector.
| Problem | Mulig årsag | Løsning |
|---|---|---|
| Intet billede vises |
|
|
| Billedet er sløret |
|
|
| Ingen lyd |
|
|
| Skærmspejling virker ikke |
|
|
| Projektoren overopheder eller slukker |
|
|
Hvis problemet fortsætter efter at have forsøgt disse løsninger, bedes du kontakte kundesupport.
8. Specifikationer
| Mærke | ELEFAS |
| Model | ELE-PRO-S1 |
| Billedteknologi | DLP |
| Indfødt opløsning | 800 x 480P (Supports up to 1080P) |
| Lysstyrke | 100 ANSI Lumens |
| Projection Size / Distance | 15 ~ 130 inches / 0.5 ~ 3 meters (1.6 ~ 10 ft) |
| Aspektforhold | 16:10 |
| Lamp Liv | > 20,000 timer |
| Batteri | 5200mAh Lithium Ion (2 batteries included) |
| Batterilevetid | More than 2 hours of movie playback |
| Indgange | HDMI, USB, Micro SD Card, AV |
| Kompatible enheder | Laptop, DVD Player, PS3, PS4, Xbox One, Smartphones (iOS 9+, Android 5.0+) |
| Særlige funktioner | Lightweight, Portable, Multi-screen sharing (AirPlay, DLNA, Miracast) |
| Produktdimensioner | 14.7 x 8 x 2 cm |
| Varens vægt | 269 g (0.6 lbs) |
9. Garanti og support
9.1. Garantioplysninger
The ELEPHAS ELE-PRO-S1 Mini Projector comes with an 18 måneders garanti from the date of purchase. This warranty covers manufacturing defects and malfunctions under normal use. It does not cover damage caused by misuse, accidents, unauthorized modifications, or natural disasters. Please retain your proof of purchase for warranty claims.
9.2. Kundesupport
For technical assistance, warranty claims, or any questions regarding your ELEPHAS ELE-PRO-S1 Mini Projector, please contact ELEPHAS customer support. Refer to the product packaging or the official ELEPHAS webhjemmeside for de seneste kontaktoplysninger.


