1. Introduktion
The VIVOTEK SC8131 is an advanced indoor IP security camera designed for reliable surveillance. This manual provides detailed instructions for the proper installation, operation, and maintenance of your SC8131 camera, ensuring optimal performance and longevity. It features a durable and versatile design, is easy to use, and delivers high-quality imaging for your security needs.
2. Sikkerhedsoplysninger
- Ensure the camera is installed indoors only, as it is designed for indoor security applications.
- Use only the power source specified for this device (PoE). Incorrect power supply may damage the camera or pose a fire hazard.
- Do not expose the camera to water, moisture, or extreme temperatures.
- Undgå at placere kameraet i direkte sollys eller i nærheden af varmekilder.
- Forsøg ikke at skille kameraet ad eller ændre det. Overlad al service til kvalificeret personale.
- Opbevares utilgængeligt for børn.
3. Pakkens indhold
Please check the package contents upon unboxing. If any items are missing or damaged, contact your vendor immediately.
- VIVOTEK SC8131 IP Security Camera Unit
- Mounting Kit (including screws)
- Hurtig installationsvejledning
- Additional accessories may vary by region or package.
4. Produktet er slutview
The VIVOTEK SC8131 features a compact, white rectangular design with dual lenses for comprehensive surveillance. It is equipped with LED indicators for status updates and supports various connectivity options.
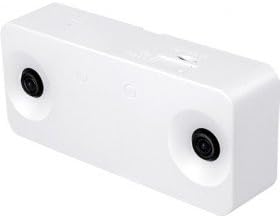
Figur 4.1: Forside view of the VIVOTEK SC8131 IP Security Camera, highlighting its dual-lens design and compact form factor.

Figure 4.2: Angled perspective of the VIVOTEK SC8131, providing a clearer view of its overall shape and the placement of its security lenses.
5. Opsætning
5.1 Montering af kameraet
- Choose a suitable location for ceiling mounting, ensuring a clear field of view.
- Use the provided mounting kit and screws to securely attach the camera to the ceiling.
- Ensure the camera is firmly fixed to prevent accidental falls.
5.2 Strøm- og netværksforbindelse
- Connect the camera to your network using either a wired Ethernet cable or via Wi-Fi.
- For wired connection, connect an Ethernet cable from a PoE (Power over Ethernet) enabled switch or injector to the camera's PoE port. This will provide both power and network connectivity.
- For wireless connection, ensure the camera is within range of your Wi-Fi network. Initial setup may require a wired connection to configure Wi-Fi settings.
5.3 Indledende konfiguration
- Refer to the Quick Installation Guide for initial network discovery and access.
- Få adgang til kameraets web-baseret administrationsgrænseflade via en web browser on a Windows PC.
- Follow the on-screen prompts to set up administrator credentials and network settings.
6. Betjeningsvejledning
6.1 Live View
Once configured, access the camera's web interface or compatible VIVOTEK software to view the live video feed. The dual lenses provide a wide field of view til omfattende overvågning.
6.2 Optagelse og afspilning
Konfigurér optagelsesindstillinger via web interface. You can set up continuous recording, scheduled recording, or event-triggered recording (e.g., motion detection). Recorded footage can be stored on an integrated card reader (if applicable) or a network storage device.
6.3 Avancerede funktioner
Explore advanced features such as progressive scan for clear images, and other settings available through the web-based management system to optimize your surveillance experience.
7. Vedligeholdelse
- Rensning: Gently wipe the camera's exterior and lenses with a soft, dry cloth. Do not use harsh chemicals or abrasive cleaners.
- Firmwareopdateringer: Kontroller regelmæssigt den officielle VIVOTEK-service. website for firmware updates to ensure your camera has the latest features and security enhancements. Follow the provided instructions carefully for firmware upgrades.
- Miljøforhold: Ensure the camera operates within its specified temperature and humidity ranges to prevent damage.
8. Fejlfinding
| Problem | Mulig årsag | Løsning |
|---|---|---|
| No power/LED indicators off | Ingen strømforsyning eller defekt forbindelse. | Check PoE connection. Ensure the PoE switch/injector is powered on. |
| Intet billede/video-feed | Network connectivity issue, incorrect IP address, or software problem. | Verify network cable connection. Check camera's IP address. Restart the camera and viewing software. |
| Kan ikke få adgang web interface | Incorrect IP address, network firewall, or browser issue. | Ensure correct IP address. Temporarily disable firewall. Try a different web browser. |
| Dårlig billedkvalitet | Dirty lens, insufficient lighting, or incorrect settings. | Clean the camera lens. Ensure adequate lighting. Adjust image settings in the web interface. |
If the problem persists after attempting these solutions, please contact VIVOTEK technical support.
9. Specifikationer
| Feature | Specifikation |
|---|---|
| Mærke | VIVOTEK |
| Modelnavn | SC8131 |
| Produktdimensioner | 7 x 16 x 3.8 cm; 396 g |
| Anbefalet brug | Indendørs sikkerhed |
| Forbindelsesteknologi | Kablet, trådløs |
| Særlige funktioner | LED Indicators, Screws Included, Quick Guide, Progressive Scan, Mounting Kit, Web-based Management, Integrated Card Reader |
| Strømkilde | PoE (Power over Ethernet) |
| Forbindelsesprotokol | Wi-Fi |
| Controller type | Windows |
| Monteringstype | Loftmontering |
| Trådløs kommunikationsteknologi | Wi-Fi |
10. Garanti og support
For detailed warranty information, terms, and conditions, please refer to the official VIVOTEK website or contact your authorized VIVOTEK dealer or point of purchase. Technical support and customer service contact information can typically be found on the manufacturer's webwebsted.


