Vigtige sikkerhedsoplysninger
Please read all instructions carefully before using the MasterPro The Ultimate Pizza Maker and Oven. Failure to follow these instructions may result in electric shock, fire, or serious injury. Keep this manual for future reference.
- Sørg altid for, at apparatet er placeret på en stabil, varmebestandig overflade.
- Rør ikke ved varme overflader. Brug håndtag eller knopper.
- Nedsænk ikke apparatet, ledningen eller stikket i vand eller andre væsker.
- Tæt opsyn er nødvendigt, når et apparat bruges af eller i nærheden af børn.
- Træk stikket ud af stikkontakten, når det ikke er i brug, og før rengøring. Lad det køle af, før du sætter dele på eller af.
- Betjen ikke noget apparat med en beskadiget ledning eller stik, eller efter at apparatet ikke fungerer korrekt eller er blevet beskadiget på nogen måde.
- The ceramic baking stone becomes extremely hot. Handle with care using the provided paddles.
- Sørg for ordentlig ventilation under brug.
Produkt overview
The MasterPro The Ultimate Pizza Maker and Oven is designed to cook perfectly crisp pizzas in minutes, and can also be used for toasting bread, reheating pastries, pies, sausage rolls, bagels, and croissants. It features dual heating elements, a removable ceramic baking stone, an adjustable thermostat, and a built-in timer.

Figure 1: MasterPro The Ultimate Pizza Maker and Oven with included lifting paddles.

Figure 2: Labeled diagram showing key components including lifting handles, window, top heating element, timer, control dial, heat indicator, bottom heating element, removable ceramic baking stone, and stainless steel paddles.
Komponenter:
- Hovedenhed: Houses heating elements, controls, and baking chamber.
- Removable Ceramic Baking Stone: Provides even heat distribution for crispy crusts.
- Lifting Paddles (2): Stainless steel tools for safely placing and removing food.
- Gennemsigtigt vindue: Giver mulighed for overvågning af tilberedningens fremskridt.
- Kontrolopkald: Justerer temperaturindstillinger.
- Timer: Indstiller tilberedningstiden.
- Varmeindikatorlampe: Lyser, når ovnen varmer op.
Opsætning
- Udpakning: Carefully remove all packaging materials from the pizza maker and its accessories. Retain packaging for storage or future transport.
- Indledende rengøring: Tør enhedens yderside af med en rengøringsklud før første brug.amp cloth. The ceramic baking stone should be wiped clean with a paper towel. Do not wash the stone with water or detergent. The lifting paddles can be hand washed with warm water and mild detergent, then dried thoroughly.
- Placering: Place the pizza maker on a flat, stable, heat-resistant surface, ensuring adequate clearance around the unit for ventilation. Do not place it near flammable materials.
- Strømtilslutning: Ensure the power cord is fully extended and plug the appliance into a grounded electrical outlet.
- Pre-heating the Stone: For optimal results, it is recommended to pre-heat the ceramic baking stone. Close the lid, set the temperature dial to the desired setting (e.g., maximum for pizza), and set the timer for 10-15 minutes. The heat indicator light will illuminate during heating.
Betjeningsvejledning
Tilberedning af pizza:
- Forvarmning: Ensure the pizza maker is pre-heated to the desired temperature (up to 400°C) as described in the Setup section. The heat indicator light will turn off when the set temperature is reached, and cycle on/off during cooking to maintain temperature.
- Tilbered pizza: Place your pizza (homemade or store-bought) on one of the lifting paddles. If using homemade dough, lightly flour the stone to prevent sticking.
- Insert Pizza: Carefully open the lid. Using the lifting paddle, slide the pizza onto the hot ceramic baking stone. Close the lid immediately.
- Indstil timer: Set the timer according to your pizza's requirements. For a typical pizza, cooking time is approximately 5 minutes. Monitor cooking through the transparent window.
- Monitor and Rotate (Optional): If desired, you can briefly open the lid and use the second paddle to rotate the pizza halfway through cooking for more even browning. Exercise caution as the oven is extremely hot.
- Fjern pizza: Once cooked, carefully open the lid. Use the lifting paddles to slide the pizza off the stone and onto a cutting board or plate.
- Køl ned: After use, unplug the appliance and allow it to cool completely before cleaning or storing.
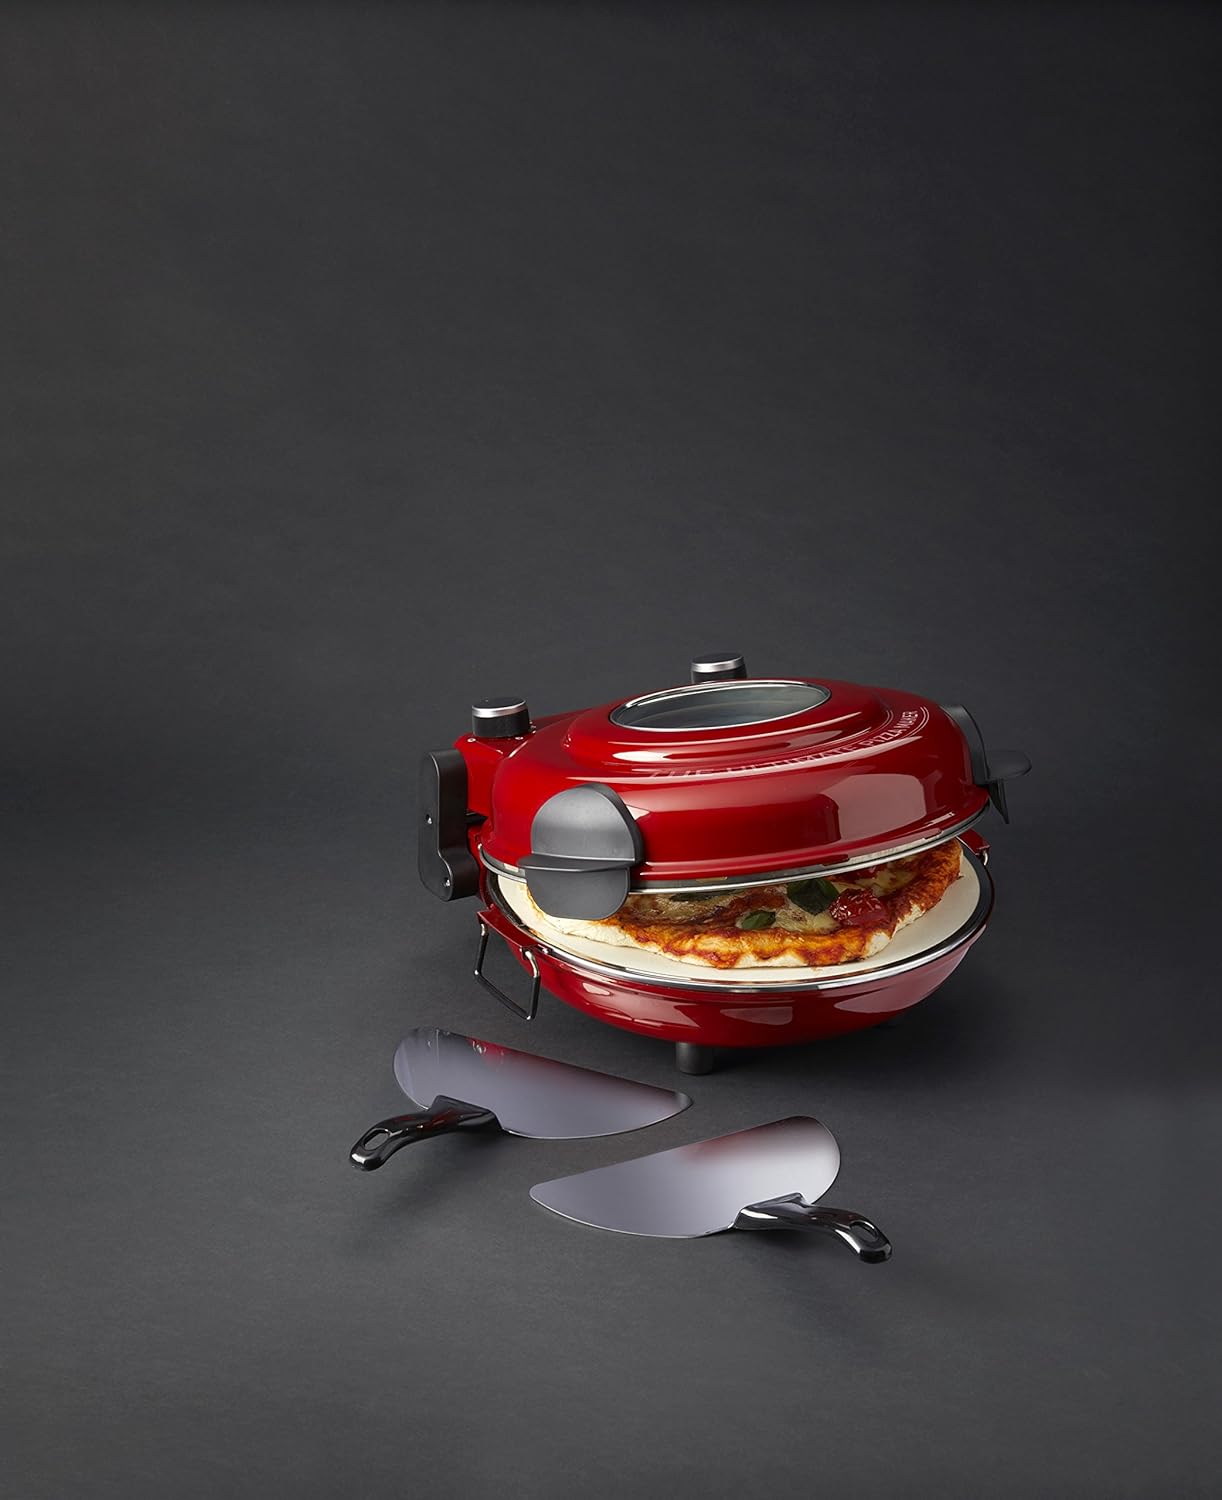
Figure 3: Pizza cooking inside the MasterPro Pizza Maker.

Figure 4: The pizza maker with its lid open, revealing a pizza on the ceramic stone.
Andre anvendelser:
The MasterPro Pizza Maker can also be used for:
- Ristning af brød: Place slices directly on the stone.
- Reheating Pastries/Pies: Use a lower temperature setting and shorter cooking time.
- Heating Bagels/Croissants: Place directly on the stone.
Always monitor food closely when using for purposes other than pizza, as cooking times and temperatures may vary significantly.
Vedligeholdelse og rengøring
Proper maintenance ensures the longevity and performance of your MasterPro Pizza Maker.
- Tag altid stikket ud og køl ned: Tag altid stikket ud af stikkontakten og lad apparatet køle helt af, inden du rengør det.
- Ceramic Baking Stone:
- Scrap off any excess food residue with a spatula or stiff-bristled brush.
- Wipe the stone clean with a dry paper towel.
- GØR IKKE use water, soap, or detergents on the ceramic stone. The porous nature of the stone will absorb liquids and detergents, which can affect its performance and taste of food.
- Discoloration of the stone over time is normal and does not affect performance.
- Lifting Paddles: Hand wash in warm water with mild detergent and dry thoroughly.
- Ydre: Wipe the exterior of the pizza maker with a damp klud. Brug ikke slibende rengøringsmidler eller skuresvampe, da de kan beskadige overfladen.
- Interior (Non-Stone Areas): For any spills or residue inside the oven (excluding the stone), wipe with a damp cloth once cooled. Ensure no water enters electrical components.
- Opbevaring: Store the appliance in a cool, dry place. Ensure the power cord is neatly wrapped and not kinked.
Fejlfinding
| Problem | Mulig årsag | Løsning |
|---|---|---|
| Apparatet tændes ikke. | Not plugged in; power outlet not active; faulty cord/plug. | Ensure plug is securely in a working outlet. Check household circuit breaker. If cord/plug is damaged, do not use; contact customer support. |
| Pizzaen steges ikke jævnt. | Uneven heat distribution; pizza not centered; lid opened too frequently. | Rotate pizza halfway through cooking using paddles. Ensure pizza is centered on the stone. Avoid opening the lid unnecessarily during cooking. |
| Pizzaen klistrer til stenen. | Insufficient flour on homemade dough; stone not properly seasoned (for first use). | Lightly flour the ceramic stone before placing homemade dough. Ensure the stone is clean and dry. |
| Timeren virker ikke. | Mekanisk problem. | If the timer is faulty, use an external timer (e.g., phone timer) to monitor cooking times. |
| Appliance causes circuit breaker to trip. | Overload on circuit; internal electrical fault. | Sørg for, at der ikke er andre højspændingsledningertage appliances are on the same circuit. If problem persists, discontinue use and contact customer support. |
If you encounter a problem not listed here, or if the suggested solutions do not resolve the issue, please contact MasterPro customer support.
Specifikationer
- Modelnummer: MPPIZZAWRD
- Strøm/Wattage: 1200 watt
- Maksimal temperatur: Op til 400°C
- Produktdimensioner: 39 x 33 x 19 cm (L x B x H)
- Varens vægt: 4.51 kg
- Materiale: Rustfrit stål, keramik, plast
- Farve: Red (with white/red variations)
- Særlige funktioner: Temperature Control, Timer, Adjustable Thermostat, Viewi vinduet
- Fabrikant: Albi Australia
Garanti og support
MasterPro products are manufactured to high-quality standards. For warranty information and customer support, please refer to the warranty card included with your purchase or visit the official MasterPro webwebsted. Gem din købsbevis i tilfælde af garantikrav.
For further assistance, you may contact MasterPro customer service through their official channels. Details can typically be found on the product packaging or the manufacturer's webwebsted.


