1. Introduktion
This manual provides detailed instructions for the assembly, operation, and maintenance of your Kappesberg S973 Office Desk. Please read all instructions carefully before beginning assembly and retain this manual for future reference.
Sikkerhedsoplysninger
- Saml altid skrivebordet på en blød, ren overflade for at forhindre ridser.
- Sørg for, at alt hardware er forsvarligt fastspændt før brug.
- Do not overload the desk or shelves.
- Hold små dele væk fra børn under montering.
- Hvis der mangler eller er beskadigede dele, må du ikke fortsætte med monteringen. Kontakt kundesupport.
2. Pakkens indhold
Before starting assembly, verify that all components listed below are present in your package. Unpack all items and lay them out on a clean, soft surface.
- Desk panels (top, side, back, shelves)
- Hardware pack (screws, dowels, cam locks, cam studs, L-brackets, plastic feet)
- Assembly tools (usually an Allen key, screwdriver not included)
- Instruktionsfolder (denne manual)
Note: The exact number and type of hardware may vary slightly. Refer to the specific hardware diagram included in your package.
3. Monteringsvejledning
Follow these steps carefully to assemble your Kappesberg S973 Office Desk. It is recommended to have two people for assembly.
Step 1: Prepare the Base Structure
Identify the main side panels and the bottom panel. Attach the plastic feet to the bottom edges of the side panels. Connect the side panels to the bottom panel using dowels and cam locks/studs as indicated in your hardware diagram.
Step 2: Assemble the CPU/Storage Compartment
Assemble the vertical and horizontal panels that form the CPU and storage shelves on the right side of the desk. Secure them to the main desk structure using the provided hardware.
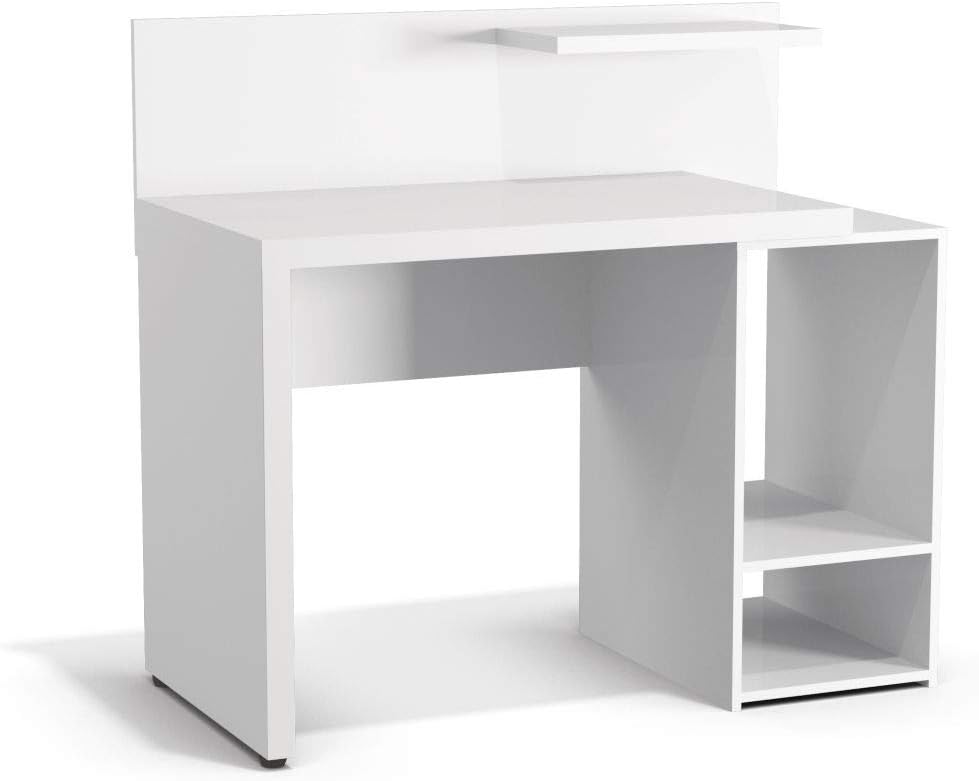
Figur 3.1: Forside view of the assembled desk structure, highlighting the integrated storage compartment.
Step 3: Attach the Desktop Surface
Carefully place the main desktop panel onto the assembled base structure, aligning the pre-drilled holes. Secure it using cam locks and studs, ensuring a tight fit.
Step 4: Install the Back Panel and Upper Shelf
Attach the back panel to the rear of the desk using small nails or screws. Then, install the small upper shelf above the main desktop, typically secured with L-brackets or dowels and cam locks.

Figur 3.2: Vinklet view of the fully assembled desk, ready for use.
Trin 5: Endelig kontrol
Once all components are assembled, gently lift and move the desk to its desired location. Verify that all screws and fasteners are tight and that the desk is stable and level. Adjust plastic feet if necessary to prevent wobbling.

Figure 3.3: The Kappesberg S973 Office Desk in a typical usage scenario.
4. Betjening og brug
The Kappesberg S973 Office Desk is designed for various office and home study applications. Its features include:
- Main Desktop Surface: Giver ample space for a computer monitor, keyboard, mouse, and writing tasks.
- Side Storage Compartment: Features two shelves, ideal for housing a CPU tower, printer, books, or other office supplies.
- Øverste hylde: A smaller shelf above the main desktop for decorative items, small speakers, or frequently accessed stationery.
Ensure that the weight distribution on the desk is balanced to maintain stability. Avoid placing excessively heavy items on the edges or on the upper shelf.
5. Vedligeholdelse og pleje
To ensure the longevity and appearance of your Kappesberg S973 Office Desk, follow these maintenance guidelines:
- Rensning: Tør overflader af med en blød, damp cloth. For stubborn marks, use a mild, non-abrasive cleaner specifically designed for wood or laminate furniture. Dry immediately with a clean cloth.
- Undgå barske kemikalier: Do not use abrasive cleaners, solvents, or polishes containing silicone, as these can damage the finish.
- Beskyt mod varme og fugt: Avoid placing hot items directly on the surface. Use coasters for drinks. Wipe up spills immediately.
- Eksponering for sollys: Langvarig udsættelse for direkte sollys kan forårsage falmning eller misfarvning.
- Hardwarekontrol: Kontrollér regelmæssigt alle skruer og fastgørelseselementer for at sikre, at de forbliver stramme. Spænd dem igen om nødvendigt.
6. Fejlfinding
Her er løsninger på almindelige problemer, du kan støde på:
- Skrivebordet er vaklende:
- Sørg for, at alle knastlåse og skruer er helt spændt.
- Check if the desk is on an uneven surface. Adjust the plastic feet or place shims under the legs if needed.
- Parts Don't Fit Together:
- Double-check the assembly diagram to ensure you are using the correct parts for each step.
- Ensure parts are oriented correctly (e.g., pre-drilled holes facing the right direction).
- Do not force parts. If a part does not fit, re-examine the instructions.
- Manglende hardware/beskadigede dele:
If you find any missing or damaged components upon unpacking, do not proceed with assembly. Contact Kappesberg customer support immediately for assistance.
7. Produktspecifikationer
| Modelnummer: | S973 |
| Mærke: | Kappesberg |
| Materiale: | MDF, MDP |
| Farve: | Hvid |
| Produktmål (L x B x H): | 94 x 96 x 92 cm (ca. 37 x 37.8 x 36.2 tommer) |
| Pakkedimensioner: | 105 x 56 x 15 cm (ca. 41.3 x 22 x 5.9 tommer) |
| Produktvægt: | 36.75 kg (ca. 81 lbs) |
| Montering påkrævet: | Ja |
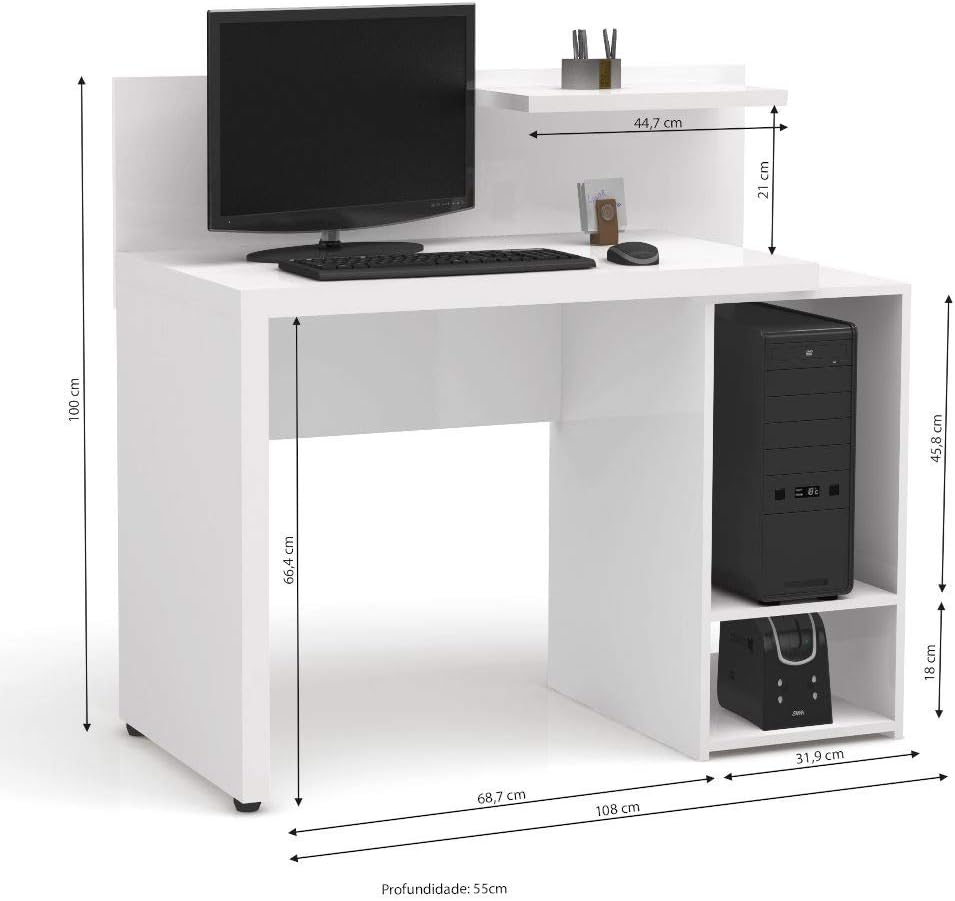
Figure 7.1: Detailed dimensions of the Kappesberg S973 Office Desk.
8. Garanti og kundesupport
Kappesberg products are manufactured to high-quality standards. For information regarding warranty coverage, please refer to the warranty card included with your purchase or visit the official Kappesberg webwebsted.
If you have any questions, require assistance with assembly, or need to report missing/damaged parts, please contact Kappesberg customer support:
- Webwebsted: www.kappesberg.com.br (Tjek venligst den officielle website for current contact information)
- Telefon: Se produktemballagen eller den officielle webhjemmeside for lokale kontaktnumre.
Please have your model number (S973) and purchase details ready when contacting support.


