1. Introduktion
This manual provides essential information for the safe and effective installation, operation, and maintenance of the Schneider Electric TeSys D Contactor, model LC1D25G7. This device is a 3-pole contactor designed for AC-3 applications, rated for 25 Amperes at 440 Volts, and features a 120 Volts AC coil. Please read this manual thoroughly before proceeding with any work involving the contactor.
2. Sikkerhedsoplysninger
WARNING: Risk of Electric Shock or Arc Flash
- Installation, adjustment, repair, and maintenance must be performed by qualified personnel only.
- Always disconnect power before working on the contactor or associated equipment.
- Brug passende personlige værnemidler (PPE) og følg sikker elektrisk arbejdspraksis.
- Sørg for, at alle ledninger er i overensstemmelse med lokale og nationale elektriske forskrifter.
- Betjen ikke kontaktoren, hvis den er beskadiget eller ser ud til at fungere forkert.
3. Produktet er slutview
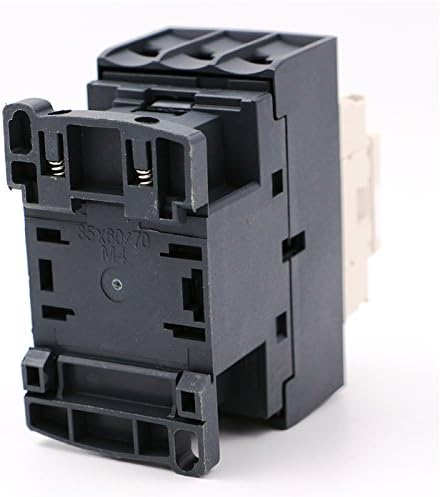
The Schneider Electric TeSys D Contactor LC1D25G7 is a robust electromechanical switch used for controlling electric motors, heating, lighting, and other electrical loads. It features three main power poles and auxiliary contacts for control circuit integration.

Figur 3.1: Front view of the Schneider Electric TeSys D Contactor LC1D25G7, showing the main power terminals (L1, L2, L3, T1, T2, T3) and control coil terminals (A1, A2), along with auxiliary contacts (NO, NC).

Figur 3.2: Side view of the contactor, displaying the product label with technical specifications, certifications (EAC, CE), and manufacturing details.

Figur 3.3: Bund view of the contactor, showing the mounting points and the lower power terminals (2T1, 4T2, 6T3).

Figur 3.4: Top view of the contactor, illustrating the upper power terminals (1L1, 3L2, 5L3) and the general construction.
Figur 3.5: En anden side view of the contactor, highlighting the DIN rail mounting mechanism and additional structural details.

Figur 3.6: The product packaging for the Schneider Electric TeSys D Contactor LC1D25G7, showing branding and key product identifiers.
4. Opsætning og installation
Proper installation is crucial for the safe and reliable operation of the contactor. Refer to the wiring diagrams provided with your specific application or system documentation.
4.1 Montering
- The contactor can be mounted on a 35mm DIN rail or directly to a panel using screws.
- Sørg for tilstrækkelig ventilation omkring kontaktoren for at forhindre overophedning.
- Mount the contactor vertically on a flat, stable surface.
4.2 Ledningsføring
- Connect the main power circuit to terminals 1L1, 3L2, 5L3 (input) and 2T1, 4T2, 6T3 (output).
- Connect the control circuit (120V AC) to the coil terminals A1 and A2.
- Utilize auxiliary contacts (e.g., 13 NO, 21 NC) for control logic as required by your application.
- Ensure all wire connections are tight and secure to prevent loose connections and potential arcing.
- Use appropriate wire gauges for the current ratings.
5. Betjeningsvejledning
The TeSys D Contactor operates by energizing its coil, which creates an electromagnetic field that pulls the armature, closing the main power contacts. When the coil is de-energized, a spring returns the armature to its original position, opening the main contacts.
- Aktivering af spolen: Apply 120V AC to terminals A1 and A2. The contactor will audibly click as the main contacts close.
- Afbrydelse af spolen: Remove the 120V AC supply from terminals A1 and A2. The contactor will release, and the main contacts will open.
- Statusindikation: Some models may include a visual indicator to show the contactor's state (open/closed).
6. Vedligeholdelse
Regular inspection and maintenance can extend the lifespan of the contactor and ensure reliable operation.
- Visuel inspektion: Kontrollér regelmæssigt for tegn på slid, skader, misfarvning eller løse forbindelser.
- Rensning: Keep the contactor free from dust, dirt, and debris. Use a dry, non-conductive cloth or compressed air. Do not use solvents.
- Kontaktinspektion: For critical applications, periodically inspect the main contacts for pitting or excessive wear. Replace the contactor if contacts are severely worn.
- Tæthedskontrol: Re-tighten all terminal screws to the specified torque values (refer to product label or Schneider Electric documentation) during routine maintenance.
7. Fejlfinding
Dette afsnit omhandler almindelige problemer, der kan opstå under kontaktorens drift.
- Kontaktoren aktiveres ikke:
- Check if 120V AC is present at coil terminals A1 and A2.
- Verify control circuit wiring for breaks or loose connections.
- Inspect the coil for damage (e.g., burnt smell, visible charring).
- Kontaktor brummer overdrevent:
- Ensure the mounting screws are tight.
- Check for foreign objects obstructing the armature movement.
- Verify the coil voltage er inden for specifikationerne.
- Kontaktor overopheder:
- Check for excessive load current exceeding the contactor's rating.
- Ensure proper ventilation and ambient temperature are within limits.
- Inspect main contacts for signs of pitting or high resistance.
- Main Contacts Fail to Close/Open Reliably:
- Inspect contacts for wear, welding, or foreign material.
- Bekræft spolevolumentage and ensure it is stable.
- Check for mechanical obstructions.
8. Specifikationer
| Specifikation | Værdi |
|---|---|
| Fabrikant | Schneider |
| Varenummer | LC1D25G7 |
| Varemodelnummer | LC1D25G7 |
| Varens vægt | 13 ounce |
| Pakkedimensioner | 4.45 x 3.66 x 2.05 tommer |
| Materiale | Plast |
| Voltage (Coil) | 120 Volt AC |
| Amperage Capacity (AC-3) | 25 Amps |
| polakker | 3P (3 NO) |
| Nominel operationel voltage (Ue) | Up to 690 V AC |
| Nominel isolering Voltage (Ui) | 600 V (UL/CSA), 690 V (IEC) |
| Nominel impulsmodstand Voltage (Uimp) | 6 kV |
9. Garanti og support
Schneider Electric products are designed and manufactured to high-quality standards. For information regarding warranty terms, technical support, or service, please refer to the official Schneider Electric webhjemmeside eller kontakt deres kundeservice direkte.
Du kan finde flere oplysninger og supportressourcer på Schneider Electric official webwebsted.


